One of the biggest mistakes I see homeowners make when decorating their own homes, is they don’t start out with a plan. They pick and choose furniture and accessories for their rooms as they go, and then wonder why things don’t look cohesive or polished in the end. In this post, I’m going to share with you my 8-step interior design process that you can use to design any room in your home.
This is the same process I’ve refined and used over the years to create beautiful and functional rooms for my clients, and I’ve tailored the process specifically for homeowners like you. If you follow these steps from start to finish, you’ll end up with rooms that you’re excited to show off to friends and family, and a home that reflects your style and personality.
The Room Design Process
Here’s a visual overview of the 8 steps of my interior design process. Don’t worry, we’ll walk through every step of the process in this post, so you can learn what’s involved with each step, If you want to download or print a copy for future reference, you can click HERE, or on the image below.

Step 1 – Set Goals & Budget
The very first step in the interior design process is to determine your goals and set your budget.
First, think about your goals for your room design. Depending on what room you’re focusing on, you’re likely going to have different goals. If it’s your primary bedroom, maybe you want to create a more sophisticated serene, adult space. For your living room, maybe it’s time for a total refresh, or maybe you need more storage and a way to hide all those toys that your little ones leave out.
Whatever your goals may be, it’s important to be clear about them before you start your room design. Why? Because you want to ensure that the final room design meets your goals and provides what you need functionally, and that means defining those goals and keeping them in mind throughout the design process.

Some questions you want to ask yourself are…what’s working well in your current room? Maybe you love the paint color in your bedroom, or maybe you have a sectional that is perfect for your large family. Those things that you love about your room are things you’re going to want to keep or highlight in your room design.
And then, what are the things that aren’t working? And I know this list can be much longer than the things that you like about your room! Does your room look dated? Are you frustrated by the lack of storage? Try to really articulate what you don’t like about the space, and then think about what specifically needs to change.
After you’ve determined your goals, it’s time to think about your budget.

It’s important to set an overall budget for your room so you can decide how much you’re willing to spend on your room. Decorating can be expensive, and you need to think about how much money you can allocate to decorating the room all at once, or spread out over several months. You also want to make sure you’re setting a budget that is reasonable to achieve your goals for the room.
Throughout the years, I’ve found that most people really underestimate just how much money it’s going to cost to furnish a single room in their home. Do some research about how much things cost, so you can create a reasonable budget for your design.
Step 2 – Choose Your Style
Once you’ve defined your goals and budget, the next step is to choose an interior design style for your space. Having a defined stye for your room is a key factor in making a room feel cohesive, and is a great way to inject your personality into the room.
Also, different design styles have “rules” or guidelines about colors, what the furniture should look like, and what kind of patterns or materials should be used. So, knowing your style upfront actually helps to limit the endless sea of choices out there, and allows you to narrow in on the right items for your design. Plus, when you know exactly what you’re looking for, you can feel more confident about shopping for items and knowing they will work well in your room. So, it’s worth investing time in identifying your style.

But, what if you have no idea what your design style is? That’s very common, but it means you’ll have to do some extra work to learn about the different design styles, and choose the one you like best. A simple Google search for “interior design styles” is a great place to start. Spend a good amount of time reading about the different styles and look at the associated images of rooms in that style. You’ll start to notice that some styles you can rule out right away, and others will become maybes or favorites for you.
If you need more help, you can always enroll in my Discover Your Decorating Style course, which walks you through the different design styles in a quiz format, helps you choose your primary and secondary design styles, and helps you make a detailed plan for implementing that style in your home.
Step 3 – Gather Inspiration
Once you’ve chosen the style direction for your room, it’s time to gather inspiration. In this step you’ll create an “inspiration board” by gathering a collection of images of rooms and other items that reflect the style you chose in Step 2,
The reason I do this step right after choosing the design style is so that I can specifically target my searches for room images, furniture pieces, colors, patterns, and accessories that align with my chosen design style. As I mentioned before, knowing your design style helps significantly narrow the field when searching for home decor, so you’ll want to find images that reflect your style and help keep you on track during the design process, rather than taking you in a new direction.
To create your inspiration board, search for images of like rooms (a bedroom if you’re designing a bedroom), furniture pieces, rugs, decorative accessories, light fixtures, patterns, or anything else that you will use for as a source of ideas and inspiration during your room design. I recommend using Pinterest, Instagram, and Google as your main search platforms, because they return the best, most targeted results. Plus, you can easily create a “Board” on Pinterest or a “Collection” on Instagram to keep all of your room inspiration pictures together.

Step 4 – Choose Your Color Palette
The next step in the process is to choose your color palette (or color scheme) for the room. Just like with style, having a defined color palette is another KEY to having a cohesive, beautiful room that looks like it was professionally designed.
Once you know your style and have some inspiration images to draw from, you should have a great source of ideas to help you choose your room colors. Certain styles are defined by specific colors, and it’s important to choose a color palette that aligns with the style you’ve selected for your room. Also, take a look at your inspiration board and see what colors show up most often that you’re drawn to.
Where can you find color palette inspiration for your room? Check out my post for 6 places to find color palette inspiration for your home.
In general, you want to aim for a color palette that has between 3 and 5 colors. Three is really the minimum that you want, and if you have more than five colors, you can risk things looking a little too scattered or random.

Step 5 – Create a Space Plan
Now that you’ve defined your style and colors, and have some great images to inspire your design, it’s time to start thinking about the main furnishings that will go into your room. But before you can choose items, you need to create a space plan.
A space plan is just a plan for how you will arrange furniture and other items within your room. It’s an important step in the design process because it helps us determine what furniture pieces will go into the room, the appropriate size for the furniture, and how we want to lay things out. It’s an essential step that needs to be taken in order to create a room that will function well and be comfortable for anyone using it.
The secret to space planning is to look at your room from a bird’s eye view, as if you’re seeing it from above. I’ll give you a quick overview of how to create a space plan, but if you need some more help, I highly recommend my Space Planning 101 mini course. That course walks you through the process from start to finish, and gives you all of the tools you need to create the best space plan for your room.
- The first step for every space plan it to measure the room. You’ll need to measure all of your walls, doorways, and windows and write down each measurement as you go. For a space plan, you don’t need to measure the heights of your walls, windows, or doors, just the widths.
- The next step is to draw your room out to scale (using your measurements from the previous step) on a piece of graph paper. You can have each square represent 12 inches, or any other scaling method you’d like to use. Draw your room using lines to represent your walls. You’ll also want to mark the locations of windows, openings and any doorways, indicating which direction the door swings.
- Next, draw furniture into the room or use furniture cutouts. Use this step to play with different furniture sizes and arrangements to see what works best for your space. Also, try to think out of the box. This is your chance to try placing your bed on all available walls in your bedroom, without having to physically move things around.
- Double check that your furniture layout leaves enough space for people to move throughout the room. Leave at least 3 ft for a walkway, and don’t place anything in a location that might interfere with a doorway.

If drawing rooms and furniture pieces isn’t for you, and you’d prefer a digital option, check out FloorPlanner.com. It’s free, and after a brief learning curve, you can be cranking out floor plans and playing with different furniture arrangements in no time.
Once you have your space plan finished, use it to determine the appropriate size for your furniture pieces. For example, if you’re planning to have a sectional in your living room, your space plan tells you the maximum size it can be while still allowing enough space in the room for movement.
Step 6 – Make a Design Board
With your budget defined, the style of your room and color palette selected, and your space plan in hand, you’re ready to bring everything together and move on to choosing specific items for your room. The next step in the interior design process is to create a Design Board.
First off, let’s talk about what a design board is. As you know, interior design is a very visual process. A design board allows you to see your room design coming together one item at a time, and make adjustments as you go, until you have a room design that you love.
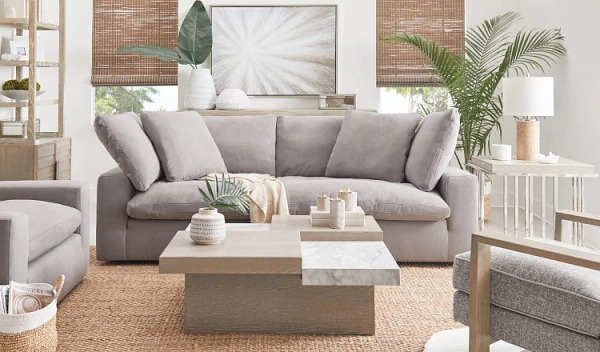
A design board is more than a mood board. A mood board typically has a mix of colors and objects that convey a feeling or mood. Even though that could be used to inspire your design, it’s not very useful for choosing furnishings that all work together in your room. Instead, the things that will go on your design board will be pictures of the specific furniture items, art, rugs, decorative accessories, pillows, light fixtures and window treatments that will go in your room. Similar to the picture you see below.

My favorite tool for making a design board is Photoshop, but you can also use something simple like Keynote or PowerPoint. I also recommend Canva, which is an online graphic design platform that has a ton of great features, like a background eraser and pre-made templates, and is very easy to use. Of course, you can always create a design board by printing and cutting out pictures of items for your room and pasting them onto some poster board, if you prefer.
To create your design board, simply copy and paste images of furniture, rugs, window treatments, lighting, etc onto your blank canvas (a plain white presentation slide for Keynote or PowerPoint). Continue adding decor and accessories until you have enough items to get a full sense of how the room will look, but not so many items that you never finish. For example, don’t worry about every single decorative piece that will go on your bookshelves, but rather focus on the main furnishings for the room.
Keep refining and adjusting your design board until you’re happy with the overall look of the room, or until you have around 80-90% of the furnishings of the room selected. Tip: Write down the source (store or website url and product name) for each item you add to your board, so you don’t forget where you found it when it comes time to purchase.
Step 7 – Choose Paint Colors
Now you might be thinking, hold on, didn’t we already choose a color palette a few steps ago? Yes, we did, but we didn’t specifically select paint colors – and there’s a good reason for that.
In general, it’s much better to choose paint colors later in the design process because you want the freedom to choose all of your furnishings without having to try and match a specific paint color. In fact, it’s so much easier to find a paint color that works with all of your furniture and decor choices at the end, than it is to try to find furniture, art, fabrics, window treatments, and home decor that works with a predetermined paint color.
Even if you already have a wall color in mind at the beginning, try to resist the urge to finalize your paint colors until you’ve chosen all of the items for your room design. Now, what if a certain paint color is part of your inspiration for the room design or you already have a color you love on your walls? That’s fine! But just know that it can make things a little more challenging trying to match room decor with a certain paint color, versus choosing the perfect paint color (that still looks like your original inspiration) later on, and ensuring it also works well with all of your furnishings.

Once you have a working design board, here are a few tips to keep in mind for choosing the perfect paint color
- Consider the mood you want to create with your paint color – light and airy, informal, or dark and moody?
- In general, you can never go wrong with a neutral wall color because it allows you the flexibility to change things up in the room without necessarily having to change the wall color
- When thinking about your paint colors, consider the 60-30-10 Rule.
- Grab my FREE guide “5 Steps to Choosing the Perfect Paint Color.” You’ll get a step-by-step approach to ensure you pick the right paint colors for your home. Plus, you’ll learn how to avoid the biggest mistakes that most people make when trying to choose paint colors.
Finally, be sure to get samples of your paint colors and test them on your walls before committing to one. I love the peel-and-stick vinyl sample sheets from Samplize, because they’re inexpensive, and super convenient to use. Plus you can move them around to different areas in your home or in your room to make sure the color looks great from all angles.

Step 8 – Finalize Design & Shop
You’ve put in so much hard work and great effort to come up with all of the elements of your room design, and now it’s time to finalize your design and go shopping!
When it comes to finalizing your design, there are a couple of things you need to do.
- The first is to go back and review your goals from Step 1, and make sure that your design and the items you’ve selected for your room meet the goals that you set.
- Next, you need to add up all of the items on your design board, and compare the total with your budget.
If all of your selected items added up fell under your budget, then pat yourself on the back for a job well done. It doesn’t always work out that way. If your design is a little over budget, like 10-15%, you’re probably still in good shape. When stores have sales, the savings are typically in a range of 15-25%, so you could wait for some of your items to go on sale. You may also be able to get discounts on larger furniture pieces at local furniture stores, just by asking. If the items you’ve selected for your room are significantly over budget, then I recommend going back to the drawing board, and see if you can find alternate items that will bring your room design back in line with your budget.

Now let’s talk about some tips for shopping.
First, don’t wait long to buy your highest priority items or anything that you just can’t live without. Stores turn over their inventory every few months, and if you wait a month or two to buy something, you may find the item is no longer available. So, while you don’t have to buy everything all at once, be sure to act quickly on your favorite pieces for the room, and any high priority or main furniture items.
Next, when you go shopping for furniture and home decor in person there are several things you’ll want to take with you. Bring along any samples of materials or fabrics, and paint colors that you need to coordinate with. Also, have your room and maximum furniture dimensions on-hand. You should never have to guess on the right size furniture, because you have a completed space plan. Just be sure to bring those important measurements along with you, or if you’re shopping online, have those measurements right next to you to ensure you buy the right size pieces for your room.

Need More Help Designing Your Dream Home?
Knowing the steps you need to take is a big step in being able to design and decorate your own home like a pro. However, if you need some additional help completing any of these steps, I highly recommend enrolling in my Room Design Recipe course. In the course, I walk you through every step in the process in detail, so you know exactly how to complete each step. And, you also get live Q&A sessions with me, so you’ll never be stuck, and a bunch of awesome bonuses. If you’re serious about learning how to design and decorate any room in your home, this course will be a compete game changer for you!


Ipop-ups, begin to describe the anxiety this article just gave me, ads plastered everywhere, constant pop-ups. I will avoid this like the plague.
This blog post clearly explains the interior design process for homeowners. It highlights the importance of collaboration and communication between the homeowner and the designer, which is essential for creating a space that the homeowner will love.
Thanks for stopping by!