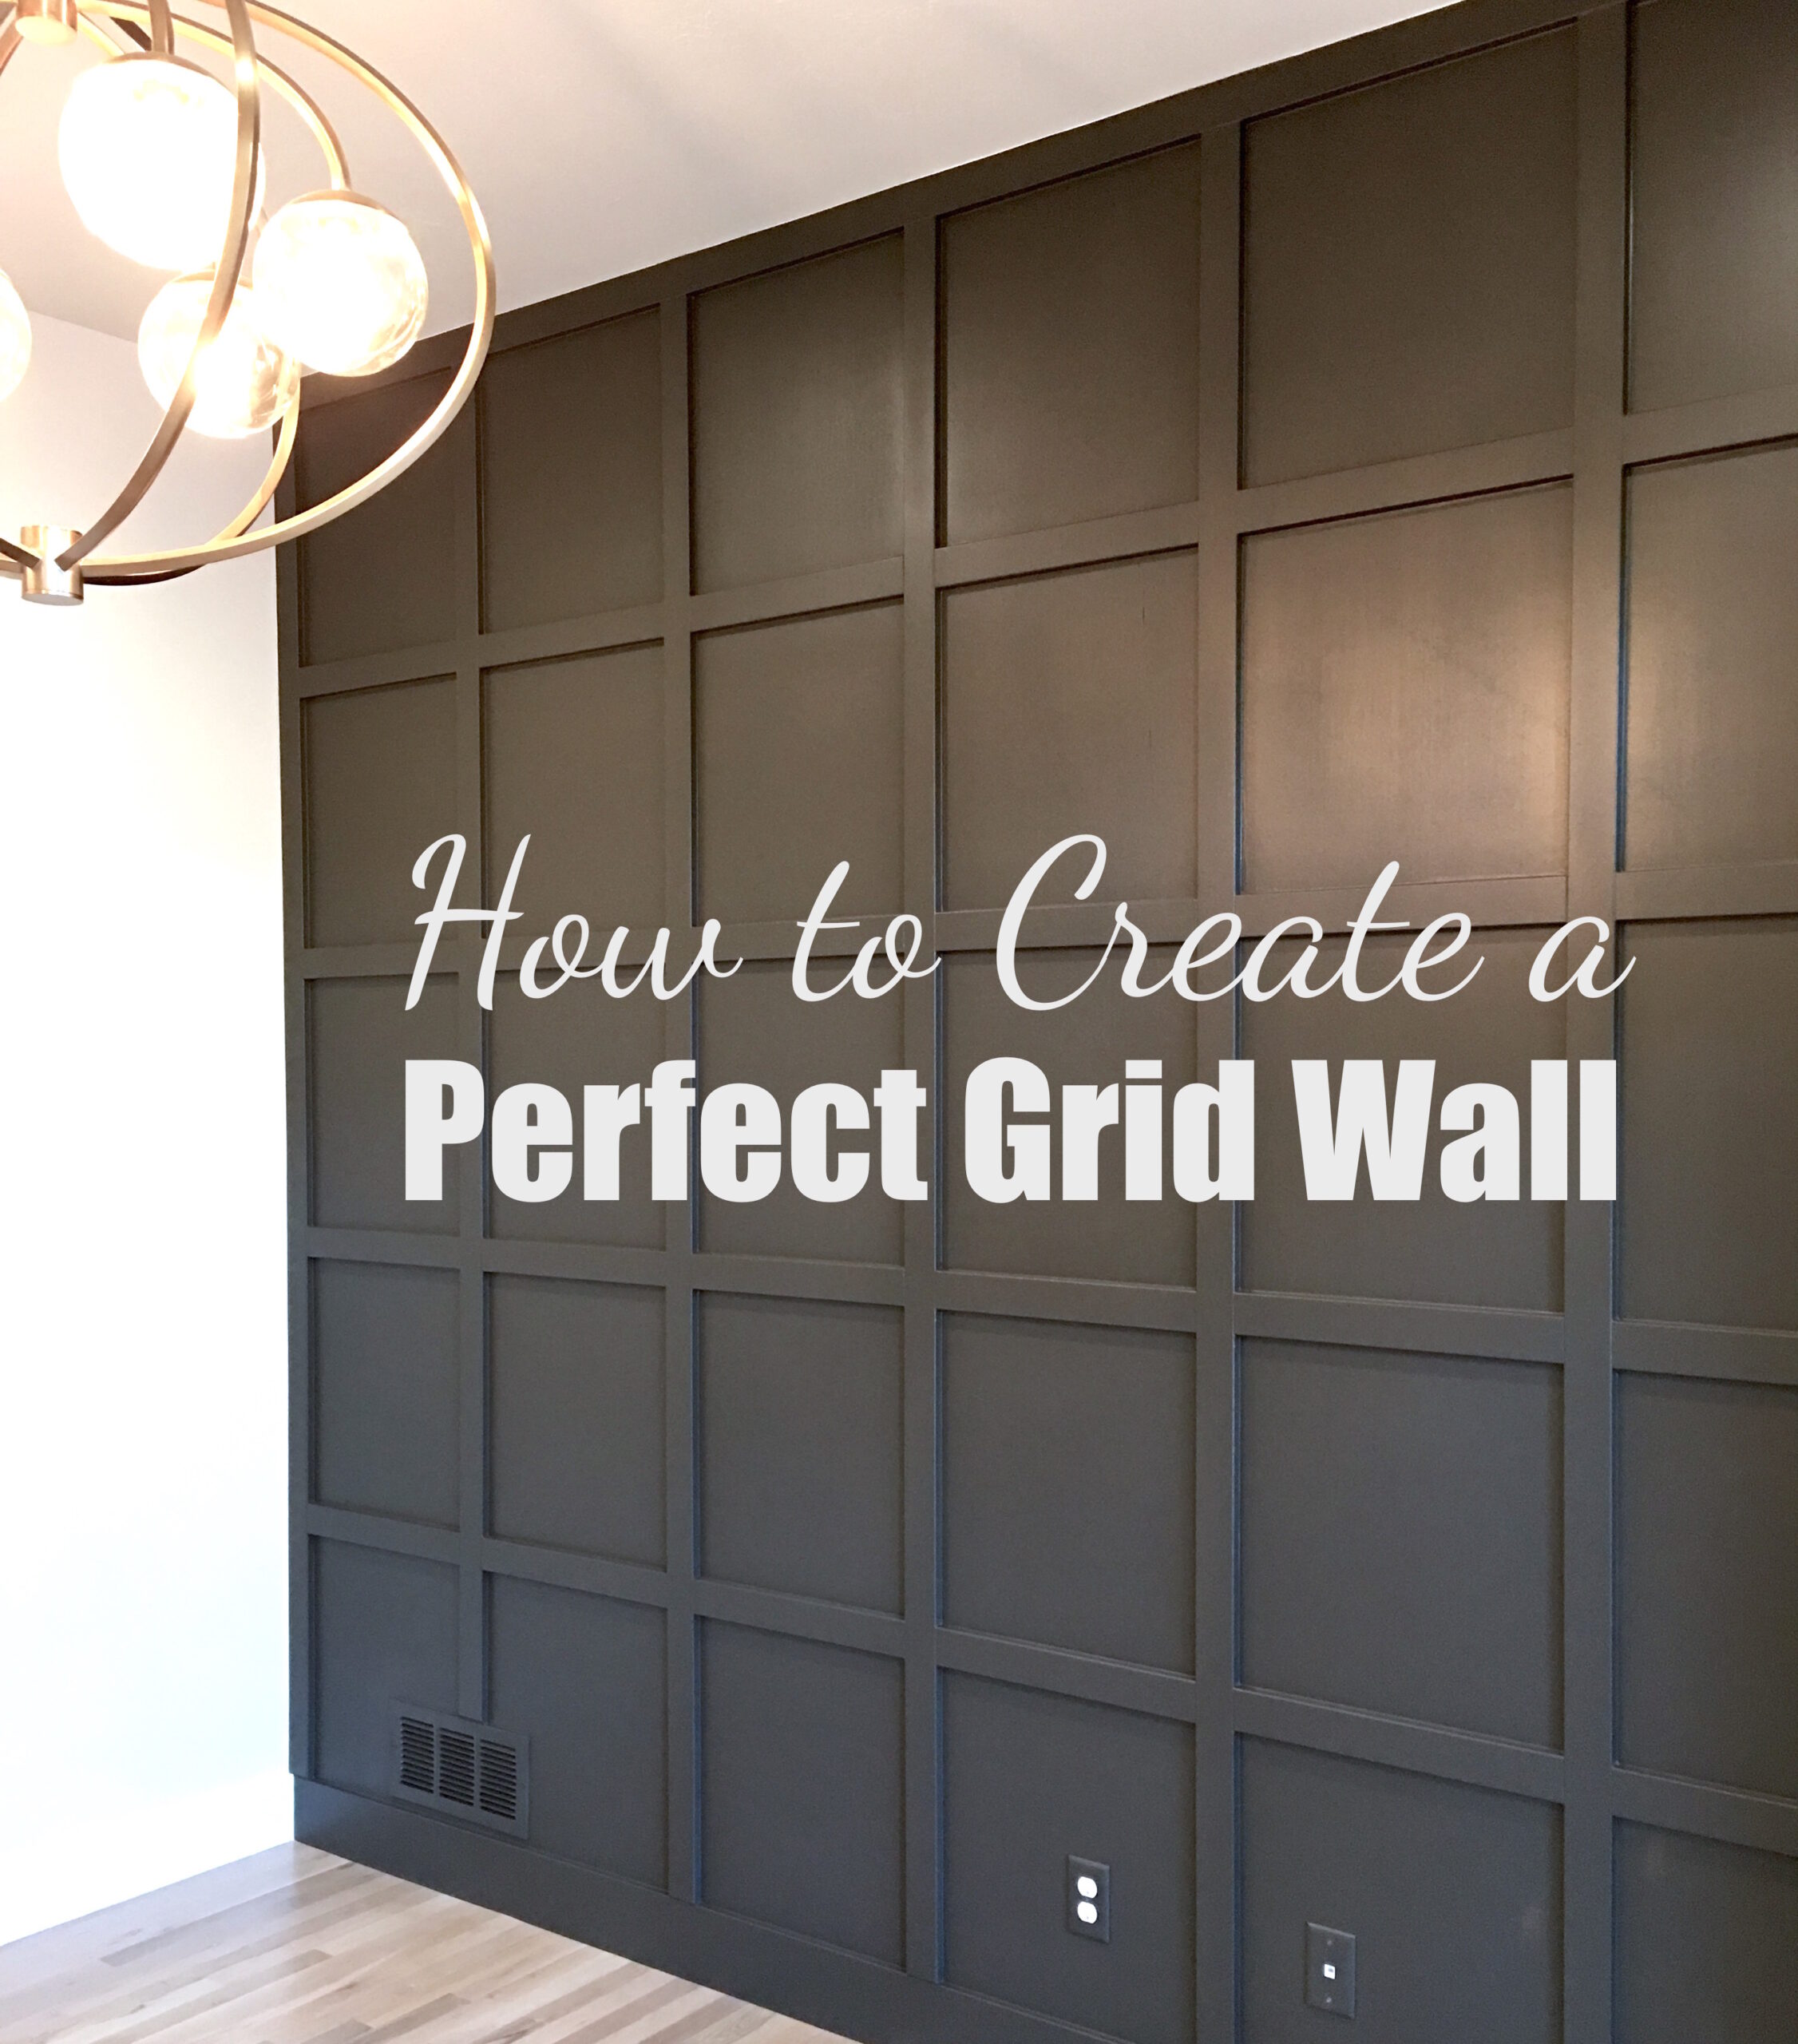
Are you thinking about installing a grid accent wall in your living room or bedroom and need a little guidance? You’ve come to the right place! We recently completed a beautiful grid accent wall for a client, and have plenty of tips to share. A grid wall, also called a board and batten wall, takes a little planning and require some basic math, but the installation part is actually quite easy to do. We love sharing tips & tricks with other DIY-ers, so we put together a detailed tutorial for you to follow to create a perfect grid feature wall in your home.
Step 1 – Plan Out the Grid Wall
Yep, this project takes a little extra planning before you get started. But, we’re gonna break it down for you into a couple of easy steps.
1. Measure Your Wall
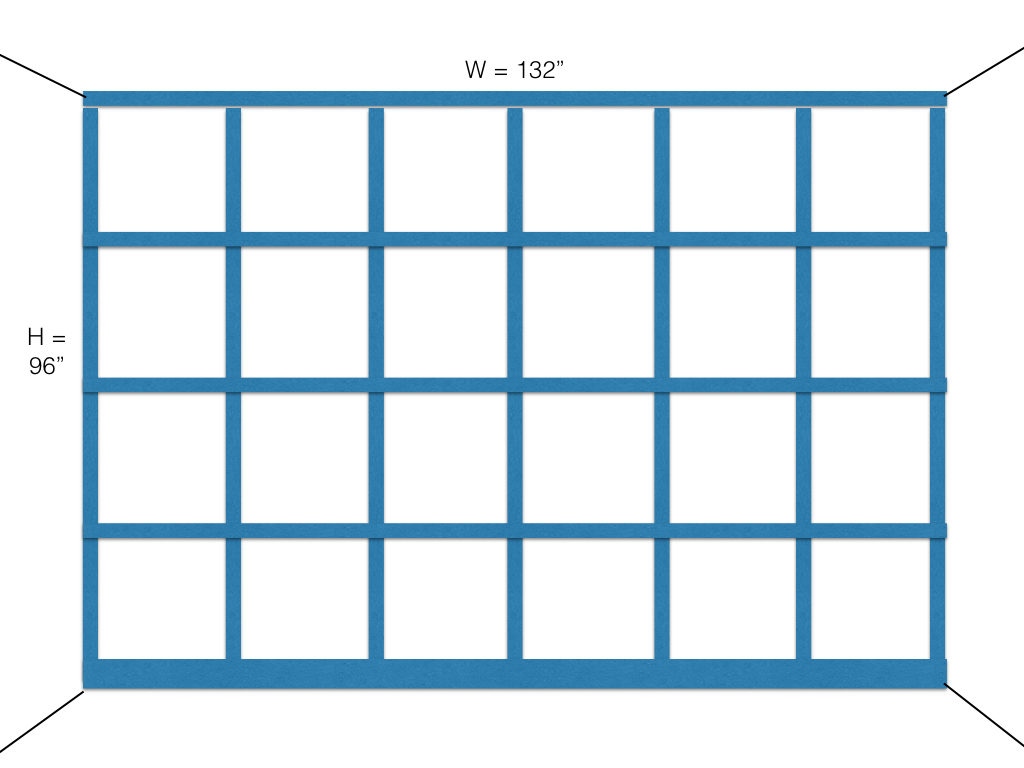
The first step in creating your board and batten grid wall is to measure the width and height of your entire wall in inches, which we will refer to as W and H going forward. Bust out your tape measure and measure the width and height of your wall. For the width, you may want to measure at the bottom and again near the top of the wall just to see if there is any significant difference (not all walls are even or straight). Same goes for the height.
2. Choose Your Materials
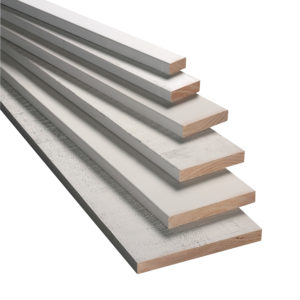
Next, you will need to know the width of your grid lines. In other words, you will need to determine if you want to use 1×3 boards, 1×2 boards, or even 1×4 boards for your materials. The width of the boards will come into play in Step 3 (below) when installing your vertical boards.
Tip: We prefer to use 1×3’s. The reason for this is purely aesthetic. The 1×4’s can end up looking a little chunky, while the 1×2’s can look too skinny on a large wall. For really small walls, however, we would recommend using 1×2’s.
For a wall like this, 1×3 MDF boards are a great choice. Not only is it an inexpensive product, but having boards that are already primed will save you some time. You can also use 1×3 primed finger joint boards, or unprimed select pine boards for your grid wall.
3. Calculate Your Squares
The key to a perfect grid wall is to make your grids as close to squares as you can. Since your wall width is unlikely to be the same height as your ceiling, this can be a little tricky. We like to have our squares ideally be about 16-24″ on a side. Anything smaller can end up looking too busy. If the squares get too big, they just look, well…too big.
If your wall width or height happen to be an even number, like 8 ft, just divide by 2 ft to determine the number of squares you will have in either direction. If your wall width or height is an odd number, you will have to get a little more creative. We came up with a handy table to take all the guesswork out of it for you:
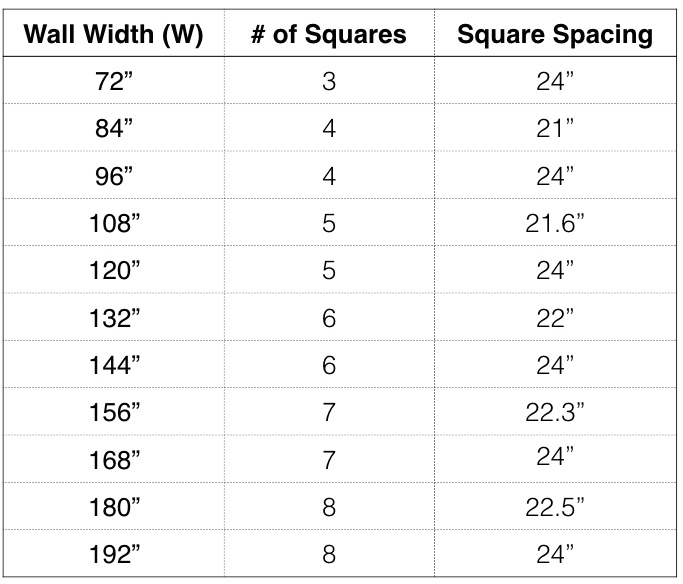
OK, now let’s check our grid spacing with an example. Suppose your W measurement is 11 ft wide (132 inches) and your H is 8 ft high (96 inches). According to our table, we should end up with a grid that is 6 squares wide by 4 squares high. Each square will be 22 inches wide and 24 inches tall. That’s pretty darn close to a perfect square!
Now that you have a good plan for your grid wall, you can calculate the number of boards you’ll need and head out to your local lumber yard, hardware store, or Home Depot for all of your supplies.
Step 2 – Install the Frame
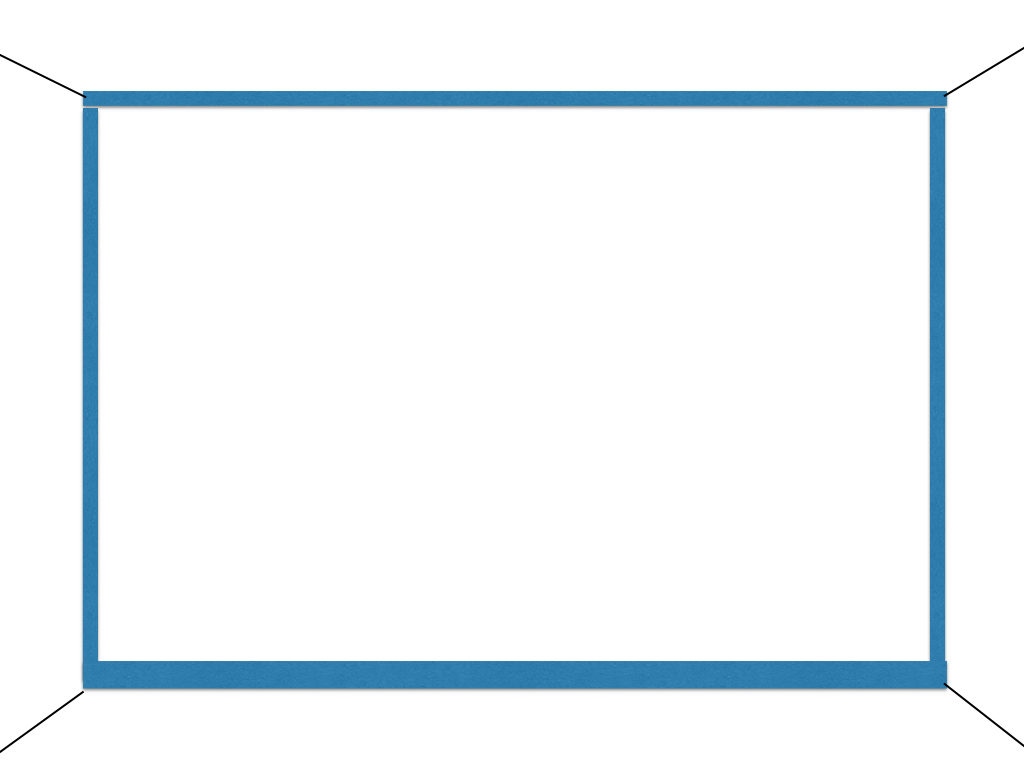
The next step is to install your top and side pieces. Along with the baseboard, this will create a “frame” for your grid wall. If you were also planning to replace your baseboards for the grid wall, install the new baseboards now, too.
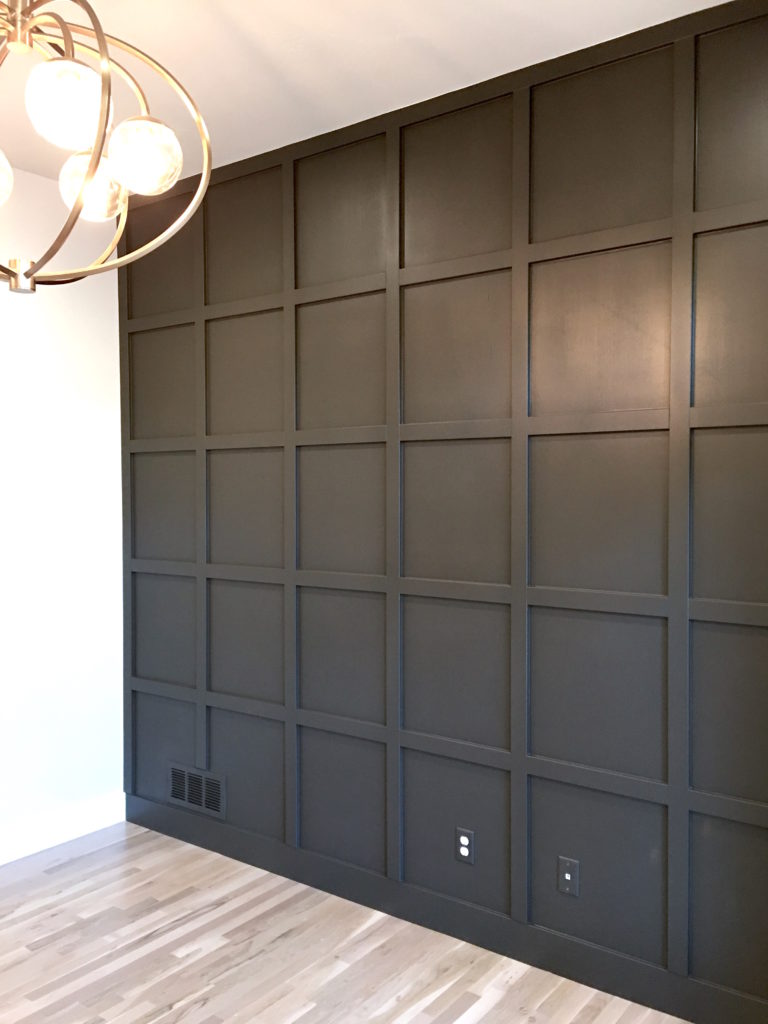
If you’d prefer to use your existing baseboard, and want to see some examples of how to integrate the vertical pieces with the baseboard, check out our Grid Wall Baseboard Examples. After this step, your wall should look like this.
Step 3 – Install the Vertical Pieces
We like to install the vertical pieces first. There are two reasons for this. The first is that most of the time, the width of the wall is wider than the height of the wall. If we installed long horizontal boards first, we would then have to install lots and lots of little vertical pieces. Installing it the other way around (the vertical pieces first), we have fewer little horizontal pieces to cut and install.
The second reason is purely for convenience. We like to avoid carting home long pieces of wood from the lumber yard or big box stores whenever possible. Since most ceilings are 8 ft high, we can buy 8 ft pieces of wood for our vertical grid line installation, and avoid having to buy and manage several really long boards.
That being said, you will probably have to buy one long piece of wood for your top horizontal header, and another for your baseboard (if you are replacing them). Buying two long pieces is more convenient in our opinion, than buying 5 or 6. Purely a personal preference.
When installing your vertical boards, we like to use our trusty nail gun and some construction adhesive or liquid nails applied to the back of the board. If you’re installing into drywall, you can also angle your nails (some pointing up, and some pointing downward) to better anchor your wood pieces into the drywall.
A little more math…
OK, time for a little more math. The distance between the edges of your vertical pieces is not going to be exactly the same as the square spacing we provided in the table above due to the width of your wood. So, how do you figure out the space between your vertical wood pieces? Here is the formula:

OK, so if you hated math in school, that formula may have made you want to quit this project before you even started. Don’t quit now! Let’s walk through it together using our example wall, shall we?
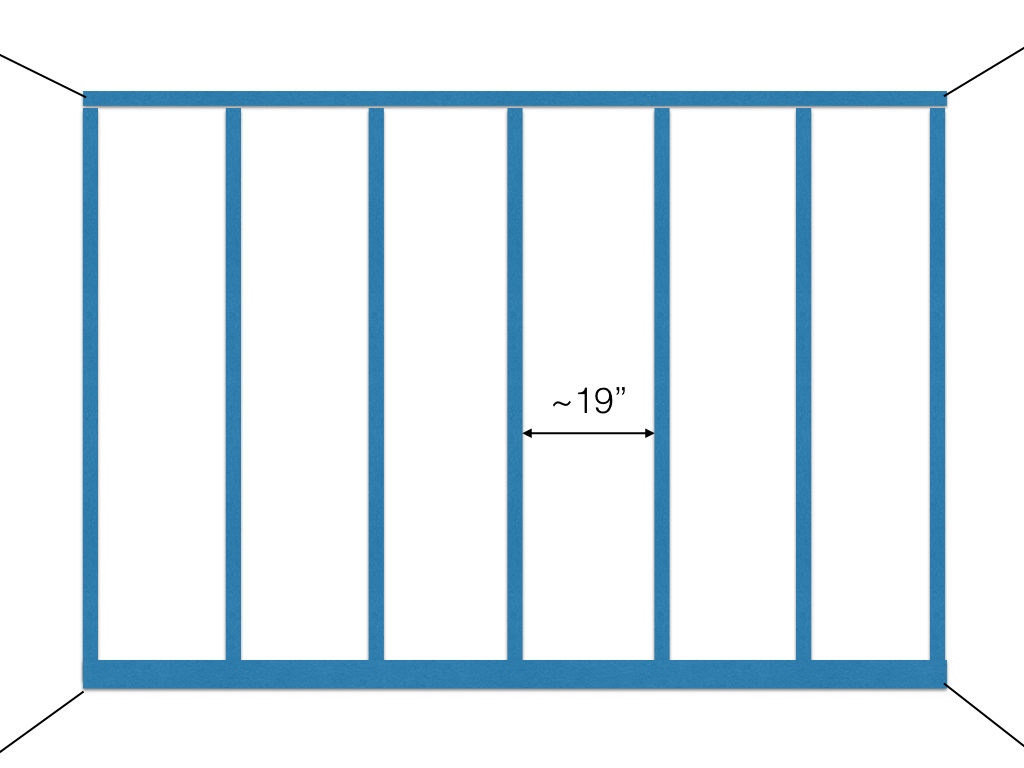
Our wall is 132″ wide, and we have divided it into 6 squares. With 6 squares, we will actually be using 7 vertical boards across the wall (# squares + 1). Each 1×3 board is going to be 2.5″ wide (because that’s how wide a 1×3 board is). If we multiply 7 times 2.5″, we get 17.5″. That’s how much space our boards are going to take up on our wall. If our wall is 132″ wide, and the wood will take up 17.5″, we are left with 114.5″ of wall. Divide that up into 6 squares, and you have just a hair over 19″ between each piece of wood. Phew, you made it!
Let’s see what this looks like on our example wall.
We like to install our vertical pieces using a 4 ft level (a laser level would also work great) to make sure the vertical grid lines are straight. The reason this is important is because your walls may not be perfectly straight. In fact, the width of your wall at the ceiling could be slightly different than the width of your wall at the floor! If this surprises you, just know that this is really common in houses.
Step 4 – Calculate Your Horizontal Spacing
OK, remember that math we just did for the width of the wall? Well, you need to repeat it for the height of the wall, too. In this case, just make sure you take into account the width of your baseboard, as it is probably wider than the 1×3 boards you will be using.
For our example wall, it looks like this… 96″ (ceiling height) – 10″ (the width of 4 1×3 boards) – 5.25″ (the width of our baseboard). That gives us 80.75″. Now we need to divide that by the number of vertical squares we will have, which is 4. That gives us 20 3/16″.
Step 5 – Create Two Spacers
OK, now this is the absolute key to installing your DIY grid wall! It will save you so much time, and make the entire rest of the installation a breeze. Listen up!
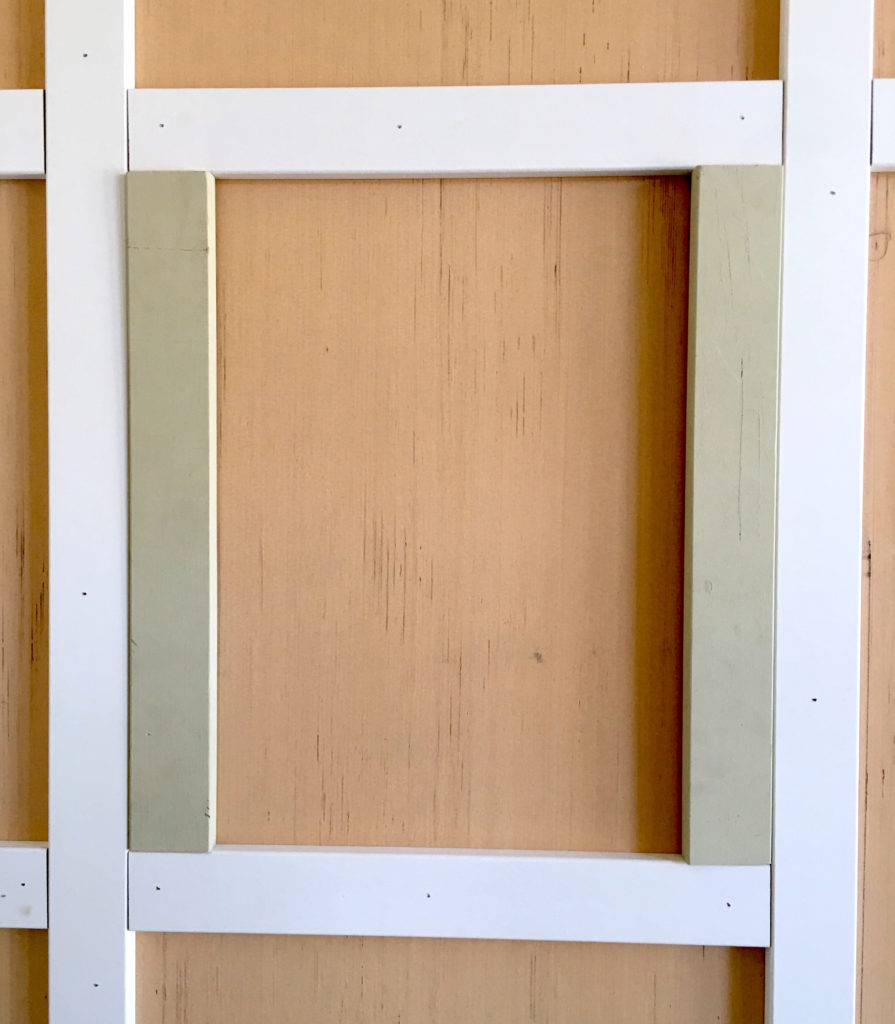
Cut two pieces of wood that are exactly the length of the horizontal spacing you calculated in Step 4. For our example wall, the two wood pieces would be 20 3/16″ long. You are going to be using the two pieces of wood as spacers for installing the remaining horizontal pieces of your grid wall.
These spacers will not only ensure that your grid pieces are straight, but that each piece is at exactly the same height as the grid piece on either side of it.
Step 6 – Install the Horizontal Pieces
Use your spacers to install the horizontal pieces, like so…
You can start from the ceiling or the floor, but just make sure to start from the same place for each column of your grid wall. Be sure the measure carefully before cutting your horizontal boards to ensure you don’t end up with large gaps that are difficult to fill (next step).
Step 7 – Fill Nail Holes & Caulk
I’m not gonna lie to you, there is a lot of caulking to do with a grid wall. You will need to caulk every square in the grid, along with the seams where your horizontal pieces meet your vertical pieces, and where your grid frame meets the ceiling and side walls. I highly recommend you get yourself a caulking gun, if you don’t already have one. Oh, and make sure to fill all the nail holes with some light spackling paste or wood filler and sand smooth before painting. You’re almost there!
Step 8 – Paint & Enjoy!
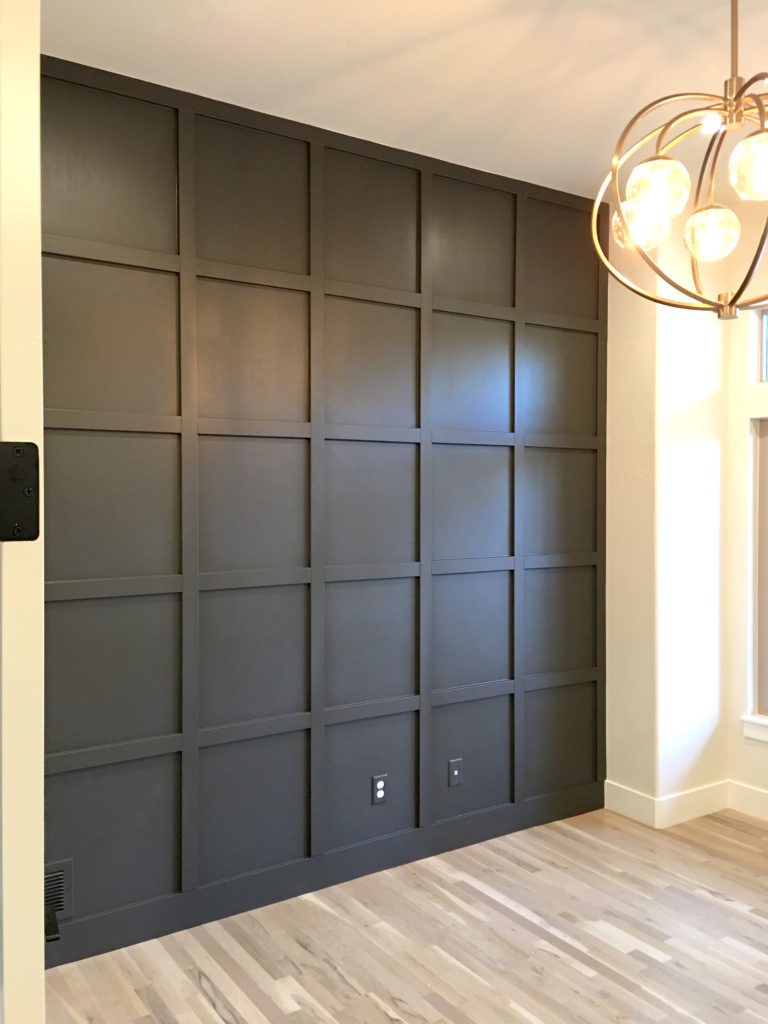
This is where the magic happens, and all of your hard work pays off…FINALLY! Pick a fabulous bold paint color or go with classic white. After two coats of paint, you will have the most gorgeous grid wall, and the final result will be worth all the effort! For this wall, we chose Sherwin-Williams Black Fox. You’re just a few brush strokes away from completing your DIY grid accent wall!
Be sure to test your paint colors on your wall before committing to one. I highly recommend purchasing some inexpensive, and super easy peel-and-stick sample sheets from Samplize. If you need recommendations for designer-favorite paint colors, you can check out my Favorite Paint Colors eBook, or check out all of the paint color ideas and reviews in my Paint & Color blog category.
Get our FREE DIY Project Planner
Need some help organizing your next DIY project? Check out our FREE DIY Project Planner! It can help you plan your tasks, identify the materials and supplies you’ll need, and create a workable schedule to ensure your next DIY project is successful.
*This post contains some affiliate links, which means that if you click a link and make a purchase, we may receive a small commission at no cost to you. We only recommend products we love, and all opinions are our own!


The grid takes “accent wall” to a whole new and much chic-er level. Love it!
Thanks! It definitely made a big impact in this office!
Looks great! Are you just using brads? Are you also gluing the boards? Thanks!
Thanks! Yes, we use our trusty brad nailer, and typically use 2.5″ nails. If our clients want a smooth finish behind the grid, we will install a fiberboard or project panel first with liquid nails and a few brad nails into studs. We try to cut these pieces so that our vertical and horizontal boards will cover any seams (takes a little planning upfront). In this case, we just nail the vertical and horizontal pieces into the backer board and drywall. Other times, when our clients don’t mind a textured wall behind the grid, we’ll use nails when we know we’ll hit studs, and a combination of glue and nails when we won’t. Hope that makes sense!
Where do you find/buy the 2.5” brad nails? I can only find the 2.5” inch for finish nails, not the brad nails. Let me know!
Looks amazing, thanks for sharing. Can you post a link to the MDF boards you size. I can’t seem to find the 1×3 at Lowe’s. Thanks
Here’s a link to some finger joint 1×3 boards. We use these boards often because they are nice and smooth for applications like this.
Hi! Where is the link to buy these 1X3 boards? I couldn’t find it in your comment. Thank you! Trying to replicate this and I’m having the hardest time!
There isn’t a link in the post, but you can get 8 ft lengths here.
Also are they true 1×3 or does it end up being 1×2.5? I plan on using 1/2 thick since I’m I stalling above existing baseboards. Thanks for your help!!
Lumber is never truly its stated size when you buy it (which can make things a little confusing). The true dimensions of a 1×3 board are 0.75 x 2.5 inches.
Thank you for this tutorial. I was stumped on the math but you made it very clear.
Thanks! I’m so glad to hear we made it easier for you.
We are installing a wall in our home that is in the building process. There will be carpet in the room. Do we need to adjust our height measure to accommodate carpet or is not significant enough to worry about? It will be a low pile
Thank so so much for this!! I was making it much harder than it needed to be
So glad we could make it easier for you! I would highly recommend you install the grid wall after the carpet, because the carpet and its pad are likely to add about 3/4 – 1 inch to your floor, and your newly installed grid wall baseboards might get dinged up during carpet installation. If you need to do it before, talk to your carpet installer or contractor about how much space to leave above the unfinished floor. Good luck on your project!
This is a great tutorial, I am just finished my paneling and about to start painting.
We have used MDF paneling, what type of paint do you recommend for MDF and can the same type of paint be used on the MDF and the existing wall?
If your MDF is already primed (it came white), you can go ahead and start painting. Be sure to fill all the nail holes and caulk all of your seams first. Yes, you can use the same type of paint for both the MDF and the wall. Just know that the first coat of paint might adhere differently to the two surfaces, because the MDF is very smooth, and your wall has more texture to it. I always recommend using two coats of a high quality paint, for best results – like a Benjamin Moore or Sherwin-Williams paint. A lower quality paint will often require a third coat, and I prefer to save time on my projects and spend a little more on the paint. You’re on the home stretch – good luck with finishing up your wall!
When installing the grid board is it ok to put it over {on top} of the baseboard?
It’s hard for me to picture exactly what you’re talking about without an image, but I’ve seen plenty of grid walls where the baseboard has the bottom horizontal grid above it. Another option is to cut the vertical stiles at an angle where they meet the baseboard, and use the baseboard as your bottom piece. Send me a picture to info@welshdesignstudio.com, and I can give you a more specific answer.
Hi – any chance you have a picture of what both of these options look like — one with the baseboard as the bottom piece, and one with the horizontal grid above it? I’m trying to get an idea of what the best option is (obviously cutting at an angle on the baseboard is more difficult, so I’m trying to determine if its worth it.
I’ll send you an email today with some examples.
Hello,
Could you please send me those pictures also? Thank you.
Absolutely! I’ll send them now.
I would also love a picture of the grid meeting the baseboard suggestions.
We have 5″ baseboards but they are very narrow at the top (beveled)
Thanks looking fowrard to this project!
Firstly, I assume you are referring to how the lowest horizontal grid is positioned relative to the baseboard (bb). If so, the proper solution is to remove the bb. A filler piece of trim (approx. height of bb) is then installed behind the bb and level with its top. This unfortunately necessitates removing 3/4″ (thickness of the new trim filler & the grid) from the mating (i.e. – perpendicular) baseboards on each side as the trim piece pushes the bb away from the wall. The lowest horizontal grid then lays on top of the newly-installed trim (behind the bb). As described, the bb is proud of the grid – as it should be. Additionally, all the horizontal grid can be the same width – again as they should be.
Looks great! Any tips on panelling an end wall in a dormer? Bed is under an eave and want to panel that wall!
The angles of your ceiling will present some unique challenges, but I would follow the same general process. First, I would install all of the border/frame pieces, then the vertical pieces, and then the horizontal pieces. The spacers will work well for the square grids, but not as well for the grids with angled sides. So, I would also be using a small level, and an angle finder tool to determine the angles I need to cut. Hope that helps, and good luck with your project!
This is an incredibly helpful tutorial! Thank you for sharing. I have two questions. 1. I am installing this in my son’s bedroom which has existing crown moulding as well as baseboards. Would you use the crown as the upper horizontal board or would you run another one beneath? 2. Would you ever consider using something more shallow than a 1×3? Something that ends up being closer to a 1/2″ maybe even 1/4″? I’m thinking of adding the visual interest with less overhang above the baseboards and less surface area to collect dust! I would love the pictures that you sent to others showing the angled vertical stiles. Thank you! 🙂
For your first question, I recommend putting an upper horizontal board just underneath the crown moulding. The reason is that if you are planning to paint your grid wall a different color than your crown moulding, you’ll want another top horizontal board to “finish off” the squares. I’ll send you a picture that illustrates what I’m talking about. For question 2, the answer is yes! I would definitely consider using a board that is 1/2″ or 1/4″ thick to help it match up better with an existing baseboard or crown moulding. The 1/4″ may not give enough shadow/depth for your liking, but you could always buy a couple of different boards with varying thickness, and see which one looks best to you. Happy to send along the pictures I sent the others. Thanks for your comment!
Hi, I just happened upon your site and wanted to thank you for this great tutorial! I have a similar question. We’d love to add this grid wall to our office. The ceiling has what appears to be double crown molding. Sorry I’m not a designer so not sure of proper name. The baseboard also has about 2″ trim right above it. Can you please share the examples with me as well? Not sure how to proceed. Thanks!
You can access those baseboard examples here.
Hi! Just finished putting up my wall and spraying the first coat of black. I think it might be too dark. I was wondering what shade and finish you used in the color above. Thank you!
For this wall, the client was also thinking about painting the wall black, but I talked her out of it. 🙂 Although it can definitely work, black can sometimes create too stark of a contrast, as you might be seeing with your wall. We went with Sherwin-Williams Black Fox (SW 7020) because it’s warmer and looked beautiful with her light hardwood floors, and brushed gold light fixture. She was thrilled with the color, and happy she didn’t go with black. Good luck with your wall!
This is awesome I want to do my family room wall like this. I read all of your helpful tips and I think this is totally doable. Can you help me with some measurements though? I am not that good at math. My wall measures 210″H and 97″ V. I have a baseboard so the 97″ is from the ceiling to the top of them. Thank you in advance.
For your wall, I would recommend having 4 squares vertically, where each will measure just over 24″ high (97/4). For the horizontal spacing, if your wall is 210″ wide, I would do 9 squares. Each square will be just over 23″ wide (210/9), so your grid will be very close to square in the vertical and horizontal directions. Hope that helps!
Is there anyway to use your existing baseboard? mine are very narrow about 1/4”
depth. I saw another post where they cut the vertical pieces at an angle so the end of the angle is touching the baseboard but nothing else. I thought it looked strange. Any other ideas? Thanks
Hi Nancy! If you’d like to use your existing baseboards, you basically have 3 options. The first is to cut the vertical styles at an angle where they meet the baseboard. Some people don’t like the angled look at the bottom of the grid. The second is to use thinner vertical and horizontal boards for your grid wall (like 1/4″ or 1/2″ thick versus the standard 3/4″ thick). The drawback to this option is that your grid can look a little “shallow.” The third option is to add a transition piece to your baseboard that can meet and match up with the thicker grid wall pieces. See example here. Good luck!
This looks amazing! We are just starting our project and trying to figure out the best way to paint. I painted the wall first and am now putting on a coat to the boards before we install. The roller makes it look textured and the brush gives a smoother look, but once it’s up what is the best smoothest look overall?
Using a paint sprayer is my favorite way to paint a grid wall, but I’ve done many of them with a standard brush and roller. I typically paint everything when it’s already on the wall, but pre-painting the wall and boards can only help reduce the amount of painting you’ll need to do to finish. I caulk all of the seams and fill & sand nail holes first. Next, I tape everything off (ceiling, adjacent walls, outlets/switches, etc.). I use a brush to cut in everywhere, and a small (4″) roller with a smooth nap (like 1/4″). You can use a foam roller if you want an ultra-smooth finish, but they can sometimes cause problems with thicker paints. After cutting in with the brush, I use the roller for the center of each grid, and go over the tops of all of the boards, as well, so that the overall finish is consistent. I recommend two coats for a nice even finish, but you may be able to get away with one good coat if you’ve pre-painted.
We have a grid around our fireplace and it has been painted. It was just painted by a professional when our house was built. However the color didn’t turn out as we hoped and we want to repaint it. Is it as easy as just applying a different color? Do we need to sand it off, prime and then repaint?
It can be that easy, yes, depending on a couple of factors. If the original paint color is pretty dark, and you’d like to go much lighter, you should apply a coat of primer first. Also, if the paint used was oil-based, and you apply latex paint over it, it will eventually start to peel. The chance that oil-based paint was used is very low, as most painters today use latex paint. But, if you aren’t sure, your best bet is to just prime it and apply 2 coats of new paint over it (no need to sand!). Good luck with your painting project!
Curious… for a wall 123 w and 115 h would I use 5 or 6 squares? Am I doing my math right
For a wall that is 123″ wide and 115″ high, I would do 5 squares both horizontally and vertically. Good luck with your grid wall!
thanks so much! would you suggest 1 X 3 or 1 X 2 wood for this size wall? Looking forward to getting started!
I would recommend using 1×3’s for this wall size.
Hi, So excited to start this in my studio. Does this get painted in two steps(Wall first then again after grid is installed) or just one(all at end)? Thanks
I paint my grid walls all at once at the end. Mainly because you need to caulk and fill all the seams and nail holes before painting, and this step can only be done once everything is installed. I like to do all my painting at once at the end – it’s a rewarding last step. 🙂
Looks amazing! Cant wait to do this My wall are 96″ x 233″ Would you recommend 5 rows or something else . Not great at math so measurements confusing to me Thank you
With a wall that long, I’d save myself a little effort and probably do 4 squares high by 10 squares wide. The grids will be slightly larger at around 22-23″ on each side, when finished. You could also do 5 rows high and 12 columns wide, but each grid will be closer to 18″ square when finished, which might end up looking a little busy on a large wall.
Here’s what I recommend…get yourself some blue painter’s tape, and tape some horizontal and vertical lines up on your wall to create the grid sizes. With the 4 squares x 10 squares, create tape lines every 24″ going vertically, and 23″ horizontally. And, for the 5 sauares x 12 squares option, create tape lines every 19″ wide and high. Stare at it for a day or two, and see which one you like best. Good luck on your grid wall, and I hope you’ll share with us which option you choose!
Hey I’ve been following this guide and done many measure ups and draw ups and I seem to be coming into a few problems I’m keeping my bottom board my h is 93inches but because I’m using the skirting it’s 91 while my w is 151.5 inches so I’m getting 22.3 spacings wide and 20.125 inches high for my squares but it still ends up being short once I get to one end of the wall I’m not sure if I’m right here as it would be 6 squares across and 4down sorry sounds bit confusing but this is were I’m stuck as I’ve gone over many times I not sure if I’m right or well off
I love this so much. Unfortunately I have a window on the wall I want to do it on. Can I still do it on that wall?
Yes, you can definitely do a grid on a wall with a window, but it will depend on the window size in relation to your wall size, and will take a little extra planning before getting started. I would create a border around my window, or use existing trim if your window already has trim around it. Adjust your grid sizes to make sure you don’t end up with a tiny sliver of wall space right before or after your window trim, and also tape up some grid lines to make sure it looks good before getting started. Here’s a great blog post for you to check out with some pictures of how the grids look around windows. Have fun with your project!
Hi there, just wanted to say – what a great website and this tutorial in particular.
I am going to give this a go.
My only disappointment was that you were not in Wales, where I was born. (Now living in London.)
We need some more Design talent like you in Wales!
Keep up the great work and thanks for sharing.
Awww, thanks! What a sweet comment – you made my day!
Could you email me the pictures of different options for using the current baseboard? Thank you!
I just sent you the email. Let me know if you have any questions!
And for anyone else who is interested, I’ve just added a link that shows the baseboard examples in Section 2 of this post.
Hi Melissa, great tutorial. What counts as a “small” wall in regards to using a 1×2 or 1×3 for the wood width? And if doing a whole room instead of just one wall would you omit the framing? Thanks!
Could you tell me the exact color of this paint I love it and can’t wait to build this grid wall!!
Absolutely! It’s Sherwin-Williams Black Fox (SW 7020).
Hello, what type of wood has been used for this? We’re finding a lot of pvc board, but if don’t hold a darker paint color.
We use either primed FJ (finger joint), MDF, or 1×3 select boards for our grid wall projects. For this specific project, it was primed FJ.
Where do you find MDF board? I can’t seem to find it at the local Lowe’s/Home Depot….
Often times the MDF is located in the moulding & trim section rather than the lumber section. If for some reason it isn’t carried at your local box store, try a local lumberyard. If they don’t have it, they might be able to order it for you. You also may be able to order MDF online through HD and Lowes and have it delivered to your local store.
Thank you for sharing with us you projects and feedback. I am drafting up my plans and want to ask you for your opinion on existing stair baseboard that already built in that runs along the stairs. The tricky part is I have these existing baseboard has a slight routed top ( not squared ) so how do i go about adding my lower grid frame on top of these built-in baseboard. Do I add a small molding to hide / smooth the transition between the built-in base board and the lower frame?
Thanks
Doug
Check out our resource on using existing baseboards here. I think you’ll find some ideas there for your baseboard situation.
We have a 180 x 120 wall would you recommend 8×5 squares or go larger? also would you stick with the 1×3 or 1×4 for board size. Thanks!
For a wall that is 180 inches wide, you are right on the edge in terms of number of grids. You could go slightly bigger with your grids, and do 7 across, or slightly smaller and do 8 across. Either will look great. The big benefit to having bigger grids is that you can decrease your overall cost a bit, and save a little time, too. So, if it were my house, I would do 5 grids vertically and 7 grids horizontally. I still recommend the 1×3 board size, because I just prefer the look of it, but you can certainly do 1×4’s if you want thicker “lines.”
Thank you so much! This website saved my project. You made it so easy for us. I’d love to send pics.
I have a wall that is 225 1/2 inches wide, and 108 high. My base board is going to be about 8 inches high because the base that is throughout the room is 5 inches tall and I’m going to run it over the top of the base board. The rest of the frame around the wall I’m thinking of doing with the same material that I’ll be using for the stiles. 3 inch wide MDF. My problem is that I have 2 windows on the wall on either end of the wall that are 5 1/2 ft tall by 3 1/2 ft wide, but they are not the same distance from their perspective corners where the wall they are on meets the side walls (or in other words, they are not symmetrically placed on the wall. Do I just build the squares and let the windows fall where they may? Sorry if this is wordy. Hope it makes sense.
You’ve got a big wall there! For the windows, I never like to just wing it, so I would recommend putting up some blue painter’s tape where you think your vertical boards will go, and see how the windows fit in first. If your windows are framed, which I recommend if you’re trying to tie in with a grid wall, you don’t want to end up with a vertical piece that’s just an inch or so away from a vertical window frame. So, if you see that you will have that situation with the tape pieces, you can adjust the spacing of the grids to avoid that issue before nailing anything to the wall. Other than that initial spacing check, just go ahead and build your grid wall around the windows (no matter that they aren’t symmetrical from their corners).
You might also consider putting a smaller transition piece from your baseboard to the vertical stiles, rather than adding another 2.5 inches on top. Just another thought. Good luck on your project!
Wow beautiful and amazing details, love it, thanks!
Thanks Paula!
When nailing the vertical and horizontal pieces you wont always hit a stud. Will nailing the 1×3’s into just the drywall hold?
Please let me know
Yes, nailing the 1×3’s into drywall alone will hold just fine. That being said, you can always use a little construction adhesive on the back side of the 1×3’s that don’t align with studs.
Great post, thanks. I’m curios about painting the 1/4” hardboard paneling – is it like mdf in that it needs an oil based primer to keep from swelling? Or will water based primer work on that?
We used water-based primer and it worked fine.
What sheen did you use with the Sherwin-Williams Black Fox (SW 7020)? My adjacent base and trim in the room is semi-gloss, but I don’t want it that shiny. I’m thinking satin?
We used satin sheen for that project, and typically use satin for all of our grid walls.
How would you fix a corner where the side wall is really crooked? Should I start the grid side frame pieces a couple inches in to camouflage it?
I wouldn’t recommend that approach, but if you send me an email at info@welshdesignstudio.com, I’ll see if I can give you some better advice. 🙂
This is the best tutorial post I have ever read!
Can you save me and my husband a headache (and an argument lol)? Our wall is 157″ W x 104″ H (with no baseboard to consider). Using your math, we are thinking 7 1×3 grids horizontally and 5 1×3 grids vertically. The vertical is what we are questioning between 5 or 4. Thanks so much for your help in advance!
Glad I could help! If you’re going with 7 grids horizontally, I would do 5 grids vertically. Why? Because that will give you the most “square” look for your grids. There is another option…if you go with 6 grids horizontally, you could do 4 vertically and have almost perfect squares. The squares would be a little larger, but would save you installation time, and cost of materials. Just sayin’
I am so impressed with your tutorial. Two questions though, my wall is 161” inches long and 96 inches tall. I was hoping you could help me with the measurements. I keep getting different numbers.
And second, what do I use to fill in the seams where the horizontal and vertical pieces of board meet…ya know to hide the seams.
Thank you again and keep up the great work!!
I would do 7 grids horizontally, and 4 grids vertically. That will give you some beautifully sized grids! We use caulk to fill seams between the wall and the grids (the insides of the grids, and the areas where the border pieces meet the ceiling and side walls. We use wood filler for the seams between horizontal and vertical boards.
Thank you for the comments, I do need help with the measurement and the math. I figured out the amount of squares, but the distances have me puzzled. My wall is 161 inches wide, 96 inches tall. My bottom baseboard is a 1×4 and my header is like yours a 1×3. For the rest of the pieces, I want to use 1×3’s.
A million thanks
Very helpful tutorial. My husband and I are in the process of installing. We are about to install the horizontal pieces and some how our vertical pieces are not all equally spaced. It is of by maybe 1-2/16 of at inch. I was wondering what you would suggest for filling in any very small gaps. Thanks!
Can you send me an email at info@welshdesignstudio.com with a picture of your situation? I’ll see what I can do to help.
I have a wall that is 84″ tall from crown to base and 184.5″ wide (of course that dang half is throwing me off). What would you suggest for measurements as far as what side boards, how many squares, and what size? I am so looking forward to adding this to our home, yours looks incredible! Thank you kindly in advance for your help!
For your wall, I would do a grid that is 4 squares high by 8 squares wide. Those will produce grids that are very close to square. I also recommend using 1×3 boards for your grid wall.
I really want to make a grid wall in my bedroom bc it is very large. The wall I want to use had two windows on either side. Can I still make a grid wall or will this be a lot more work!? Thanks for any tips or advance!
Christina
Yes, you can absolutely still do a grid wall with windows! You will need to add a frame around each windows, if they don’t already have one. Also, check the spacing of your vertical pieces with painter’s tape before you start installing. You’d like to avoid having a tiny little sliver of space between one of your vertical boards and your window frame. If you encounter this, you can always adjust your grid spacing slightly. The rest of the installation is pretty straightforward. Just work around the windows, measure twice, and cut once! 🙂
Hi! I love the wall and the chandelier! Any chance you know where the light is from and the name of it! Thanks!
Sorry, I don’t know where the client purchased that light fixture from. It is beautiful, isn’t it?
@mwelsh, you mentioned that it is common for top/bottom widths, and left/right heights to not be the same resulting in leveling issues. I cannot get my left right vertical border boards level without them sticking out several inches from the wall. Is it ok to go ahead place these unlevel as long as I get the rest of the vertical boards as level as possible?
It’s common for walls to change up to an inch over a long span, but several inches is definitely going to present a challenge! You’ll want to install your left/right vertical frame boards to look like they are flush with the wall. I would buy myself up to a quarter inch on each side by skewing the boards toward the level direction, and then filling in the corner seam with a generous amount of caulk. You then have two options: either install the remaining vertical boards level, or install the remaining boards skewed, as needed, to compensate for the crooked walls (aiming for level in the center). In the first case, my concern would be a visually noticeable difference between the sides and the adjacent level vertical boards. In the second case, you can trick the eye by installing the vertical boards askew, but it creates more issues for you down the road to fill the gaps you’ll inevitably be creating during installation. My advice? Try each option out by putting up some painter’s tape first to represent your vertical boards. Stand back and see which option works best visually. Good luck on your wall!
I’m not sure if this question was already asked, but do you think this would be easy to remove when moving? I’m living in an apartment and would like to do this for my son’s nursery.
Everything’s removable! 🙂 Not always easily, but certainly removable. If I were going to install this in a more temporary way, I’d probably just use fewer nails, and maybe not use so much caulk.
We have a very long wall we want to do this to. It’s 22′ 7″ long. My fear is this will make the wall look too busy. Do you have any measurement suggestions on how to do this to such a large wall?
For a long wall, it’s a good idea to make your grids a little larger overall, so it doesn’t end up looking too busy. If you want to go bigger, you could aim for squares that are closer to 26-30″ wide. However, it depends on the height of your ceilings. For an 8 ft ceiling, you can do 4 squares high (24″ high squares), or you could do 3 squares (32″ high). If you went with 3 squares, your best bet is then to choose 8 or 9 horizontal squares (both work fine) to create an even-looking grid.
This looks fantastic! My walls have texture to them, do you have any recommendations on smoothing that out, or does it look OK with textured walls behind the MDF?
For textured walls, I recommend installing a smooth 1/4 inch plywood or MDF panel board over the textured walls, and then installing your grid boards on top of that. That will give you the smoothest look underneath. However, I’ve seen plenty of people install grid walls and wainscoting directly on top of textured walls. It’s really up to you, and how you prefer it to look once finished. Here’s a pic of a grid wall installed directly over a textured wall, so you can see what it looks like: https://smallstuffcounts.com/wp-content/uploads/2018/09/modern-navy-entryway-makeover-hri-7.jpg
I am grateful I came across your blog! Very helpful and detailed. My textured wall is 11’6″w X 9’8″h. I am thinking about putting panelling to cover the texture. Based on your info, seems my battens would be about 6 squares wide by 5 squares high, right? This seems like alot of squares. Other items to consider is that I have crown moulding and my side walls are angled about 25 degrees. Any suggestions? Also, any recommendations using MDF vs Finger Joint?
You can certainly increase the number of squares by 1 in each dimension, and it will look great! I recommend putting up some painters tape on your wall to mark out the grid lines, and then stand back and see which option you like best (more grids or fewer grids). We personally prefer finger joint, because it has nice sharp edges, whereas MDF can have a slightly rounded profile. But, as far as a material goes, both work just fine for grid walls.
Your example for measuring was by far the simplest! I’ve bern able to do the math for spacing but my question is for the length of the vertical boards. (Step 3)
If my wall width is 146 & height 104 (minus trim) which means I will have 7 vertical boards.
How tall should my vertical boards?
Am I supposed to subtract the width of the 2 horizontal boards? Which will leave me with 99 inches?
I am having difficulty with determining the size of my squares. W 163″, L 108″, 2.5″ baseboard that I would like to keep, using 1×3 wood. I want to use Example 3: One last option, is to add another piece of decorative trim at the bottom to create a transition between your baseboard and a thicker horizontal bottom grid.
Can you please help with determining box size, how many boxes?
Hopefully I’m understanding your question correctly…Your vertical boards will be the distance between your baseboard (or bottom frame piece), and your top frame piece. If your bottom and top frame pieces add up to 5 inches, and your wall is 104″ high, then yes, your vertical lengths will be right around 99 inches. OK, now this next part is important. You don’t want to just go cutting your vertical boards all at 99 inches because walls are never straight and perfect. Instead, be sure to use a tape measure to measure the vertical distance at the point where you will be installing each of your vertical boards. You may find some will be just under 99 inches, or just over. Measuring at each location is the best way to ensure you minimize any gaps.
Your information is so awesome, thank you for sharing! Ok, we are in the middle of a new construction home and have decided to add this design element. Our dining room wall is 136” W and 120” H. We brought our ideas to the builder and he said we can only do 1×2 or 1×4 grid lines due to the 1×3 being “special order”. Grrrr. So due to the size of the wall we are going with the 1×4 width. We also plan to use a 6” flat baseboard and top frame so that the adjacent standard 5” baseboards and crown mouldings can terminate straight into our feature wall. We are deleting the crown moulding from the feature wall. I hope that makes sense. Based on these dimensions, with the 1×4 pieces (really 3.5), do you suggest 6 squares wide and 5 squares high?
Great choices with the baseboards and crown moulding to set your grid wall up for success! With the 1×4’s and size of your walls, I would probably reduce the number of squares in each direction by 1, giving you 5 grids wide by 4 squares high. Larger squares can create a more balanced look with the larger baseboards, crown, and board sizes.
Your information is very useful. I have a wall with 175 inches Width and 106 inches Height. Do i go with 7 horizontal and 5 squares vertical or 4 squares? I am planning to go with 1X3. Please advise.
Please can you advise.My young granddaughter would love a grid wall but I wonder if the wall is too small for it to create a nice look. The wall measures exactly width 2730m and height 3250mm. Think that’s maybe width 1071/2ins and height128 ins. Sorry did these measurements before I stumbled across your wonderful website so have tried to convert it into inches. If you think it would look alright could you please help with the working out of grid and what size of MDF etc we should use.Getting too old for this but hopefully she can have it done by grandpa as this covid 19 has hit children hard. Thank you so much
Sorry my previous measurements are wrong. Height 88.50 ins. Width 107.75″ins
Thank you for not bothering to reply to my question and asking for your help. I have decided to get a company in.
I’m so sorry for the delay! I’m really behind on my comment responses. You can always send me an email at info@welshdesignstudio.com for a faster response.
Thank you for this wonderful tutorial! I really like how you explain the math. I wanted to put a grid wall behind my toilet. The wall is only 42″ wide by 10′ tall. I wanted to use some leftover 1 x 4 primed mdf. That would mean I would only have 2 squares 15 1/4″” wide by 15 1/2″ length. Would it look weird to have a grid that is only 2 squares wide?
No, I don’t think it would look strange to have 2 squares, but I think 1×4’s might look a little beefy for such a small space. I’d suggest you put up some painter’s tape to represent the width of the boards and a partial grid wall (no need to tape out the whole thing!), and then stand back and see how it looks.
This is a really great tutorial… planning my wall now. Thank you!
Thank you for this great project….Hi can you please send me pictures of this project being completed with crown and base molding. Also my width of the wall is 88 1/2 and the height is 82 1/2. What size wood do you recommend? It’s a small wall, but I want the grid to make a statement. Thank you!
Please click the link here for the crown and base tips. I would use either 1×3 or 1×2 for a wall that size. I still prefer the look of 1×3 for the majority of grid walls.
Love this. We are finishing up and painting. Any advise on what paint would work best?
I prefer to use a Satin or Eggshell finish for grid walls, and am partial to Benjamin Moore and Sherwin-Williams products because they have great coverage. Hope that helps!
Wish I had seen this before I worked my brain with all the math. But I love the results if our wall.
We certainly tried to make the math a little easier on the brain, since it can become a little overwhelming. 🙂 So glad to hear your grid wall was a success!
Can you please help me with measurements please. (8 feet 9 inches) tall, (15 feet 6 inches) wide. I tried figuring this out. I don’t think I’m doing this right. Thank you
Thank you for this awesome tutorial! I am planning to put a grid wall in my daughter’s room. My only concern is that our walls are textured (it’s a Colorado thing). Have you seen this done on a textured wall? Do you think it would look ok with the difference in texture between the boards and the wall?
I really dislike textured walls, but it’s done on every house here.
Thank you!
I know all about textured walls in Colorado! 🙂 Yes, I’ve seen grid walls done on top of textured walls, and it looks fine. It really just comes down to personal preference, and whether or not you want to take the extra steps to lay down a smooth panel under your grid. Here’s a blog post that shows pictures of a grid wall done over some very textured walls, so you can see what it would look like.
Hi my wall is 3 metres wide. X 242 cm down
Can you help me calculate please
I’m thinking about doing this to 3 wall in my open plan living room, what are you thoughts on doing it on more than one wall?
How would you treat your grid if a wall plug or switch plate ends up being in the path of the grid? Adjust the grid or???
Best case scenario is you adjust the grids. However, there are a few options for dealing with a plug or plate in your path. You can do something like this, where you mitre in the boards. You could notch around it, like in this pic. Or, you can build out a little platform for it, and extend the plug flush with the boards, like this.
Hi Melissa ! This is the best site ! I was at another site and was stressing a little on doing this project due to the wall width. My wall width is 191.25 inches (15.9 ft) by 92.5 inches (7.7 ft) high (I’m leaving the baseboard intact-going to use your suggestion on using a transition piece to avoid the overhang-great idea ! ). So when I was initially browsing the web for “how-to”s one web site stated to start the project by framing it out along the edges – okay – but then doing the horizontal pieces first – I’m thinking great – now I will have a cut on my horizontal pieces because I’m not going to find 16 foot 1x3s ! I kept looking at sites to help with the squares calculations and came upon this site ! Yes ! You provided a solution for avoiding long horizontal pieces for the central grid (except for the header and bottom) – install the vertical grid pieces first since I can get 8 ft 1x3s ! Excellent ! Plus based on your formula it appears for my wall I will go with 8 squares horizontally and 4 high but if I keep the baseboard and do the transition piece to avoid the overhang that will in effect reduce my vertical height by 2-3 inches to approx 88 inches high – maybe then do 7 horizontal squares by 4 squares high ? I would appreciate your opinion / thoughts on that ! Thanks again for this information – Its on my favorites web pages ! Thanks ! Stay Safe !
It was great talking to you via email. Good luck with your grid wall!
Fantastic tutorial! Your best tip for me is the spacers. I’m starting a 20’ high x 16’ wide wall tomorrow and this is going to save me so much time!
We’re about to begin a custom home build, but I’m going to do some projects after the build and this is one of them. Finding your incredible totorial has given me the confidence that my husband and myself can actually pull this off!!! You are fabulous in your descriptions, and extinction and all the helpful answers you’ve given to all the great questions! I will be back with some of my own in sure! I’m totally saving this article and totorial and you’ve now gotten a new fan! Thank you so much for your help and intrest in helping all of us! You are Truly awesome!
Hi there – a great article – would you be able to help confirm our maths as our dimensions are between what has been provided in the table. Our wall height is 86.61 inches and width is 128.34 inches. – we would go for 4 sqaures H and 5 sqaures W – however what would be the height and W of square spacing? Looking to get this started tomorrow am based in the UK – hope you can help us – 🙂 – thanks
Hi
I saw your article at below link and really liked. Well done. I was thinking of having similar grid wall for my father’s bed wall in our new house under construction.
https://welshdesignstudio.com/tutorial-for-creating-perfect-grid-wall/?epik=dj0yJnU9WVlNZUhhRG55dmVIbE0yWHg0THhZNGg5MjJ0d2lfR1ImcD0wJm49alhwbkp1Zk12MVV6Ym52ZmNtcXZudyZ0PUFBQUFBR0xBaDZ3
I am contacting regarding some confusions I was having reading the article?
1. When you say 1×3 mdf, it means 1 inch thickness and 3 inch width?
2. By baseboard you mean skirting?
3. My father’s room wall width is about 15 feet and height is about 9.5 to 10 feet. How many vertical and horizontal boxes u suggest? And how much thickness of mdf boards? I want to be as close at a square from both sides.
4. I saw attached picture in pinterst. It looks like they used 3 inch board and on top of it 2.5 inch boards. 3 inch board is 0.75 inch thick perhaps and 2.5 inch board is 0.5 inch thickness as it looks like. I want a similar look.
https://www.pinterest.com/pin/544302304976644295/
Shall appreciate your guidance.
Regards
asim
Hi there! The grid wall looks wonderful! Finished my grid wall in my bedroom (accent wall), my other walls are painted anew gray, any ideas of what I would paint my accent wall? Would like a pop of color but not dark and drastic? Thank you. Barb
Do you have another tutorial or could you add to this and detail the caulking step? I find that caulking everything is more challenging than I think it’s going to be and all those internal seams! How do you get it looking smooth and professional and consistent?
That’s a great idea to add a post about caulking. I’ve tried many different methods throughout the years, and had the best luck with my finger and a damp rag. I use the rag to moisten my finger, smooth out the caulk with my finger, and wipe off any excess onto the rag…keeps things nice and smooth, and clean. Also, try not to use too much caulk – you can always add more, but using too much at once gets messy.
The key to a perfect grid wall is to make your grids as close to squares as you can. Since your wall width is unlikely to be the same height as your ceiling, this can be a little tricky. We like to have our squares ideally be about 16-24″ on a side. Anything smaller can end up looking too busy.
Thank you for your tutorial! Do you think this will look okay on a textured wall?
I’ve seen many people do a grid directly over textured walls, and it looks fine. My personal preference is a smoother surface underneath, but it will definitely save you time to skip the backer board step.Here’s a pic of a grid wall installed over some pretty heavily textured walls, so you can see how it would look. https://smallstuffcounts.com/wp-content/uploads/2018/09/modern-navy-entryway-makeover-hri-7.jpg
Does the wall with take the 1×3 into account? The wall I am doing this in is 149” if I use the spacing with the 1x3s (144”) that’ll give me the 6 squares across. Should I go off the 144” or the 149”?
Hi, I think the idea of placing a “project board” or “fiber board” is a very handy way to deal with a slightly bumpy textured wall. I’ve been looking for a “fix” for this issue for months! Oh, by the way, is a project board the same as a fiber board, and is it coated with something first before painting…I’m thinking perhaps Paint Primer?
Thank you!!!
Hi, I think the idea of placing a “project board” or “fiber board” is a very handy way to deal with a slightly bumpy textured wall. I’ve been looking for a “fix” for this issue for months! Bu the way, is a project board the same as a fiber board, and is it coated with something first before painting…I’m thinking perhaps Paint Primer?
Thank you!!!
We’ve installed a few of these grid style walls for clients as an opportunity to accent a living space.
You are correct in using the 1×3 for most rooms. In our experience a 1×4 can be used depending if the wall and room can handle the size. Most rooms cannot.
Looks Great!