
I’ve been so excited to share this bathroom before and after with you! Our primary bathroom renovation has been a huge project in our 2025 remodel, and today I’m finally revealing the finished space – from the bland, dated “before” to the light, spa-like new bathroom we get to enjoy every day. This post walks you through our floor plan, tile, countertops, plumbing fixtures, light fixtures, and decor, and I’ll include affiliate links to our exact selections throughout the post.
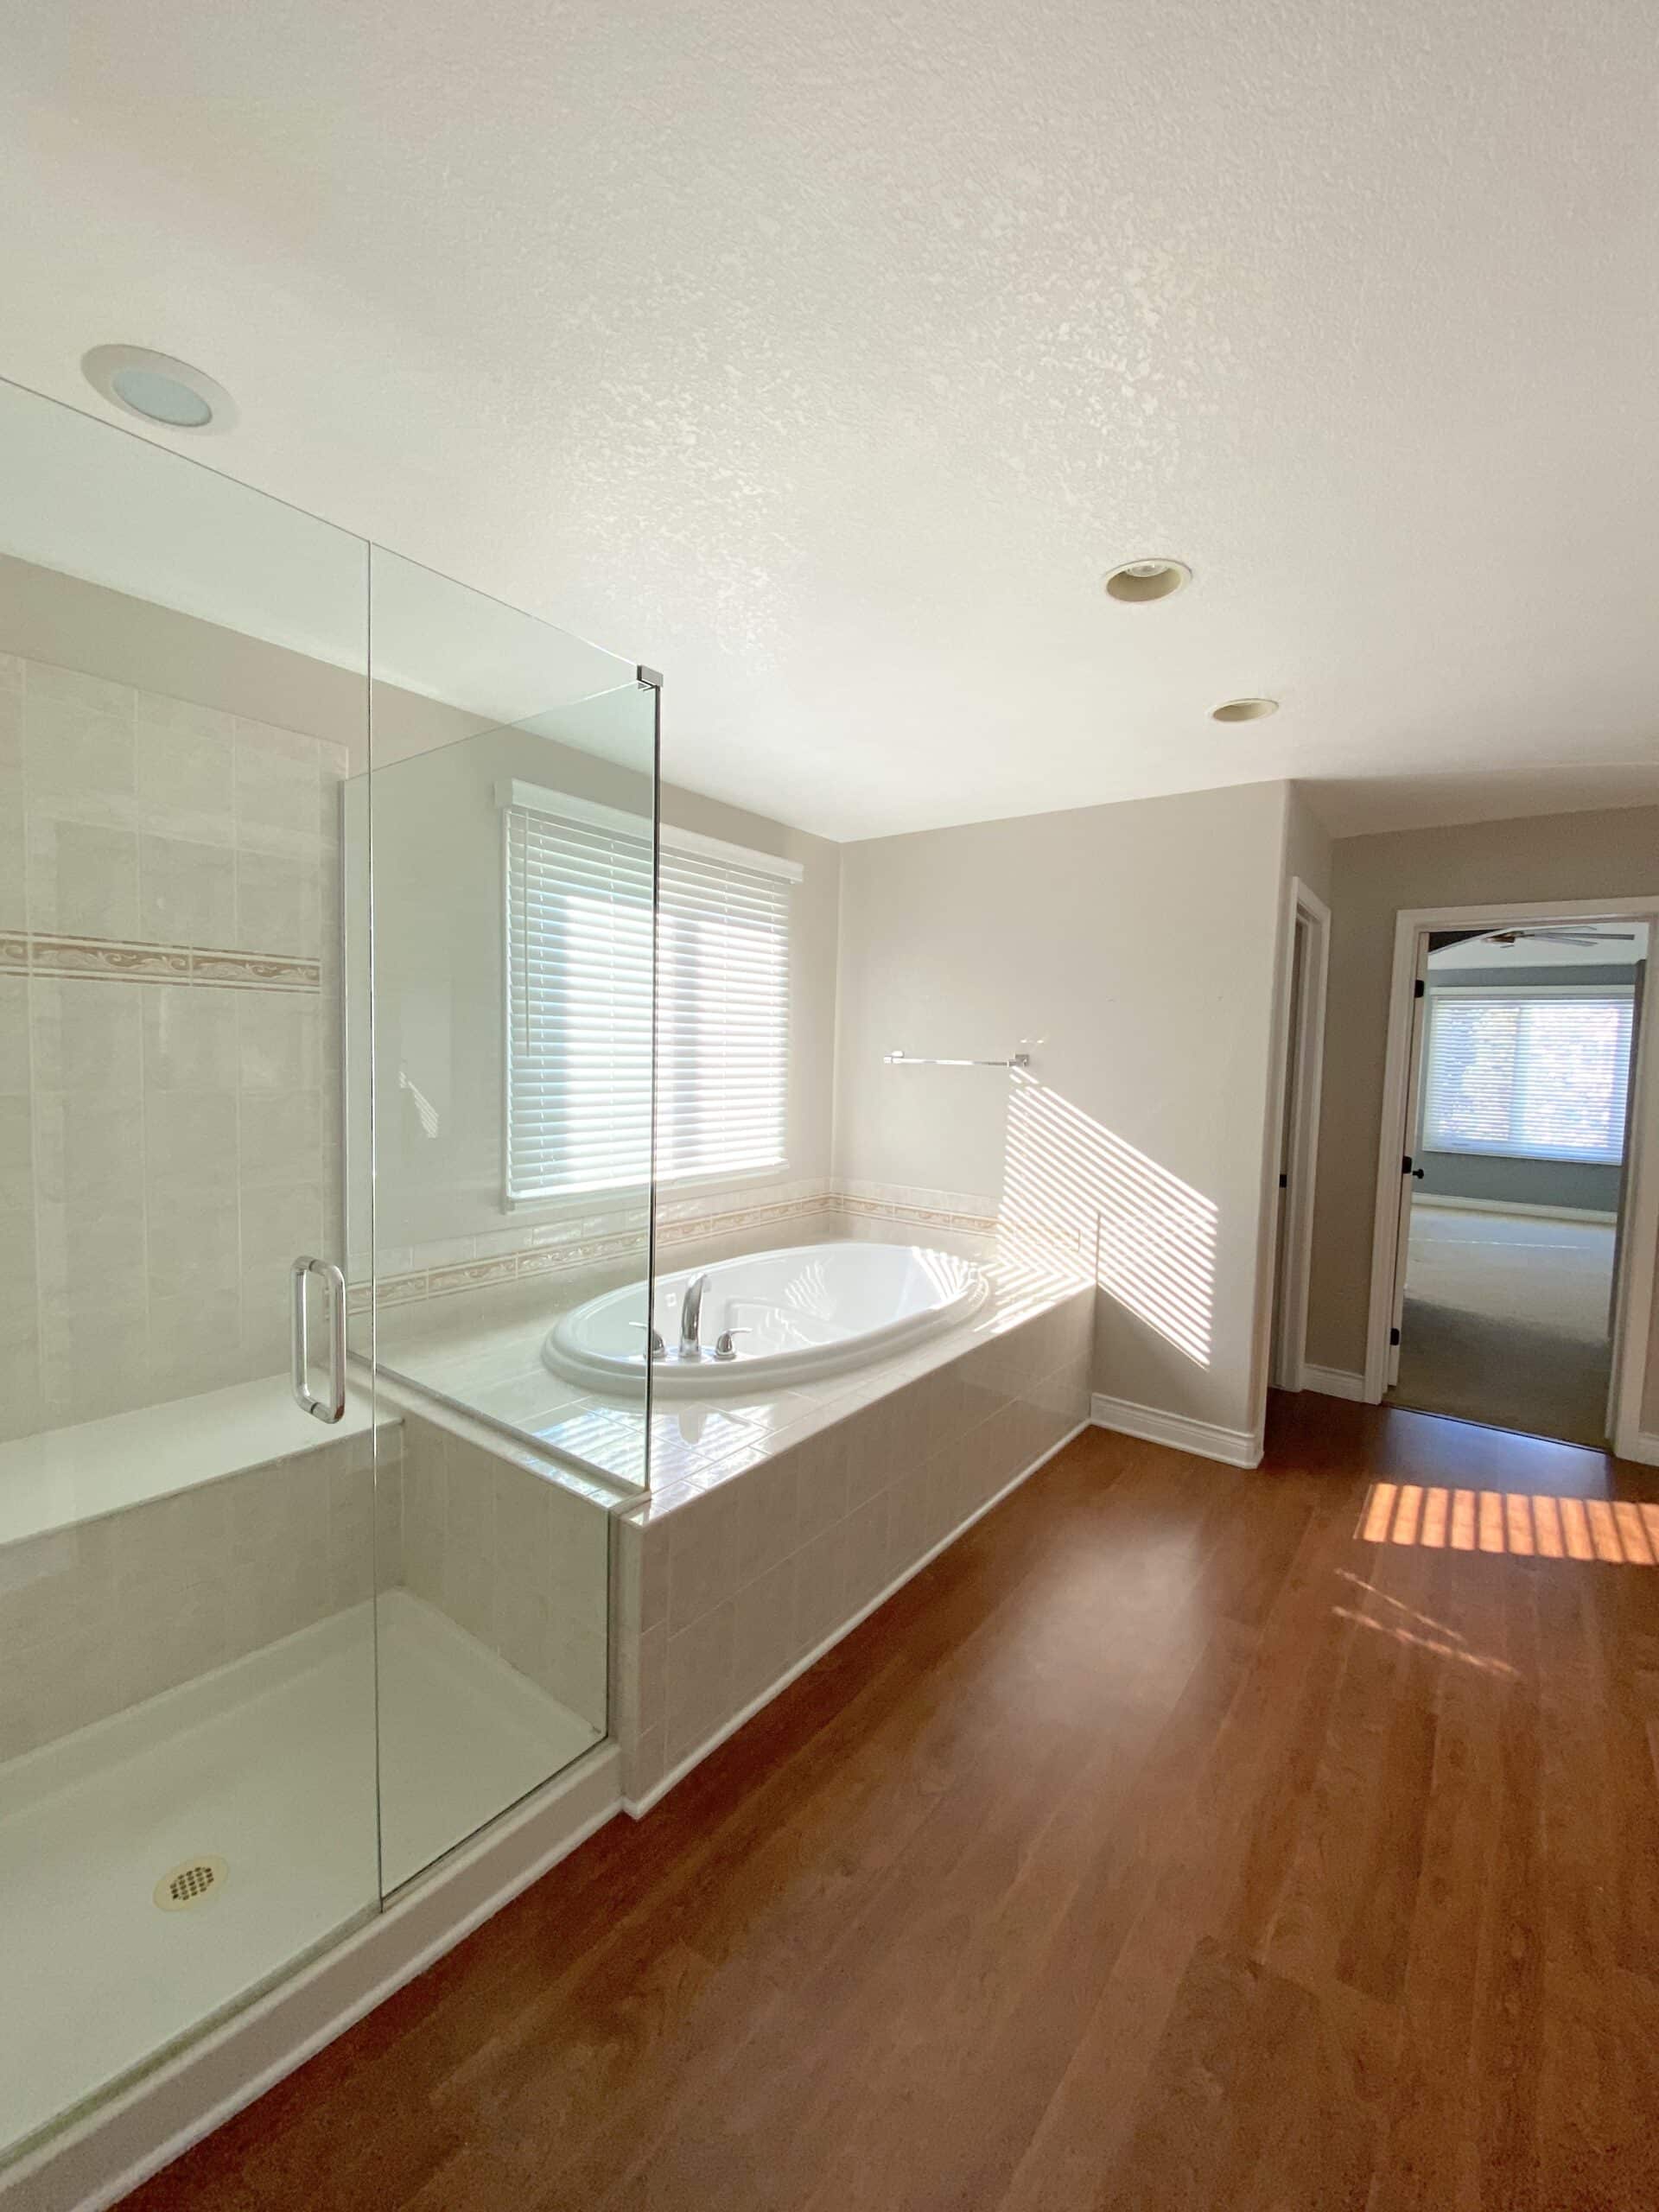
Our Primary Bathroom Before
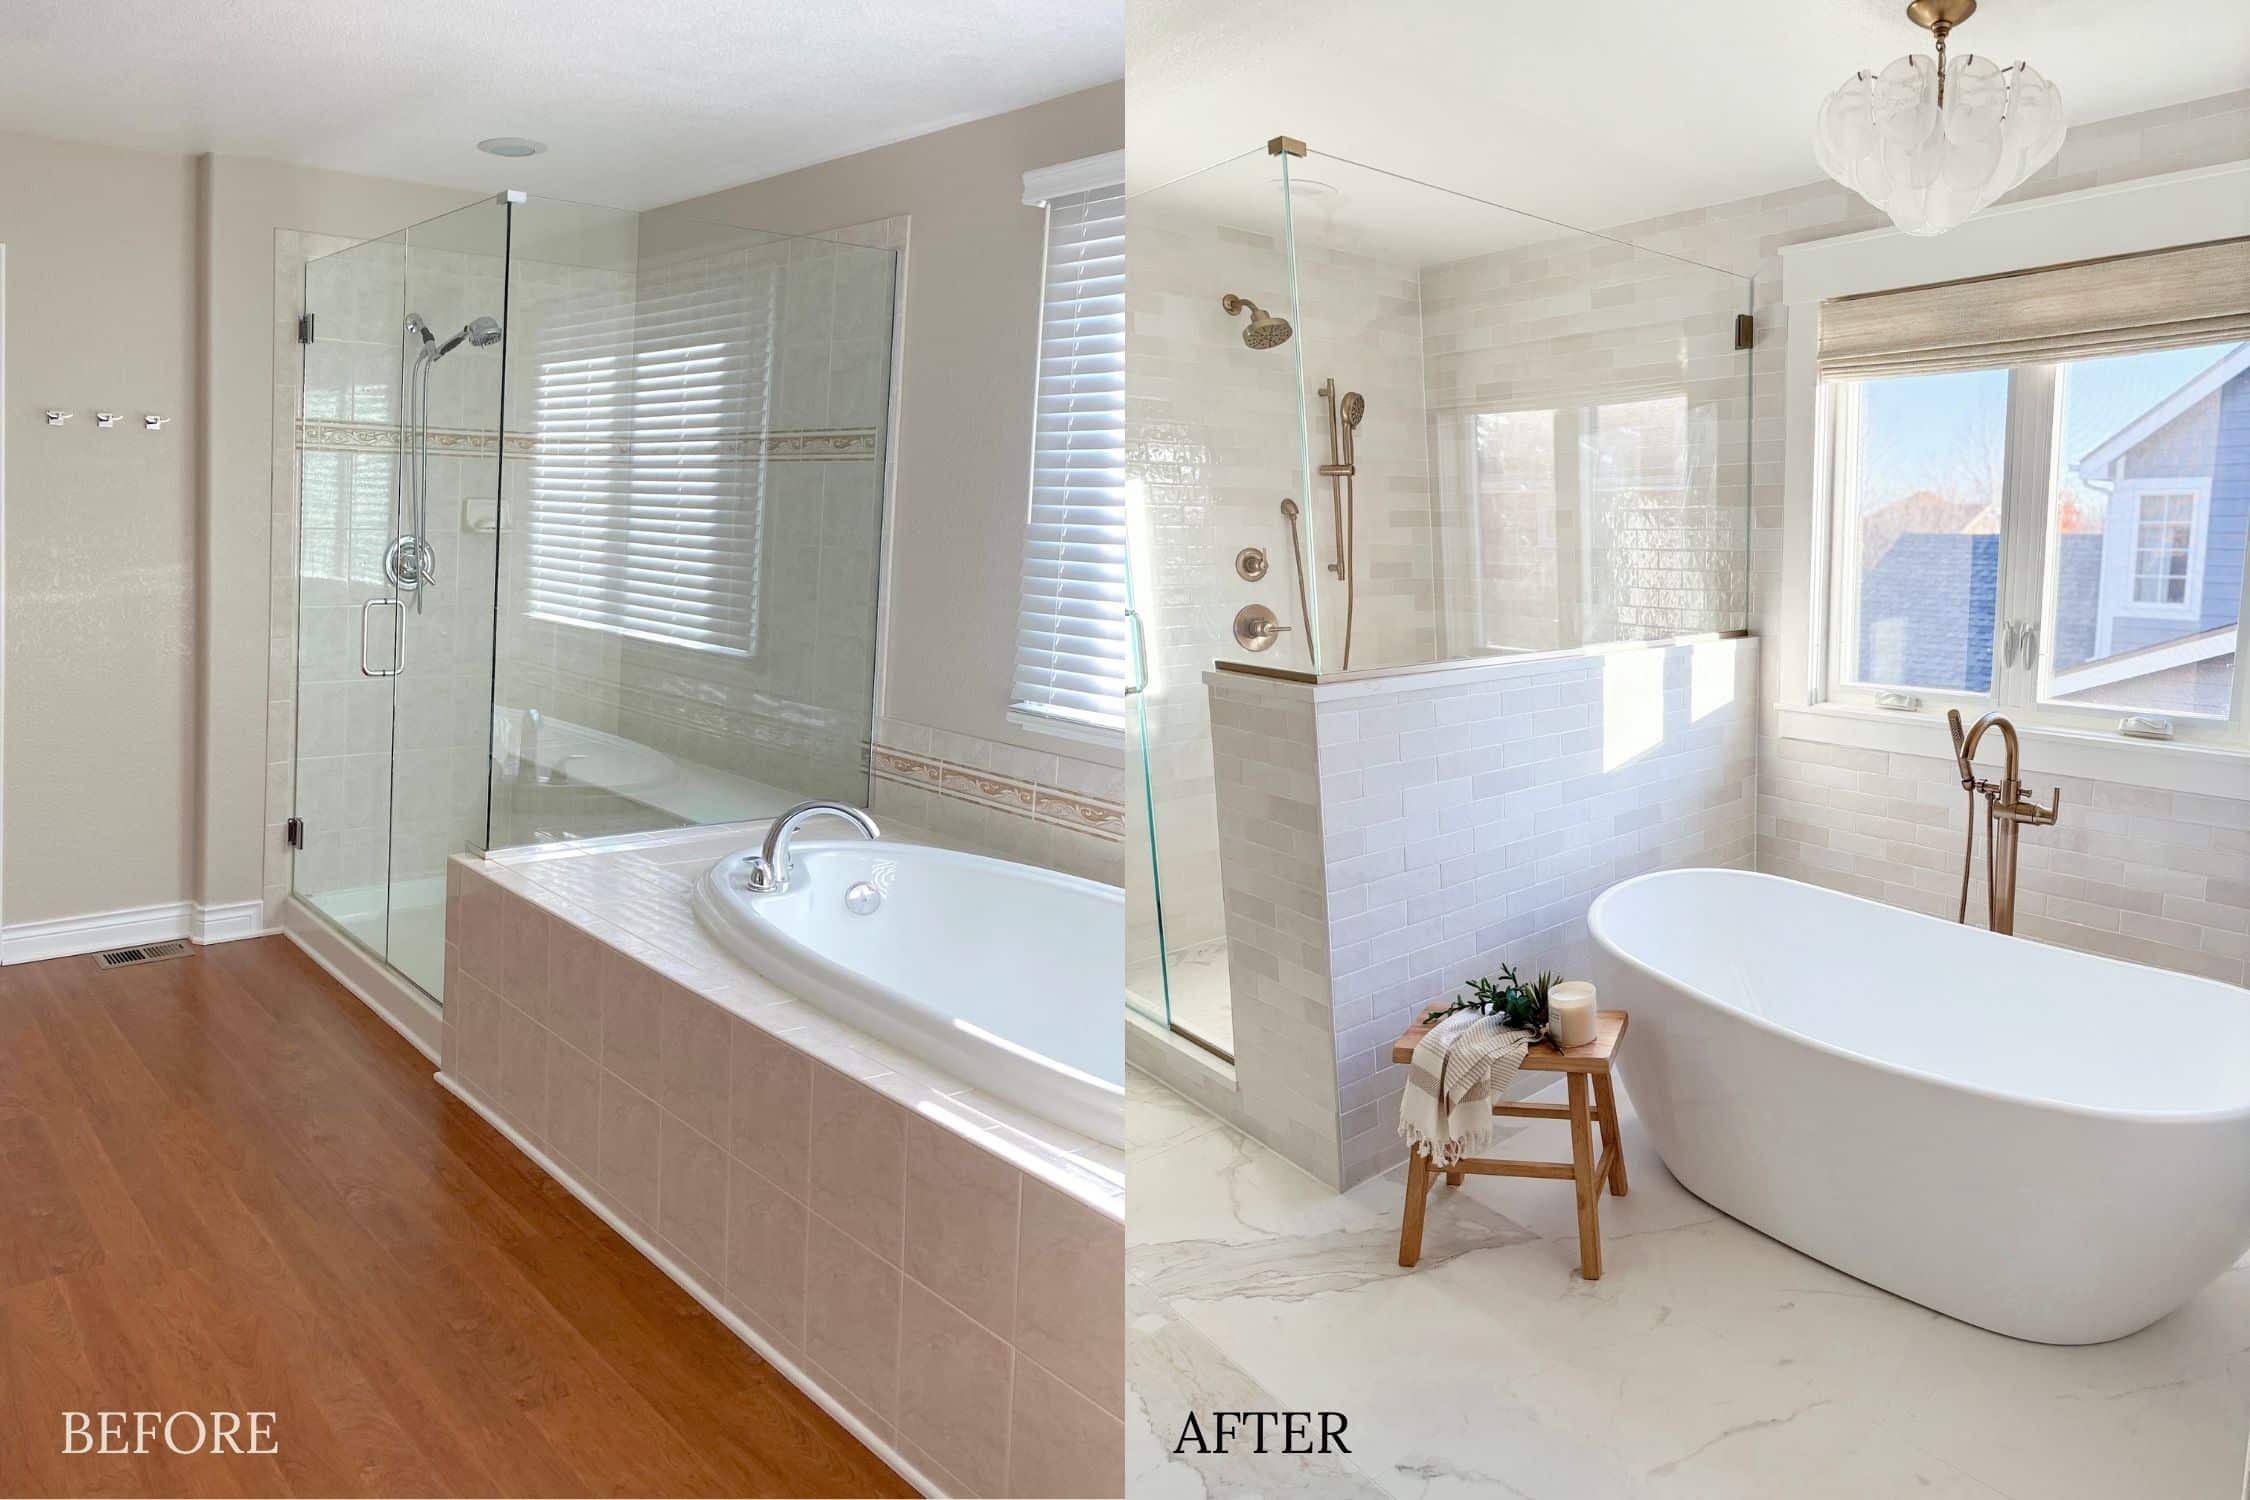
Let’s start with the “before,” because the bathroom makeover feels even more dramatic when you see where we started.
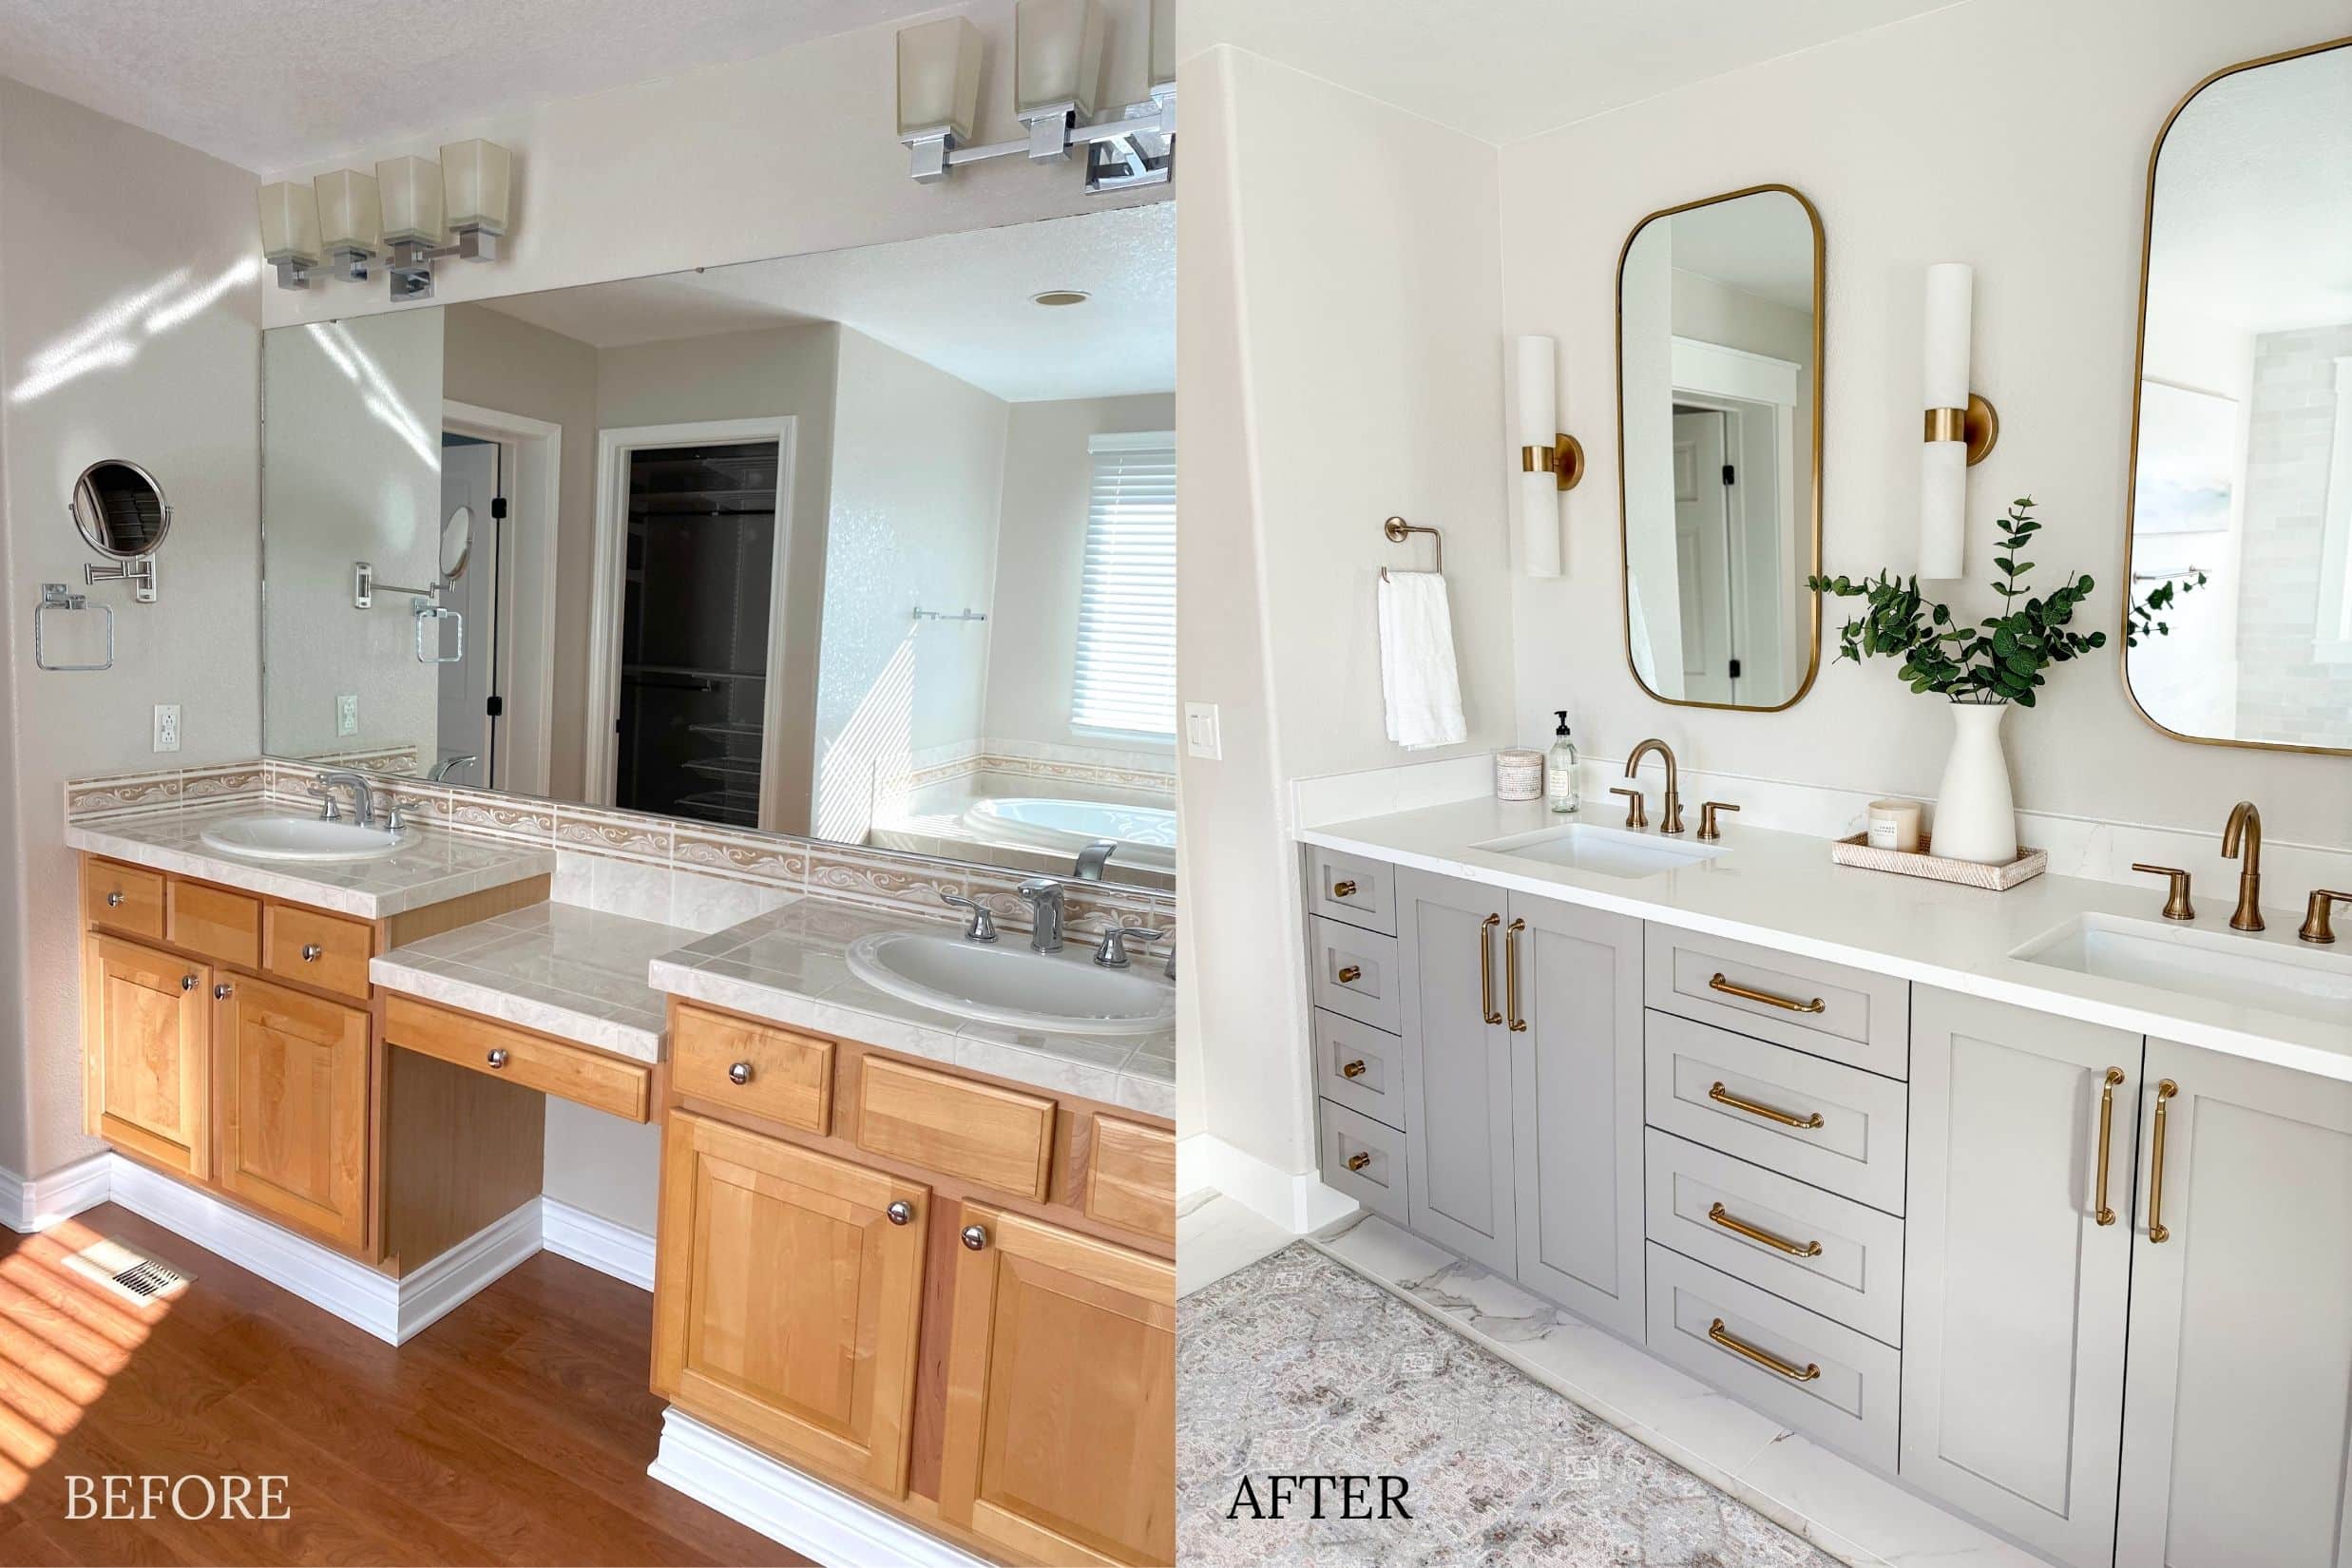
Our primary bathroom was a good size on paper, but the finishes made it feel tired and uninspiring. We had plastic wood-look Pergo flooring, a big built-in tub with a bulky surround, a two-level vanity, and a shower that felt more utilitarian than relaxing. It definitely didn’t match the “California Casual meets Modern Coastal” style I love.
We decided early on that we wouldn’t move plumbing. The sinks, shower, and toilet stayed in the same general locations to keep costs under control. But functionally, this was still a full gut renovation: everything came out down to the subfloor and wall studs so we could rebuild the room with a cleaner layout, better materials, and a more modern, spa-like bathroom feel.

The New Floor Plan & Overall Bathroom Feel
The floor plan of our primary bathroom stayed similar, but the feeling of the room is completely different.
- The old built-in tub and surround were removed and replaced with a sleek freestanding tub.
- The shower kept roughly the same footprint, but we reworked the bench and added a half wall between the shower and tub.
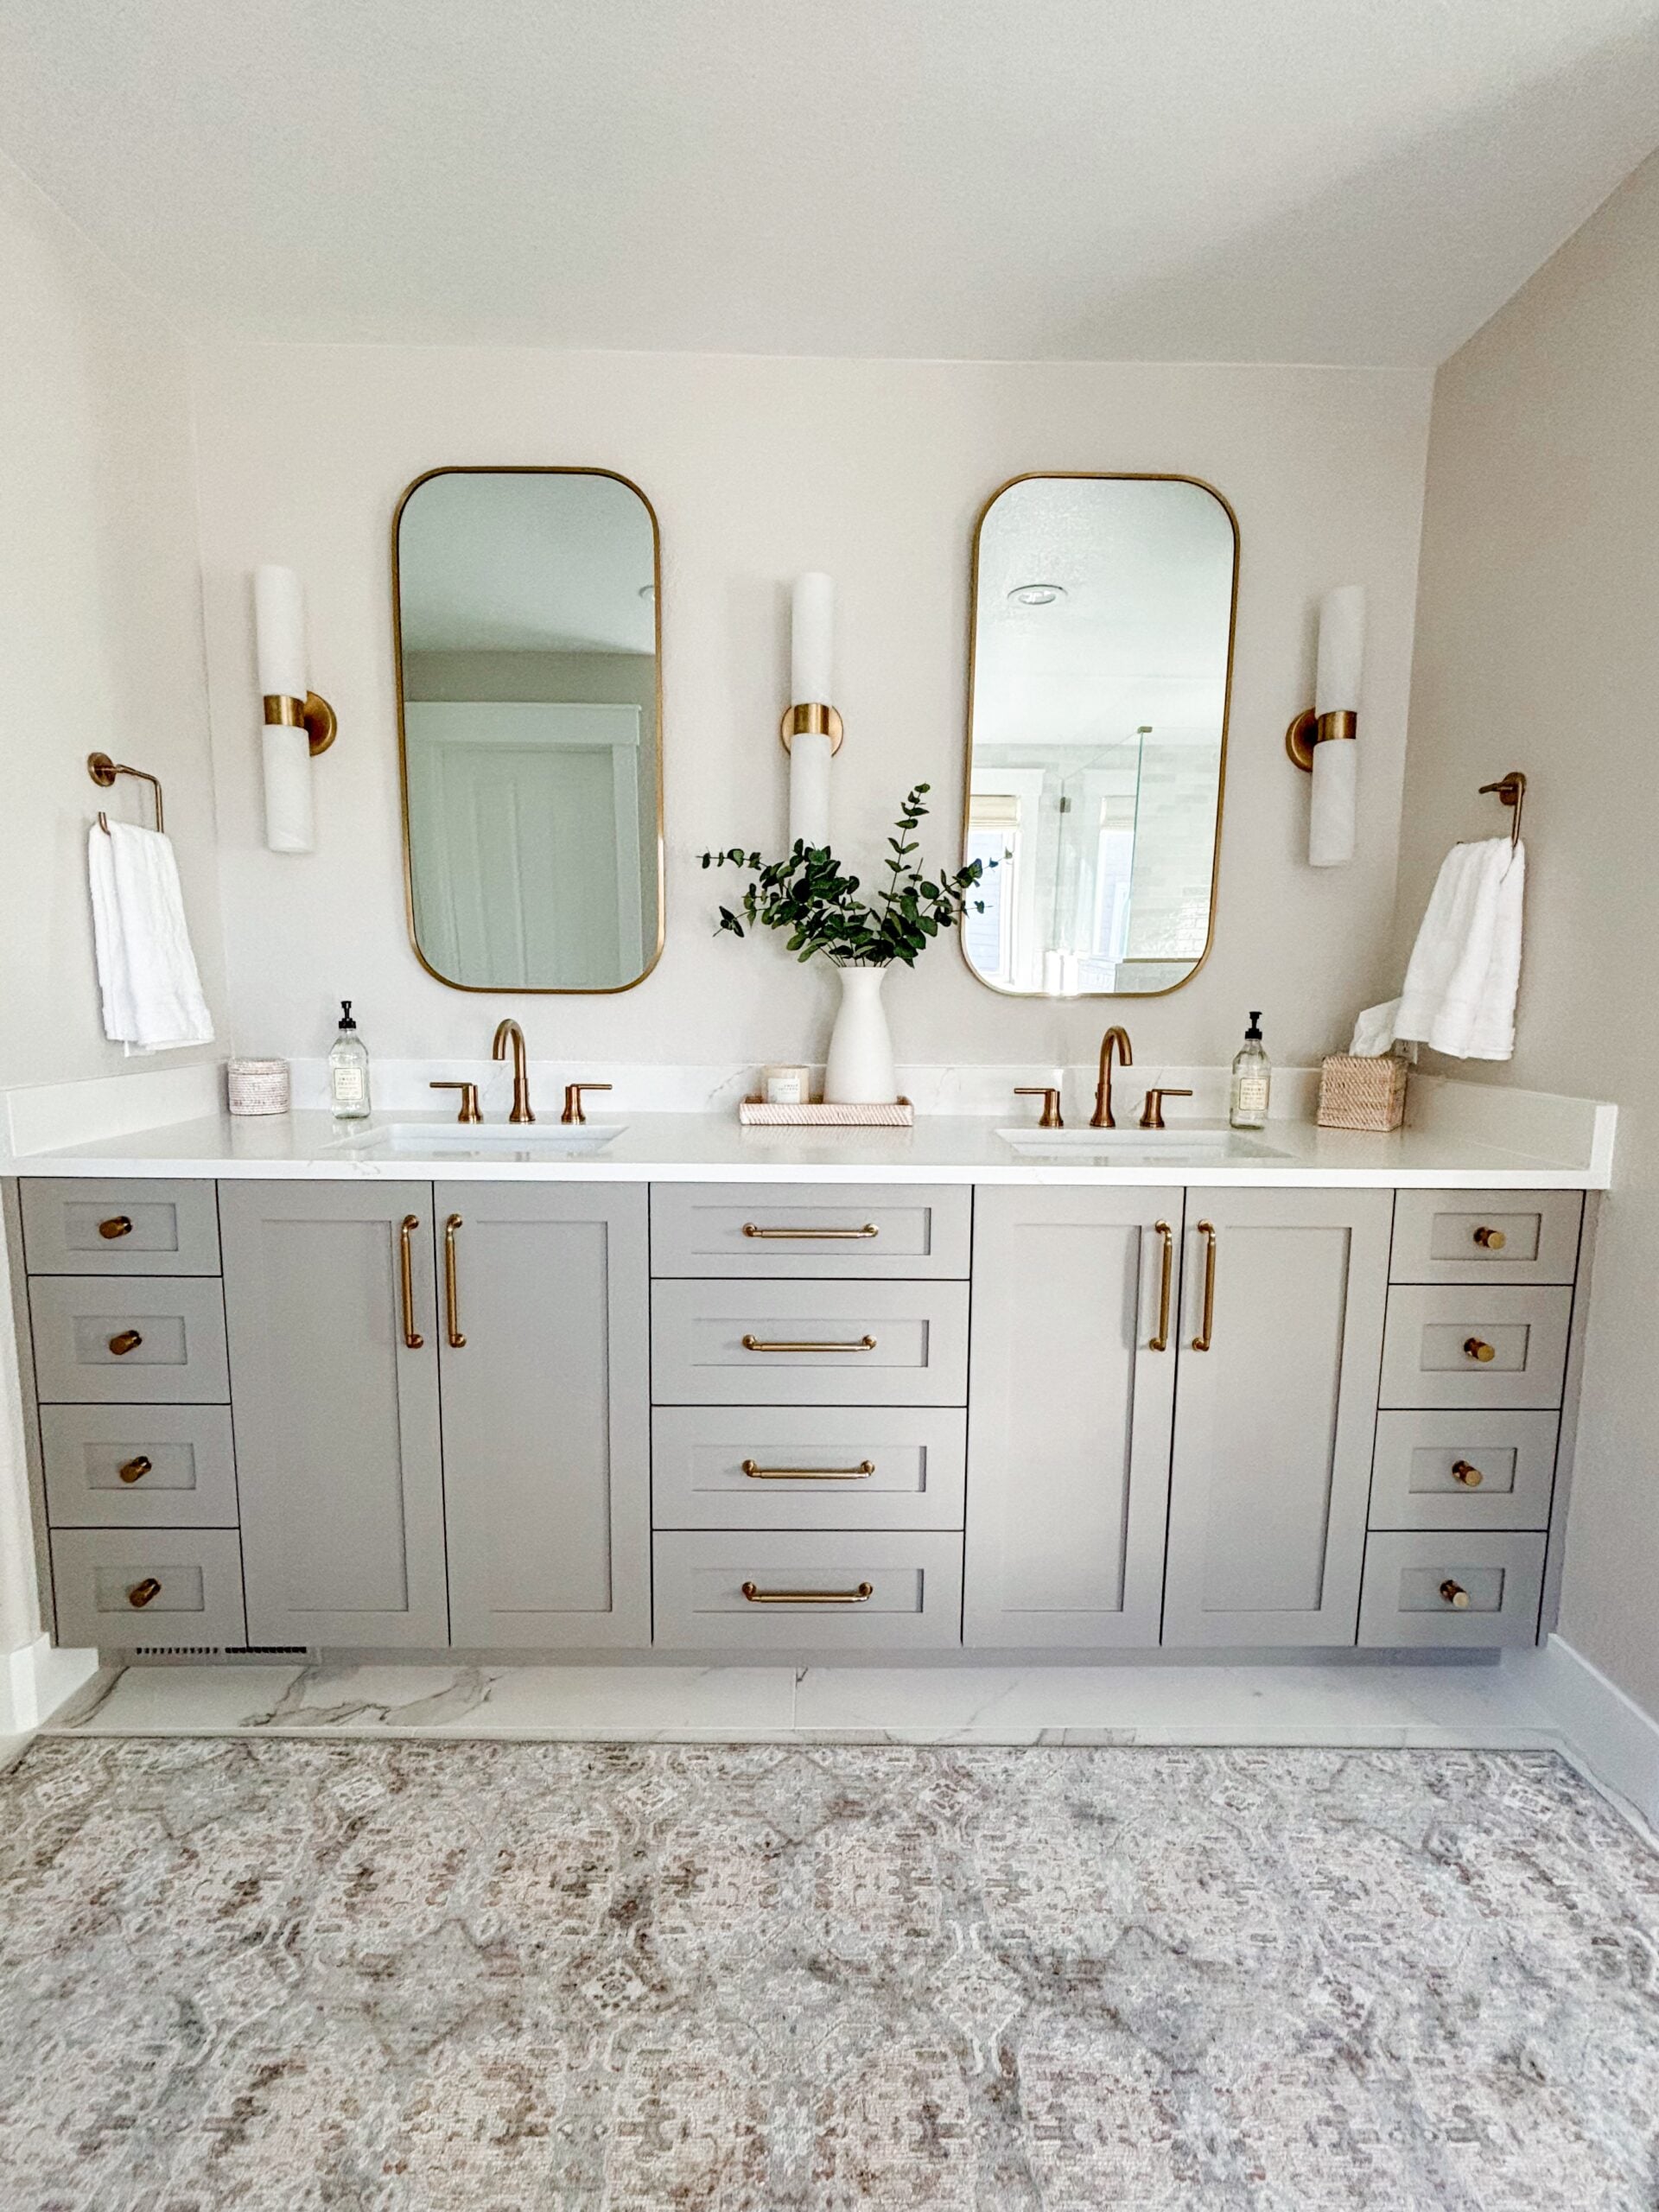
- The double vanity stayed in the same location, but we swapped the dated two-level top for a single, long countertop and new cabinetry.
- Our private water closet got a functional upgrade: a pocket door, which makes the small space so much easier to access.

Instead of feeling choppy and dated, the primary bathroom now feels bright, open, and cohesive. It’s a calm retreat that still handles real life and our daily routine.
Our Primary Bathroom After
Drumroll please…here is our new and improved primary bathroom! I’m so happy with the way it turned out. From the clean lines, to the spacious shower, to the sophisticated new finishes, this bathroom is one of the most beautiful spaces in our new home.
- Design Credit: Welsh Design Studio
- Construction/Contractor Credit: Natural Construction
- Custom Cabinetry: Ilnicki Woodworks
The Floor Tile
One of the most important decisions in any bathroom renovation is the floor tile. It sets the tone for the entire room.
We ripped out the old Pergo and replaced it with a large-format, marble-look porcelain tile in a honed finish. The larger size means fewer grout lines (translation: easier to keep clean), and the subtle veining gives us that classic marble look without the maintenance worries.
- Floor tile: large-format marble-look porcelain, honed finish (source: Bedrosians Magnifica 24″ x 48″ – 8mm Honed Porcelain Tile in Calacatta Super White)
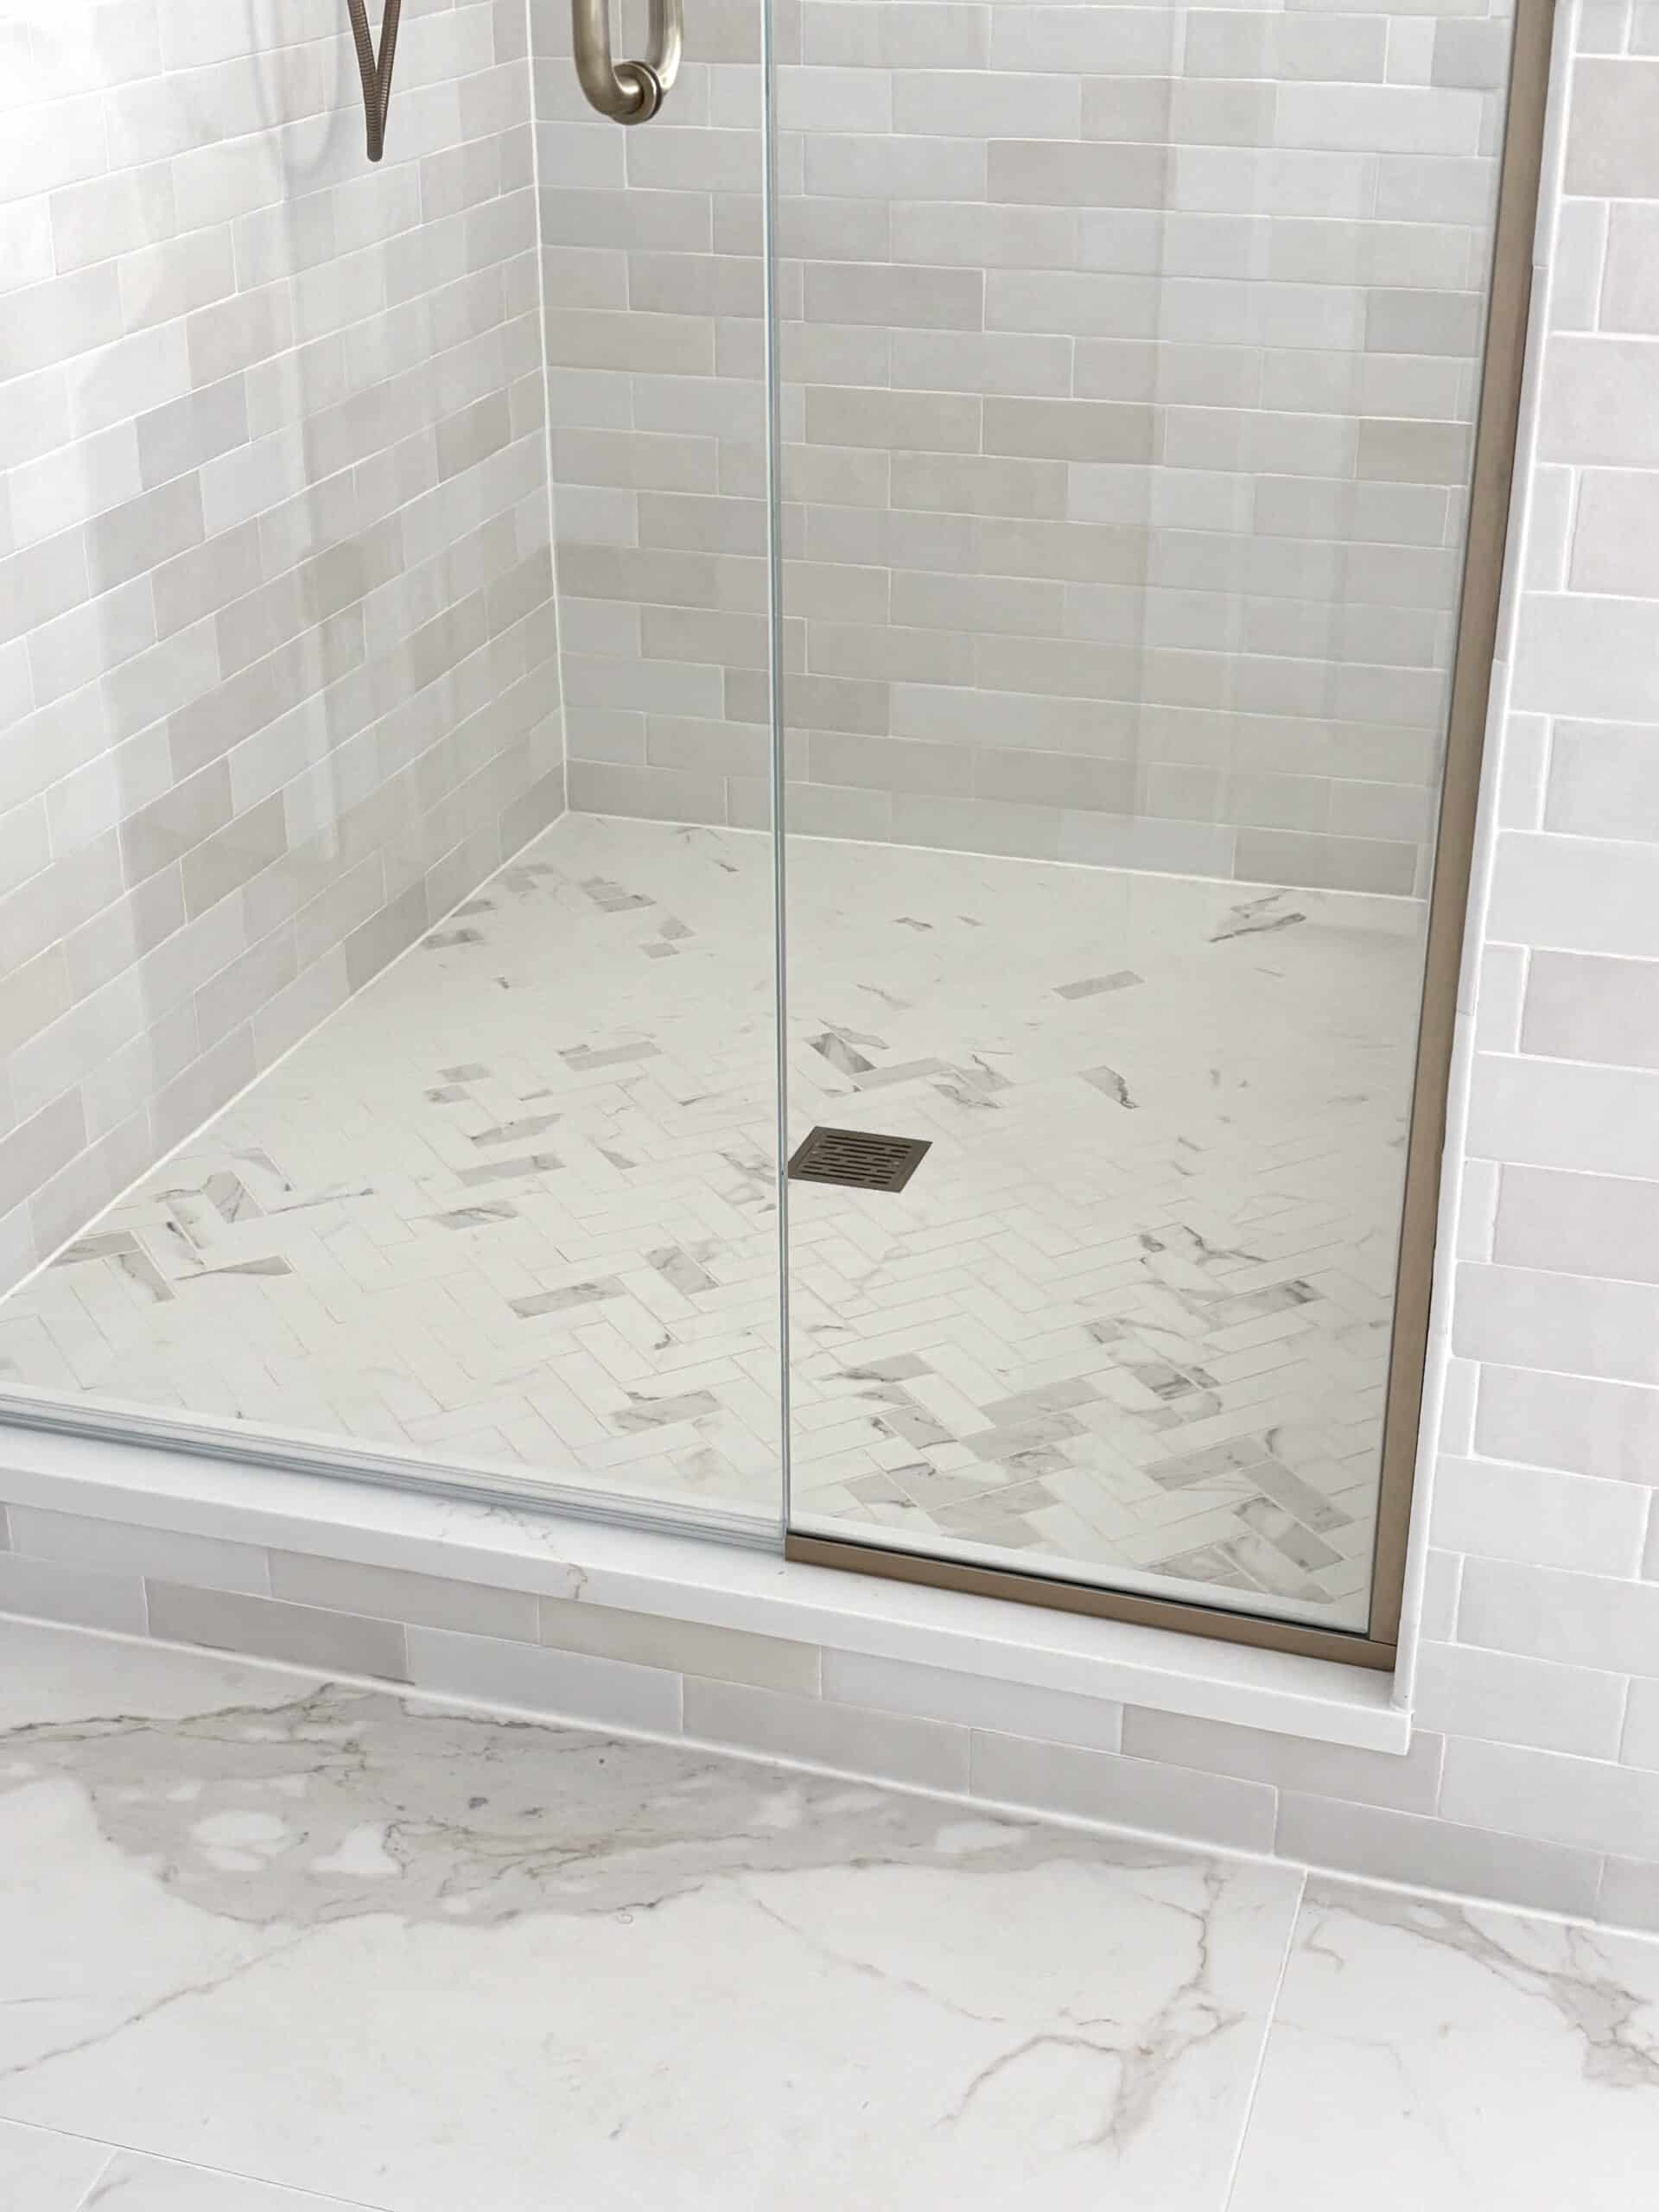
- Shower floor tile: same tile in a smaller 1″ x 4″ herringbone pattern (Magnifica 1″ x 4″ Honed Herringbone Porcelain Mosaic Tile in Calacatta Super White)
Using the same material in a different format on the shower floor ties everything together but adds just enough pattern to keep the space interesting.
Floor Tile | Shower Floor Tile | Shower Wall Tile
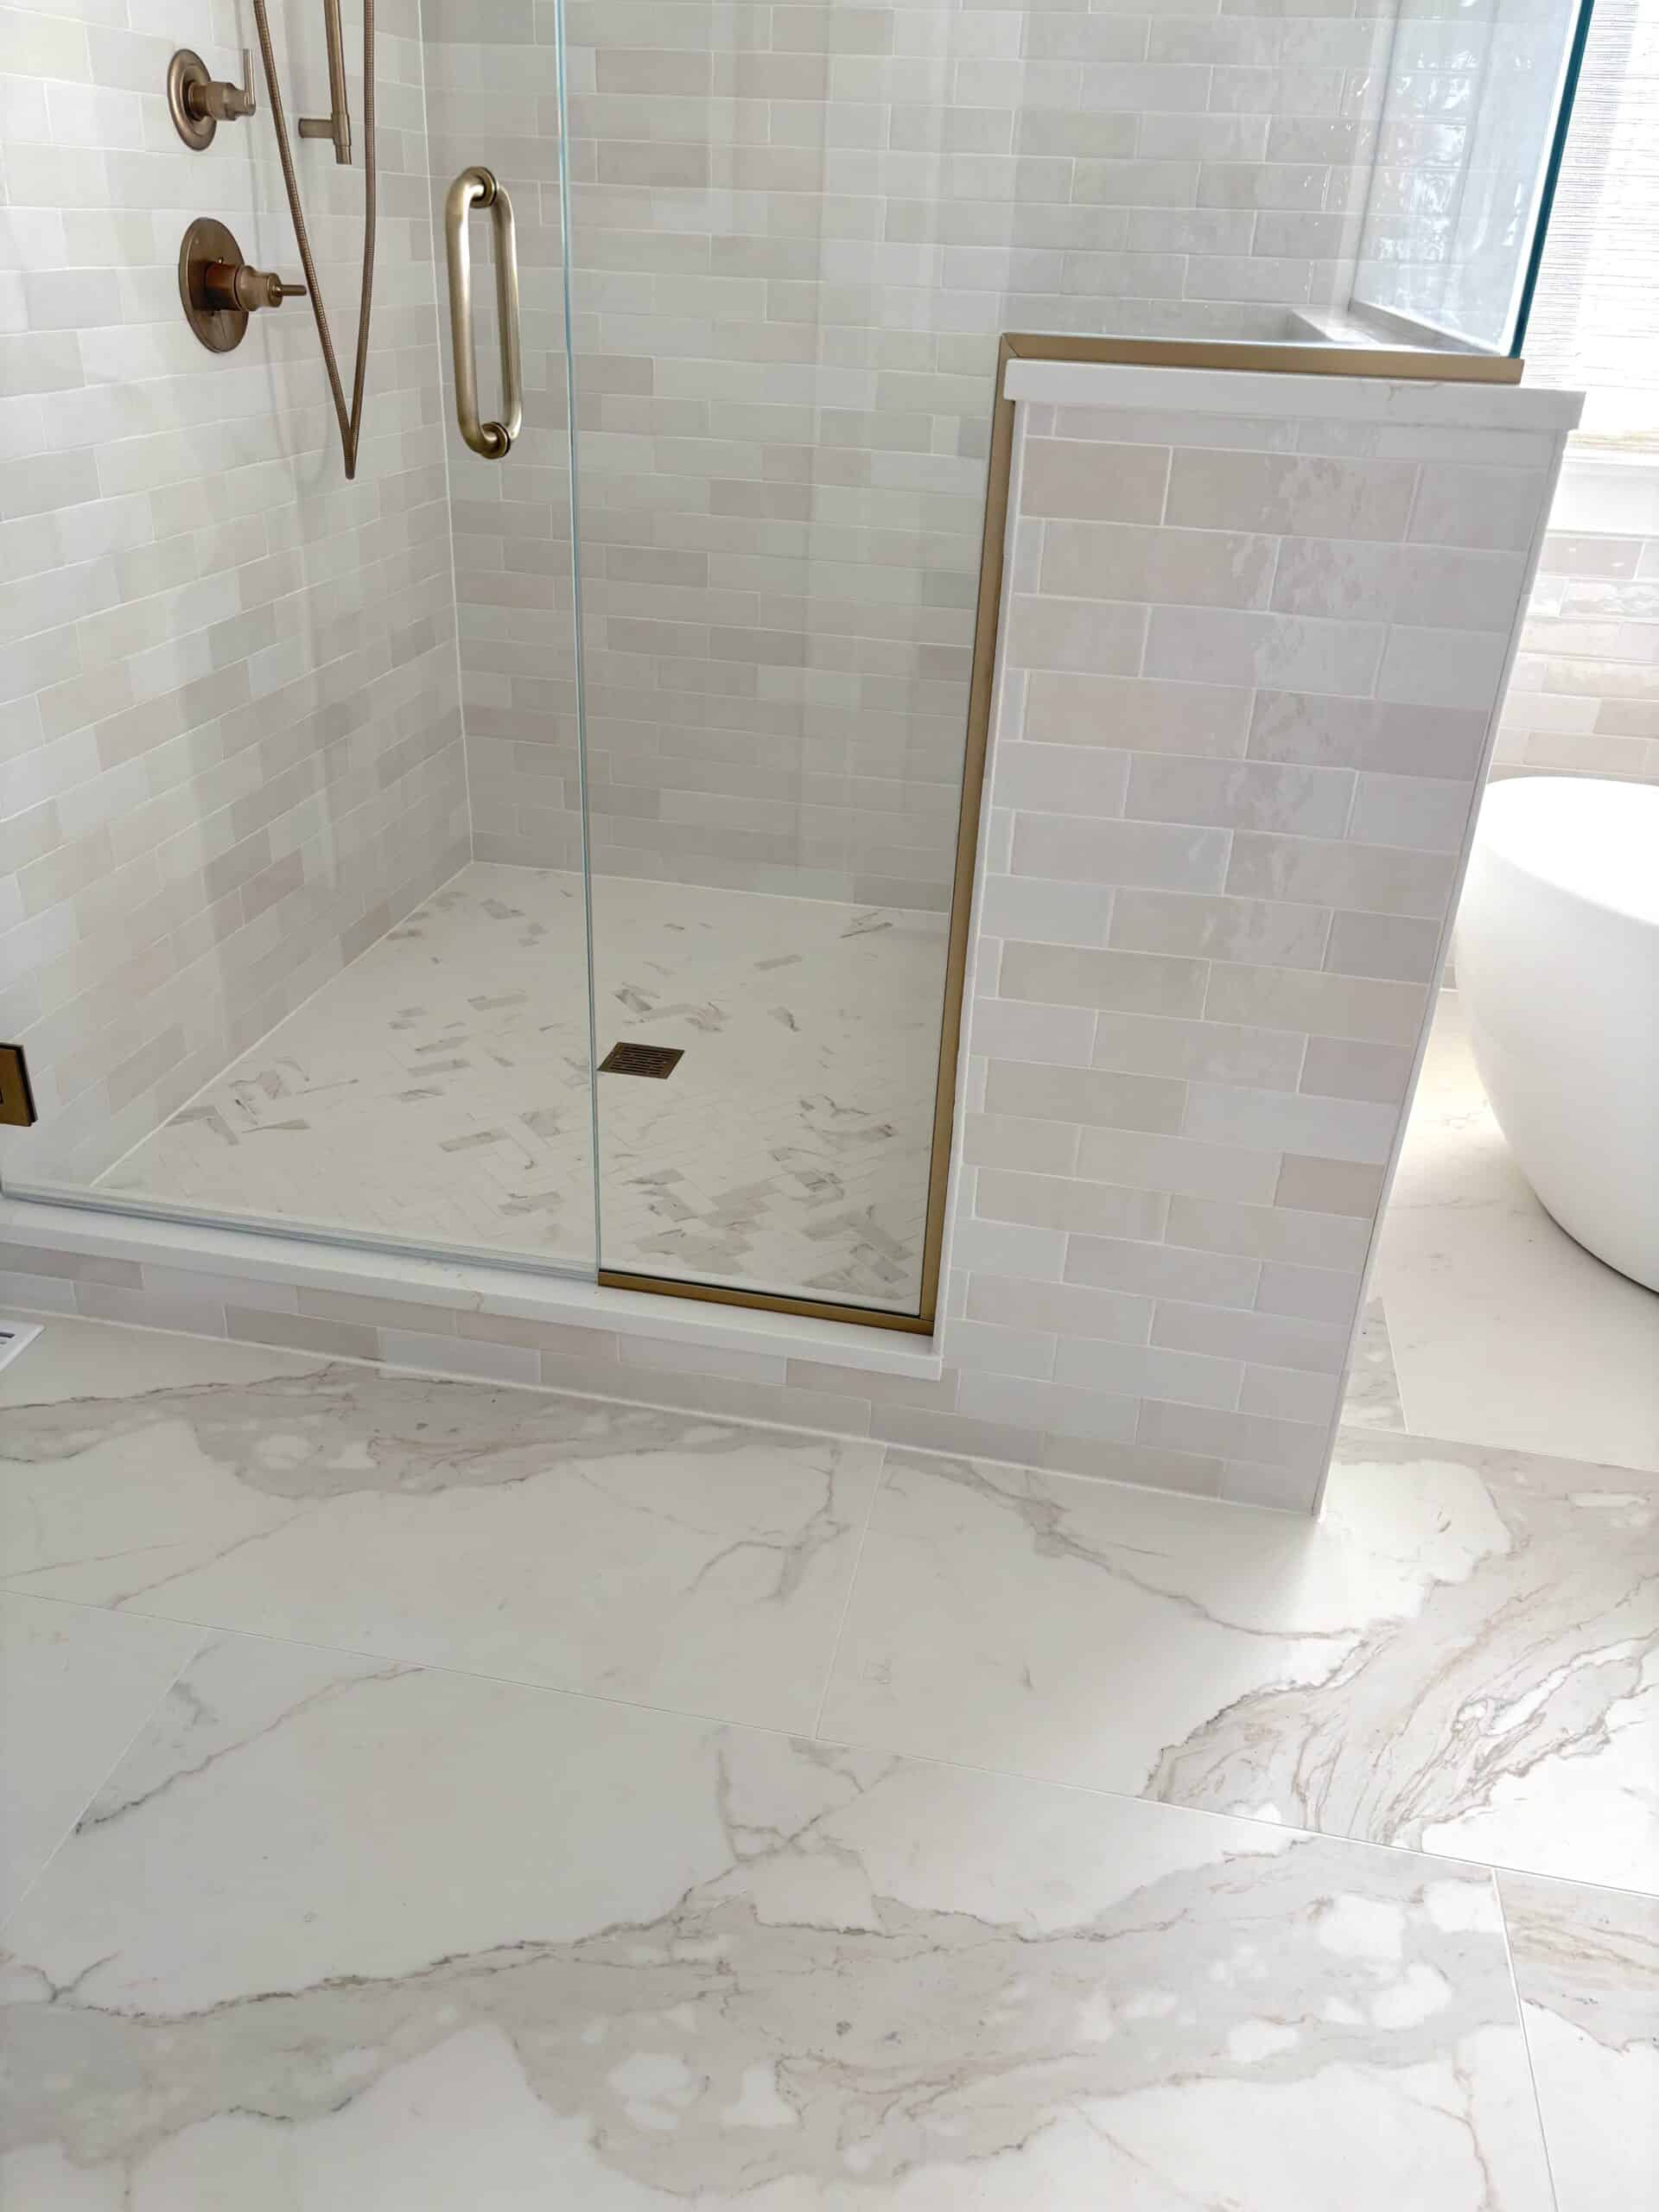
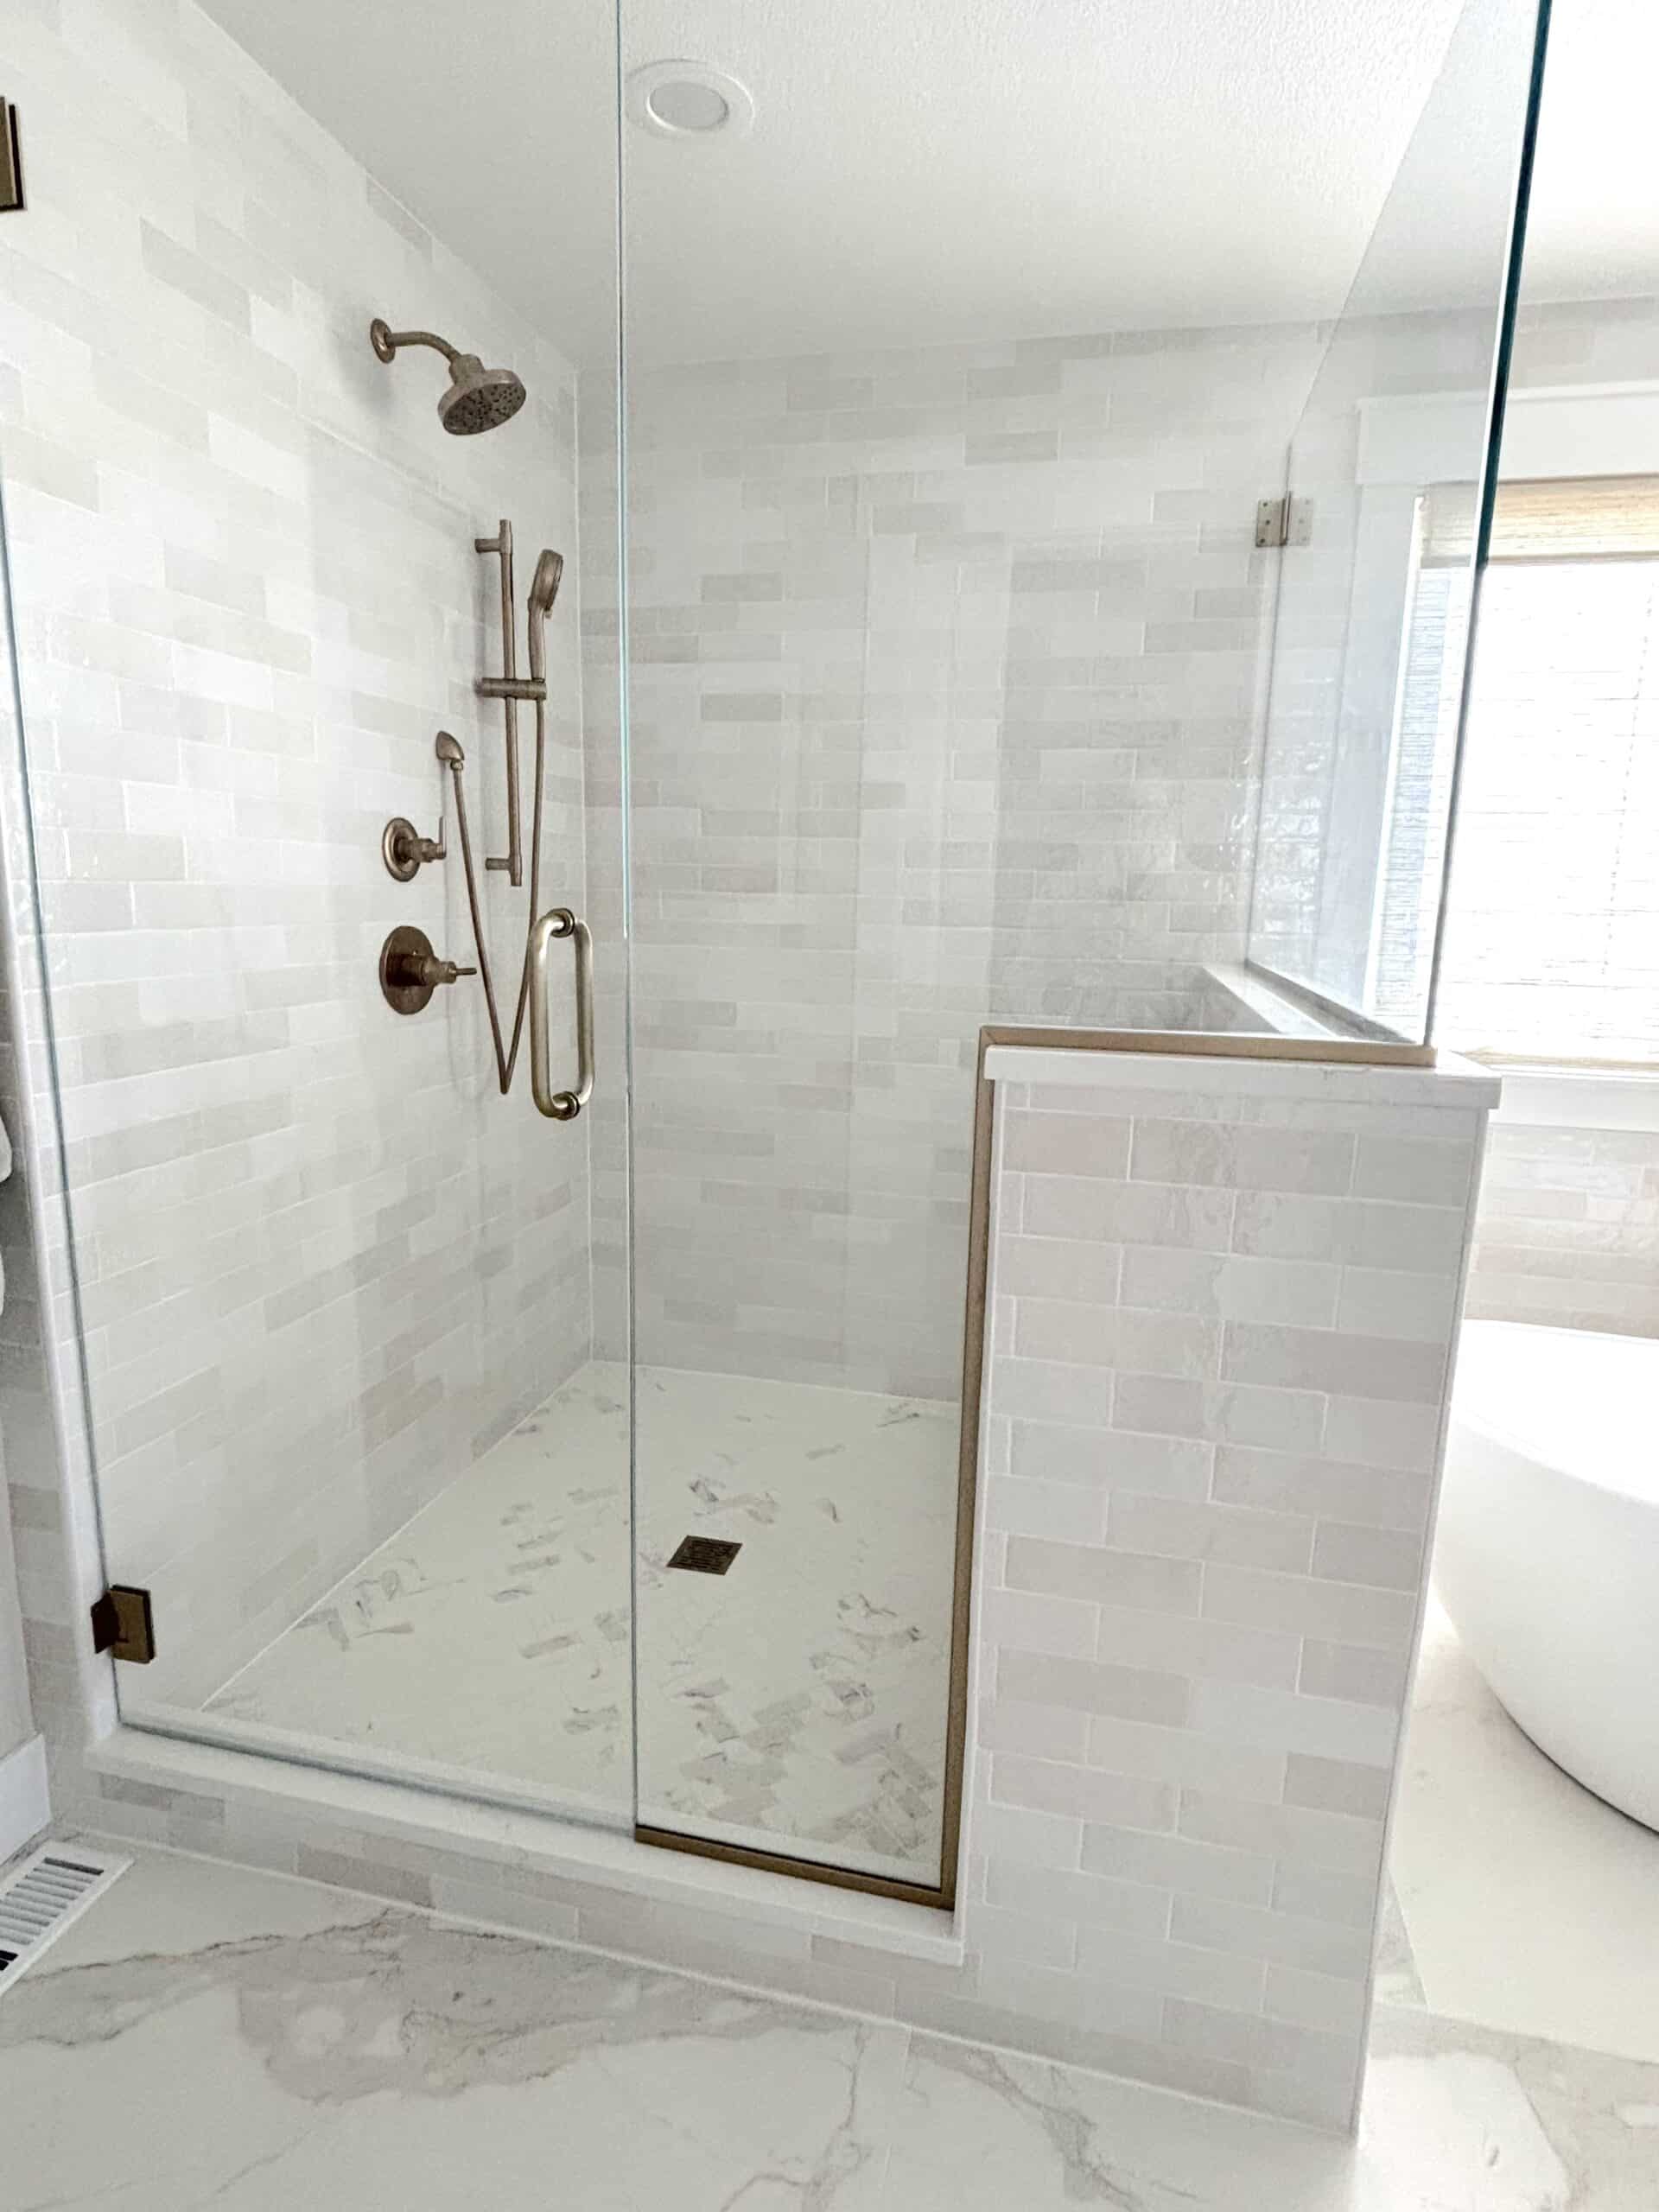
Our Shower Upgrade
Our new walk-in shower is absolutely one of the best parts of this bathroom renovation. The size is similar to what we had before, but the materials and details make it feel like a completely different space. We also relocated the bench from the side to the back of the shower, which makes it feel more spacious than before.
For the walls, I chose the tile I’ve been swooning over for years: Cloe tile from Bedrosians. It’s a glossy, tonal subway tile with beautiful color variation that feels both modern and timeless. We used it on the shower walls and the tub surround for a seamless, spa-like look.
- Shower tiles: Cloé 2.5″ x 8″ Glossy Ceramic Tile in White (glossy tonal subway)
- Shower floor: Magnifica 1″ x 4″ Honed Herringbone Porcelain Mosaic Tile in Calacatta Super White
- Bench top, ledge, and curb: MSI Calacatta Miraggio Gold quartz (to match our countertops)
- Shower Fixtures: Delta Trinsic in Champagne Bronze finish
- Grout: Bright White
The Cloe tile bounces all the natural light around the room and adds a subtle texture that’s gorgeous in person. It’s one of those materials that looks good in photos, but even better when you’re standing in the space.
Shower Floor Tile | Shower Wall Tile | Shower Head | Hand Shower | Shower Valve Trim
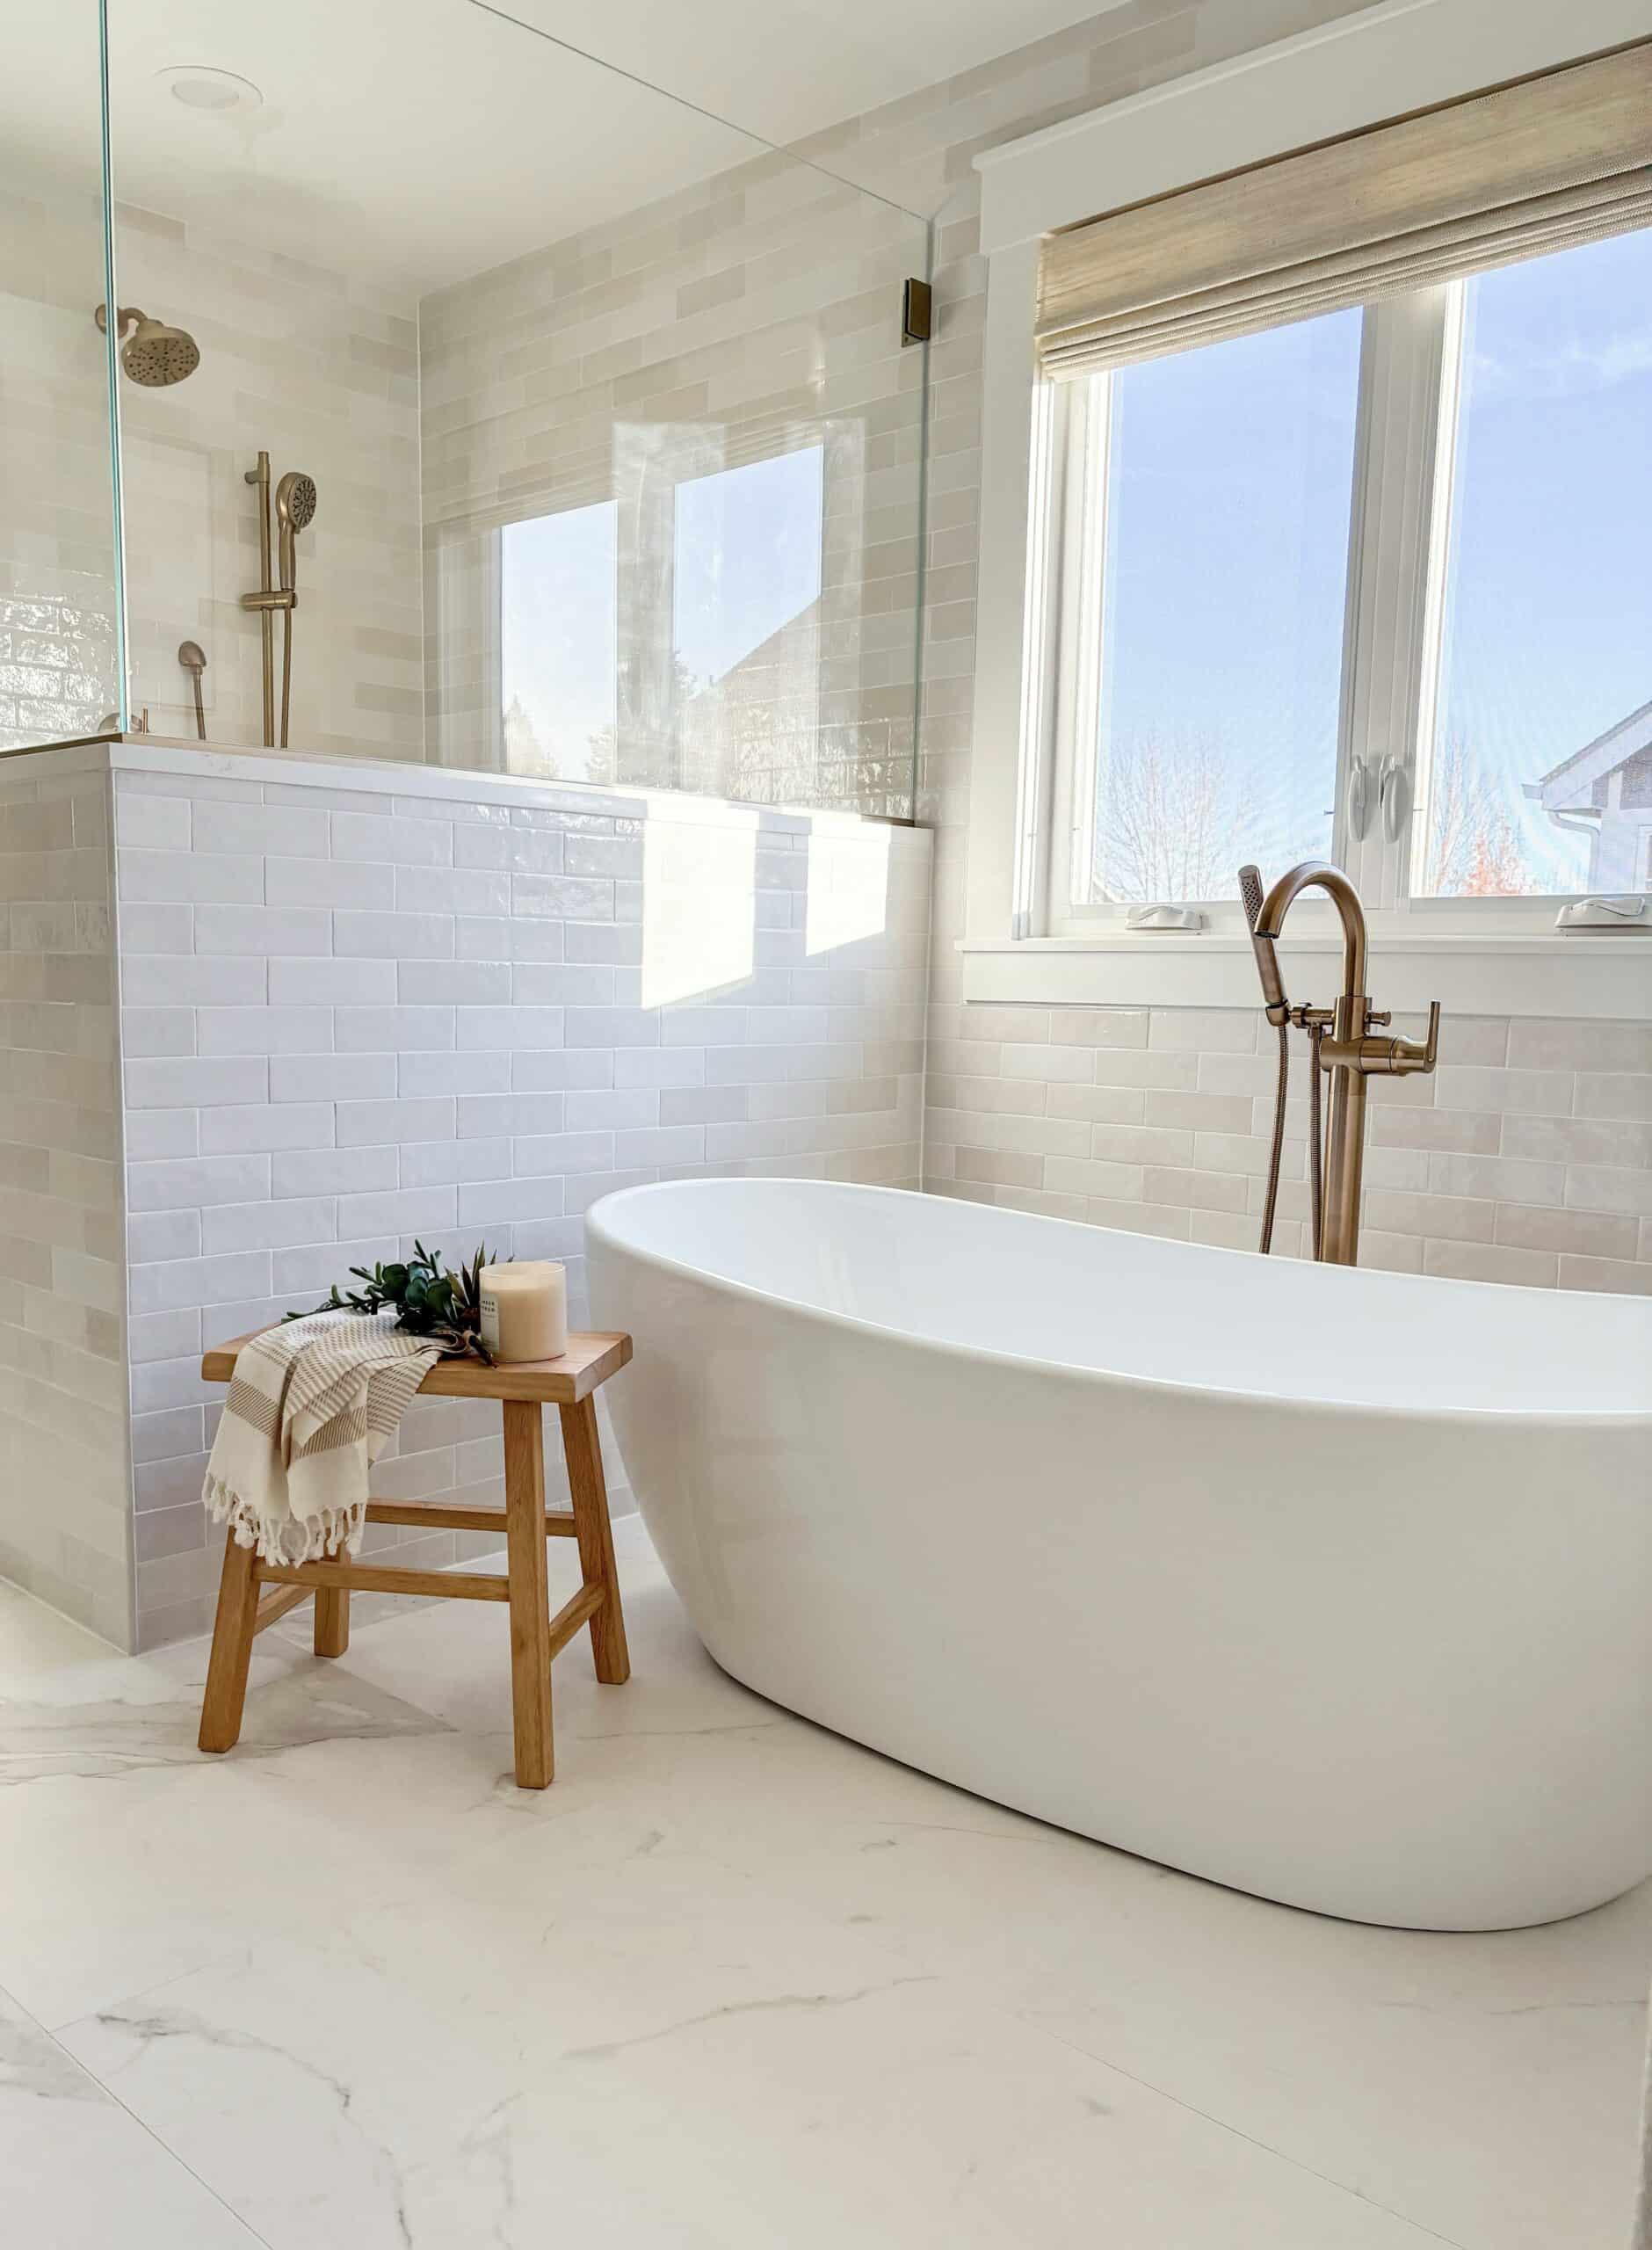
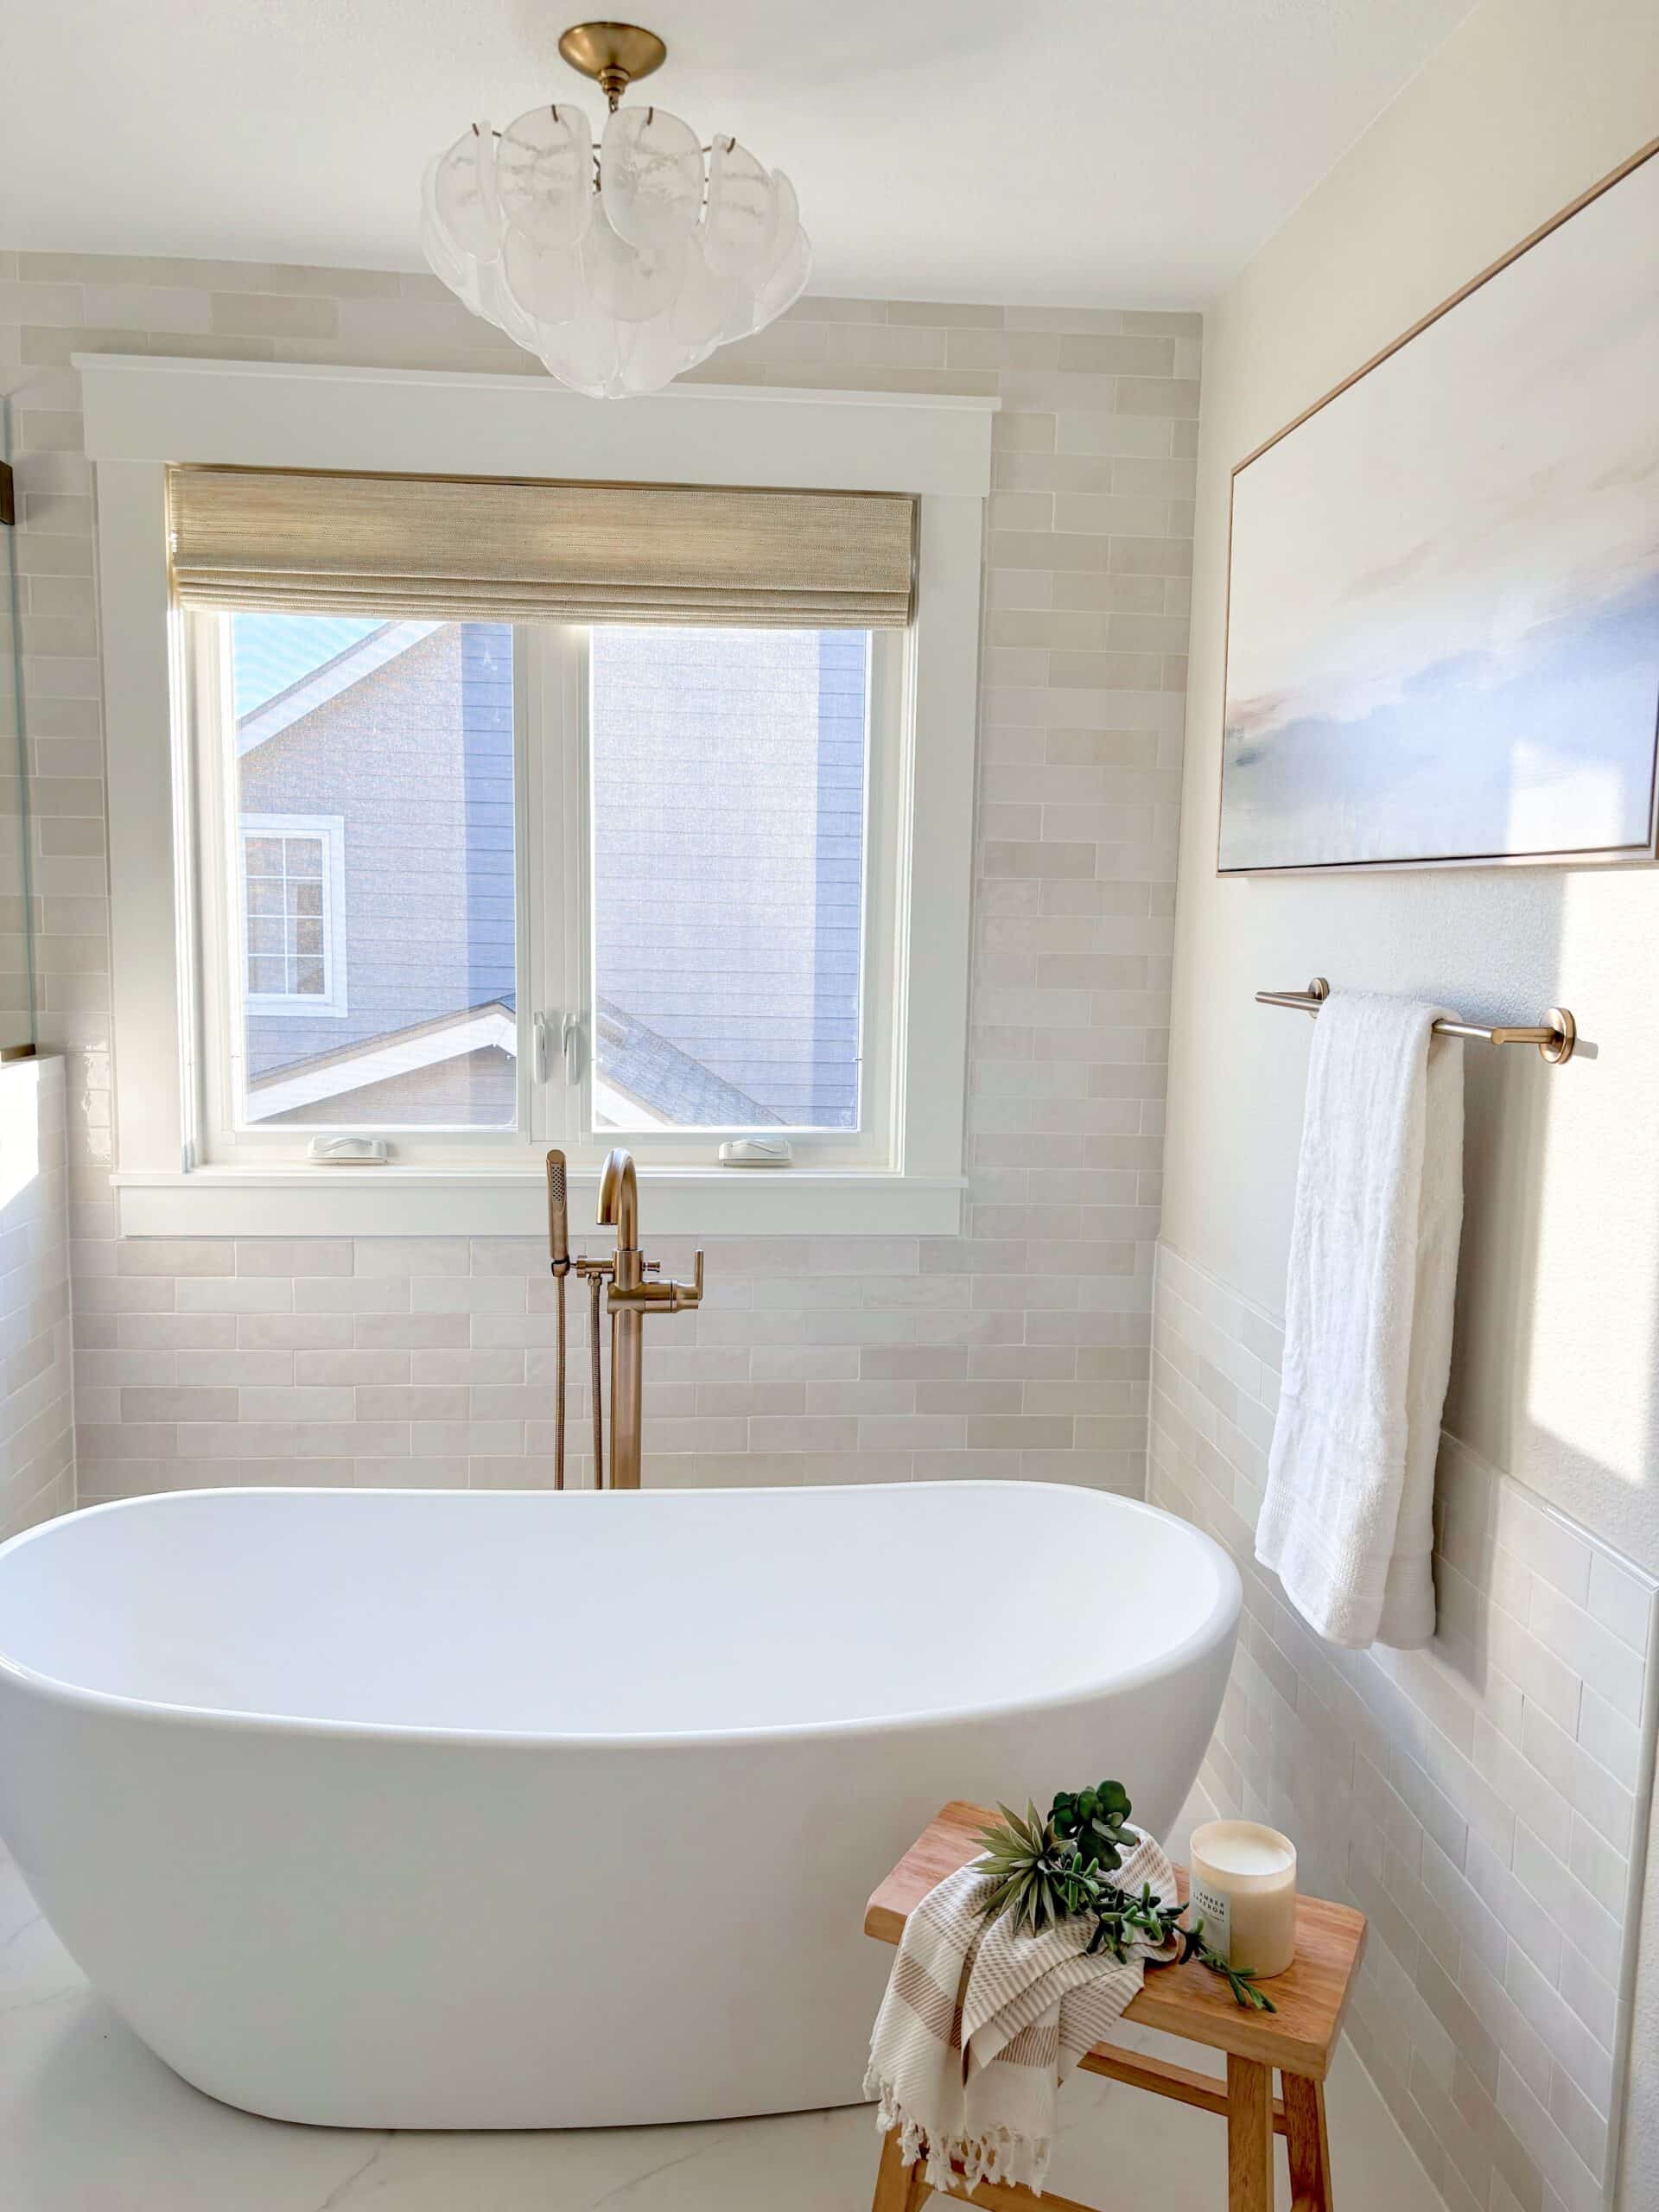
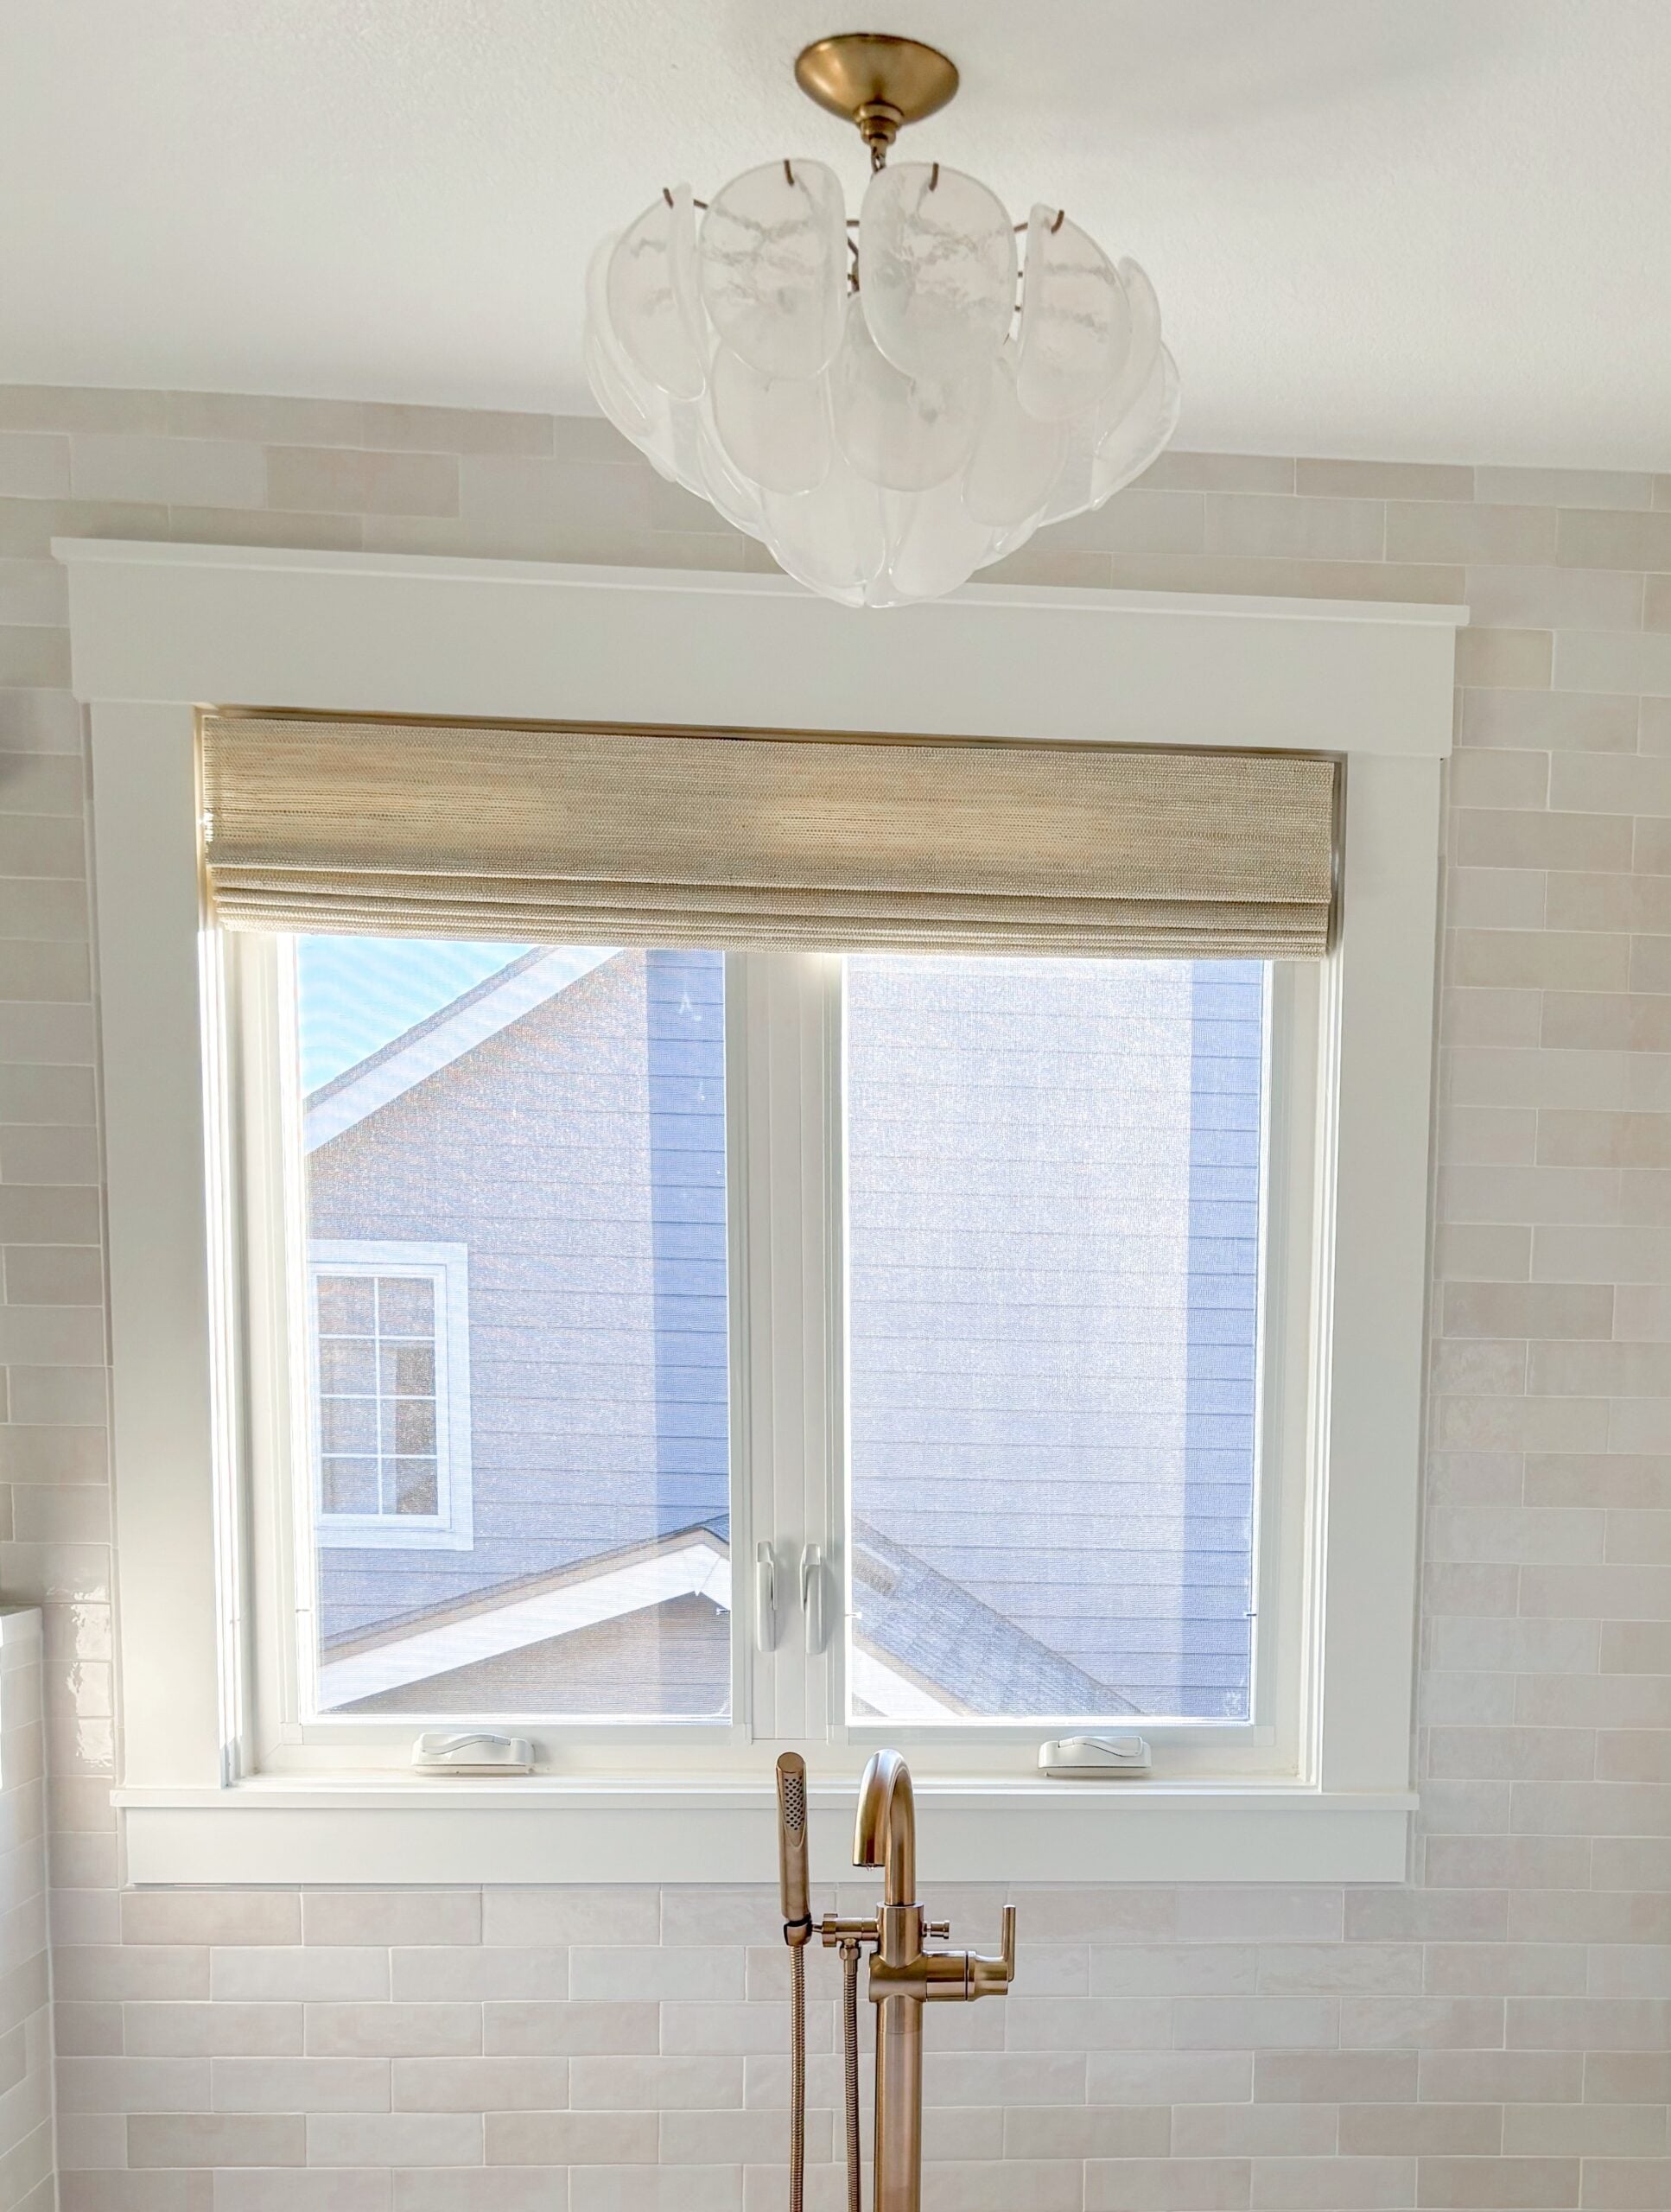
The Freestanding Tub Alcove
The huge built-in corner tub that used to dominate the room is gone, and I don’t miss it for a second. In its place, we installed a more streamlined freestanding tub (Wyndham Rebecca 65″), paired with a floor-mounted tub filler.
We added a half wall between the shower and the tub that hides all of the “shower stuff” (shampoo bottles, soap, etc.), and offers some privacy, while still allowing light from the window to stream in.
This space was a huge opportunity for some wow factor! We took the shower wall tile and added it all the way to the ceiling in the tub area, as well. Then, we added a gorgeous glass light fixture above the tub. We also installed some beautiful lined bamboo roman shades in the window to reflect our modern coastal style, and highlight the beautiful window trim.
The result is a tub area that looks luxurious, and feels open and airy, but still connected to the rest of the room. It’s the perfect spot to unwind at the end of the day.
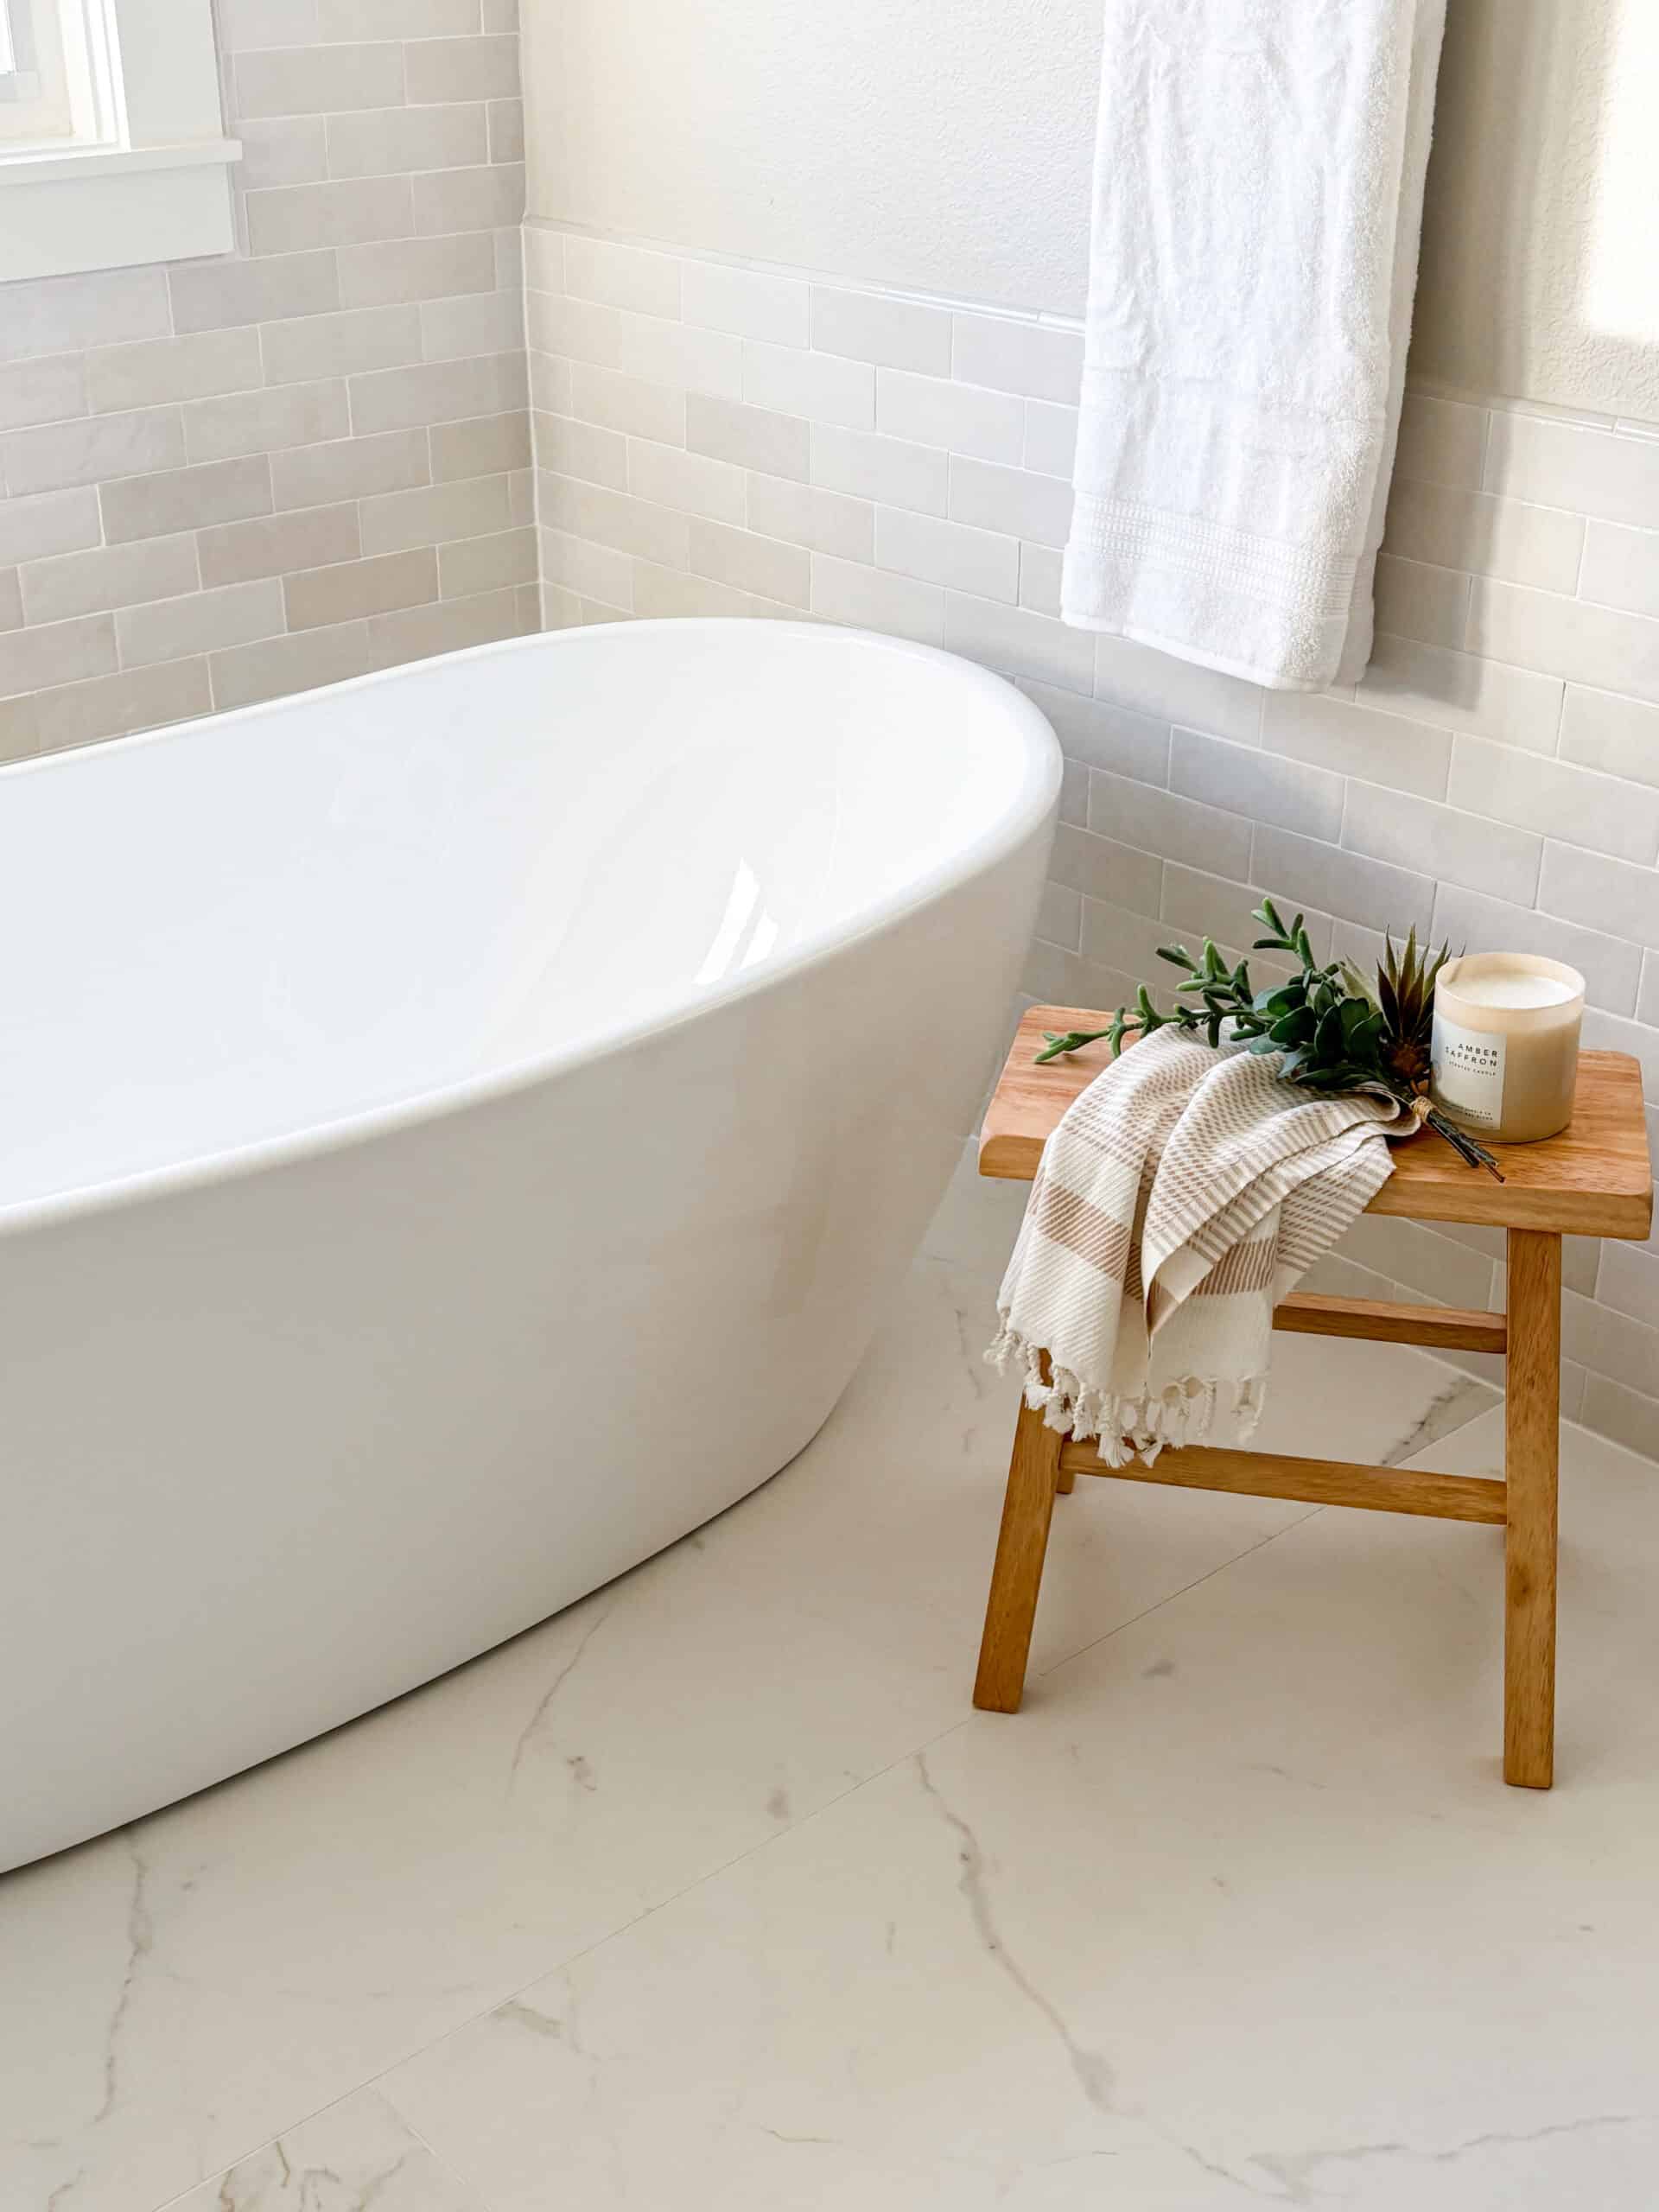
Freestanding Tub | Tub Filler | Towel Holder | Art | Wood Stool | Turkish Towel | Wall Tile | Bamboo Shades
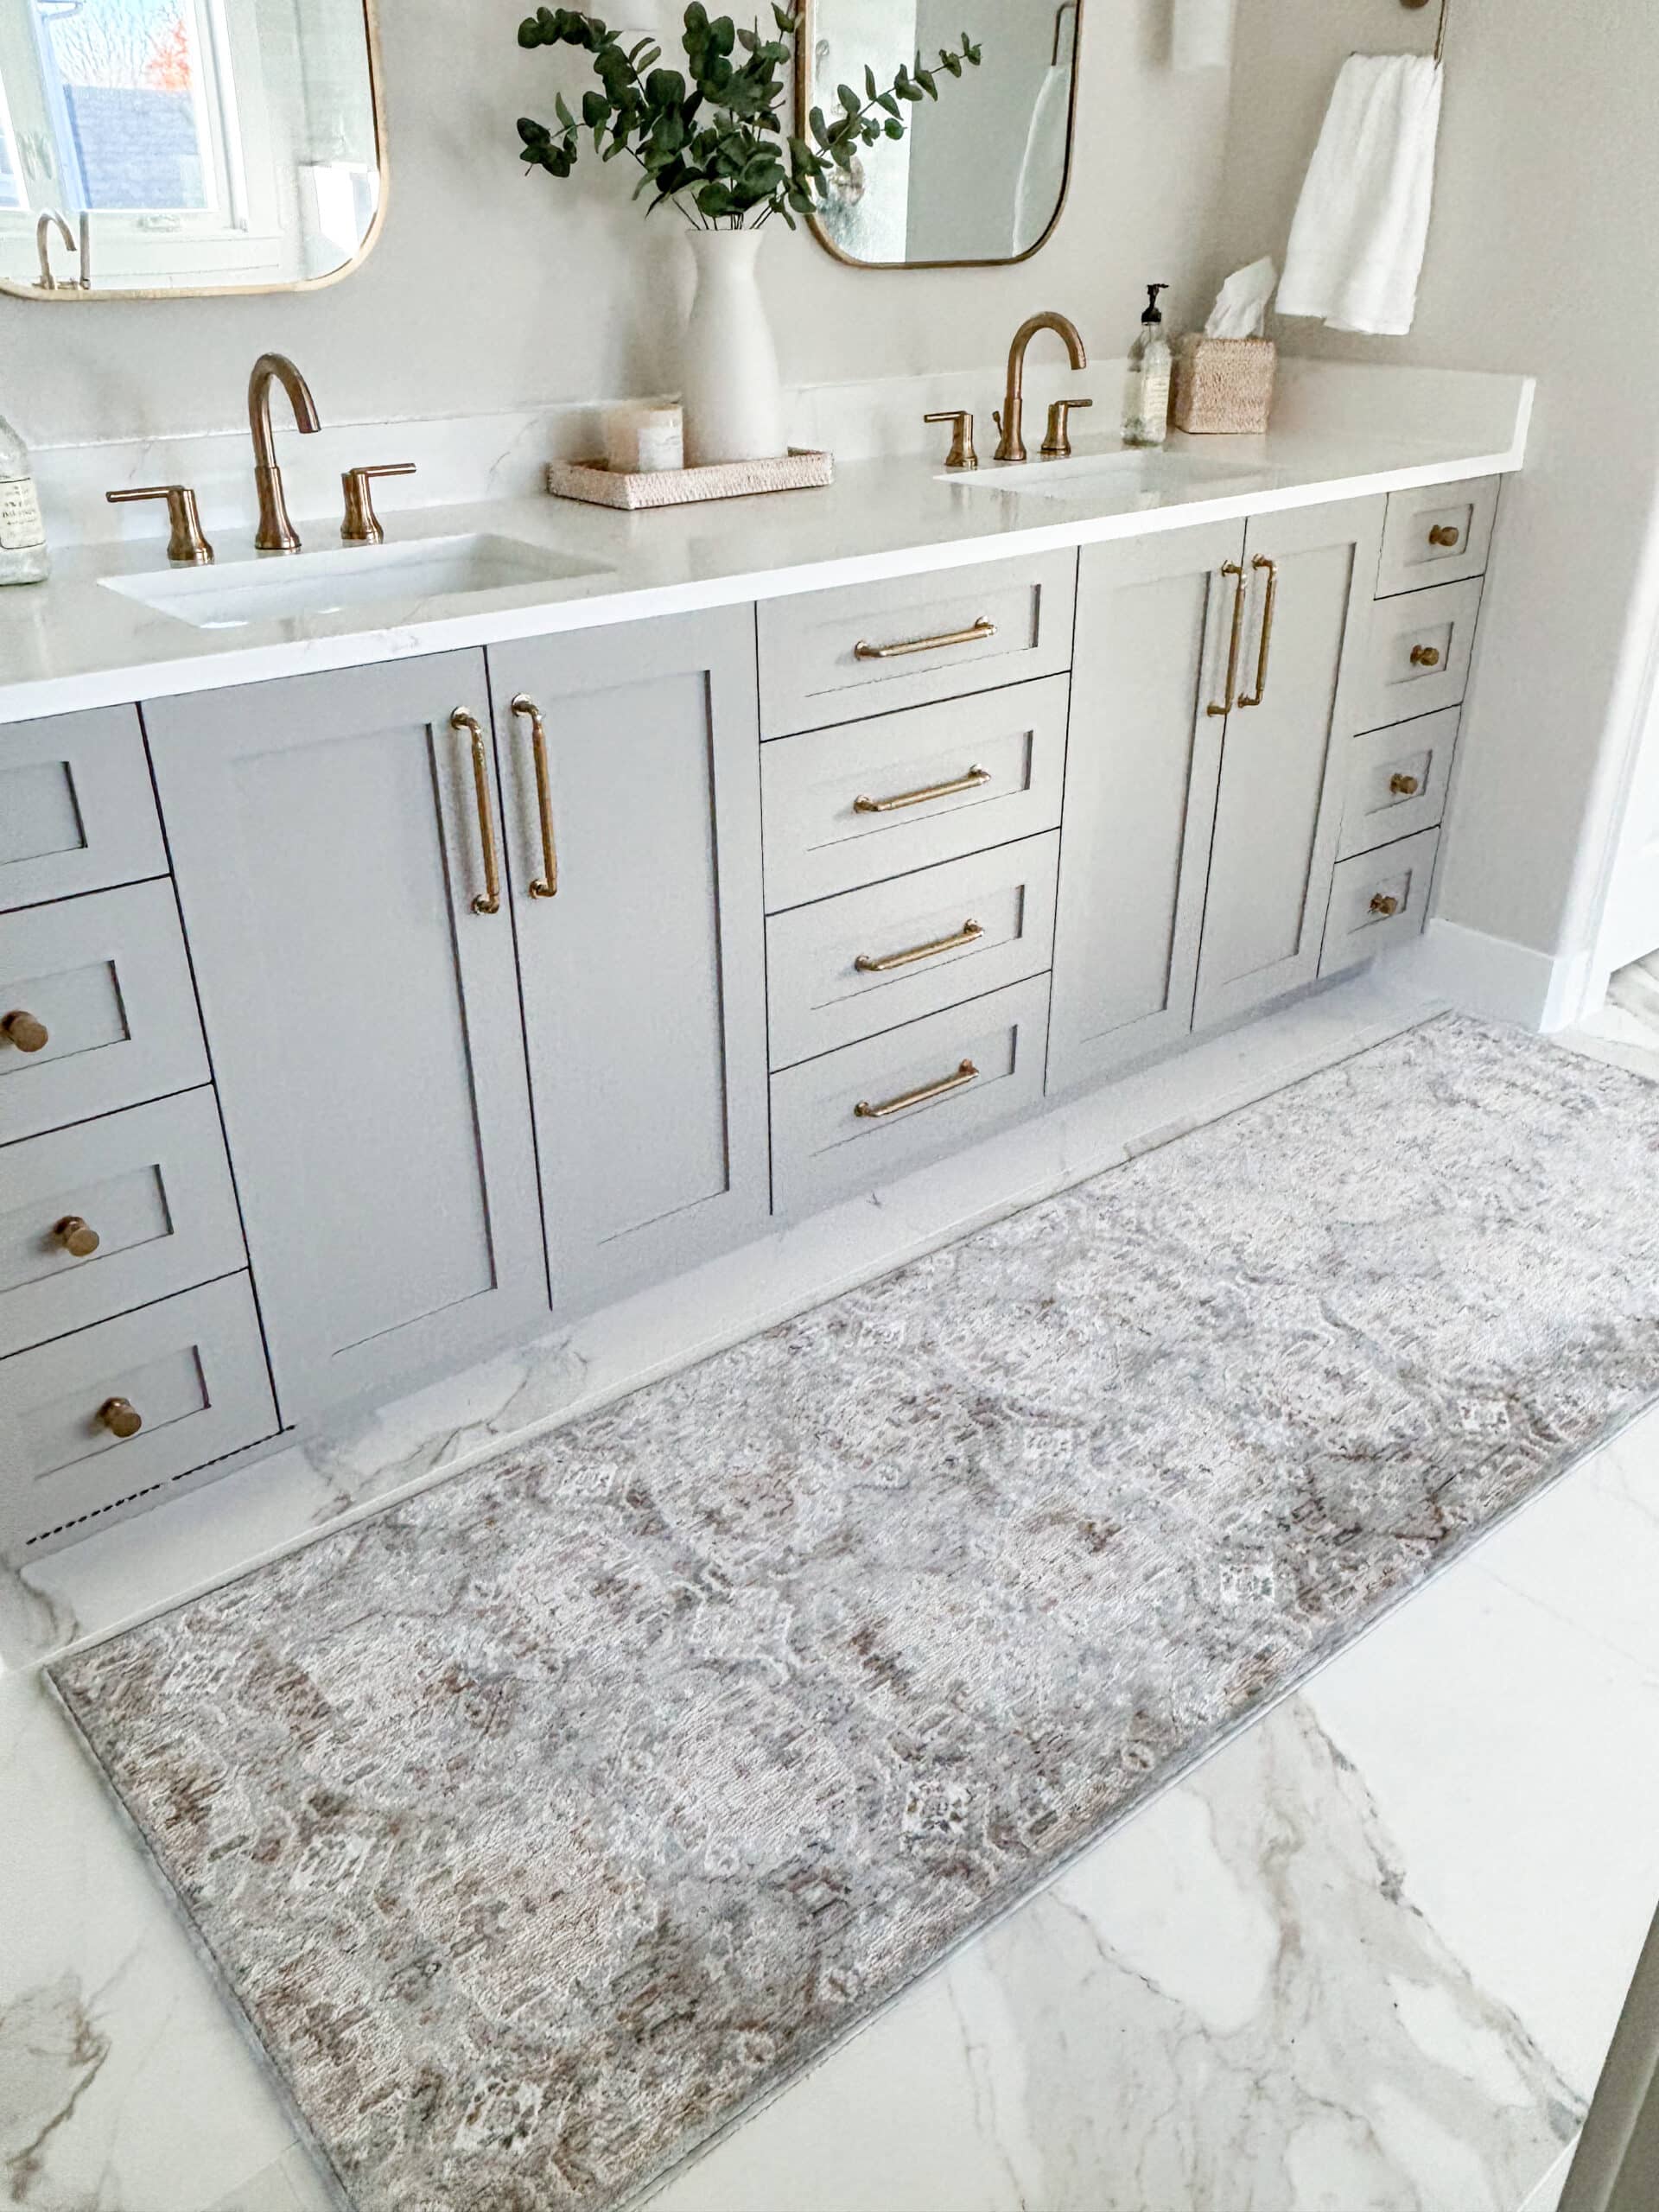
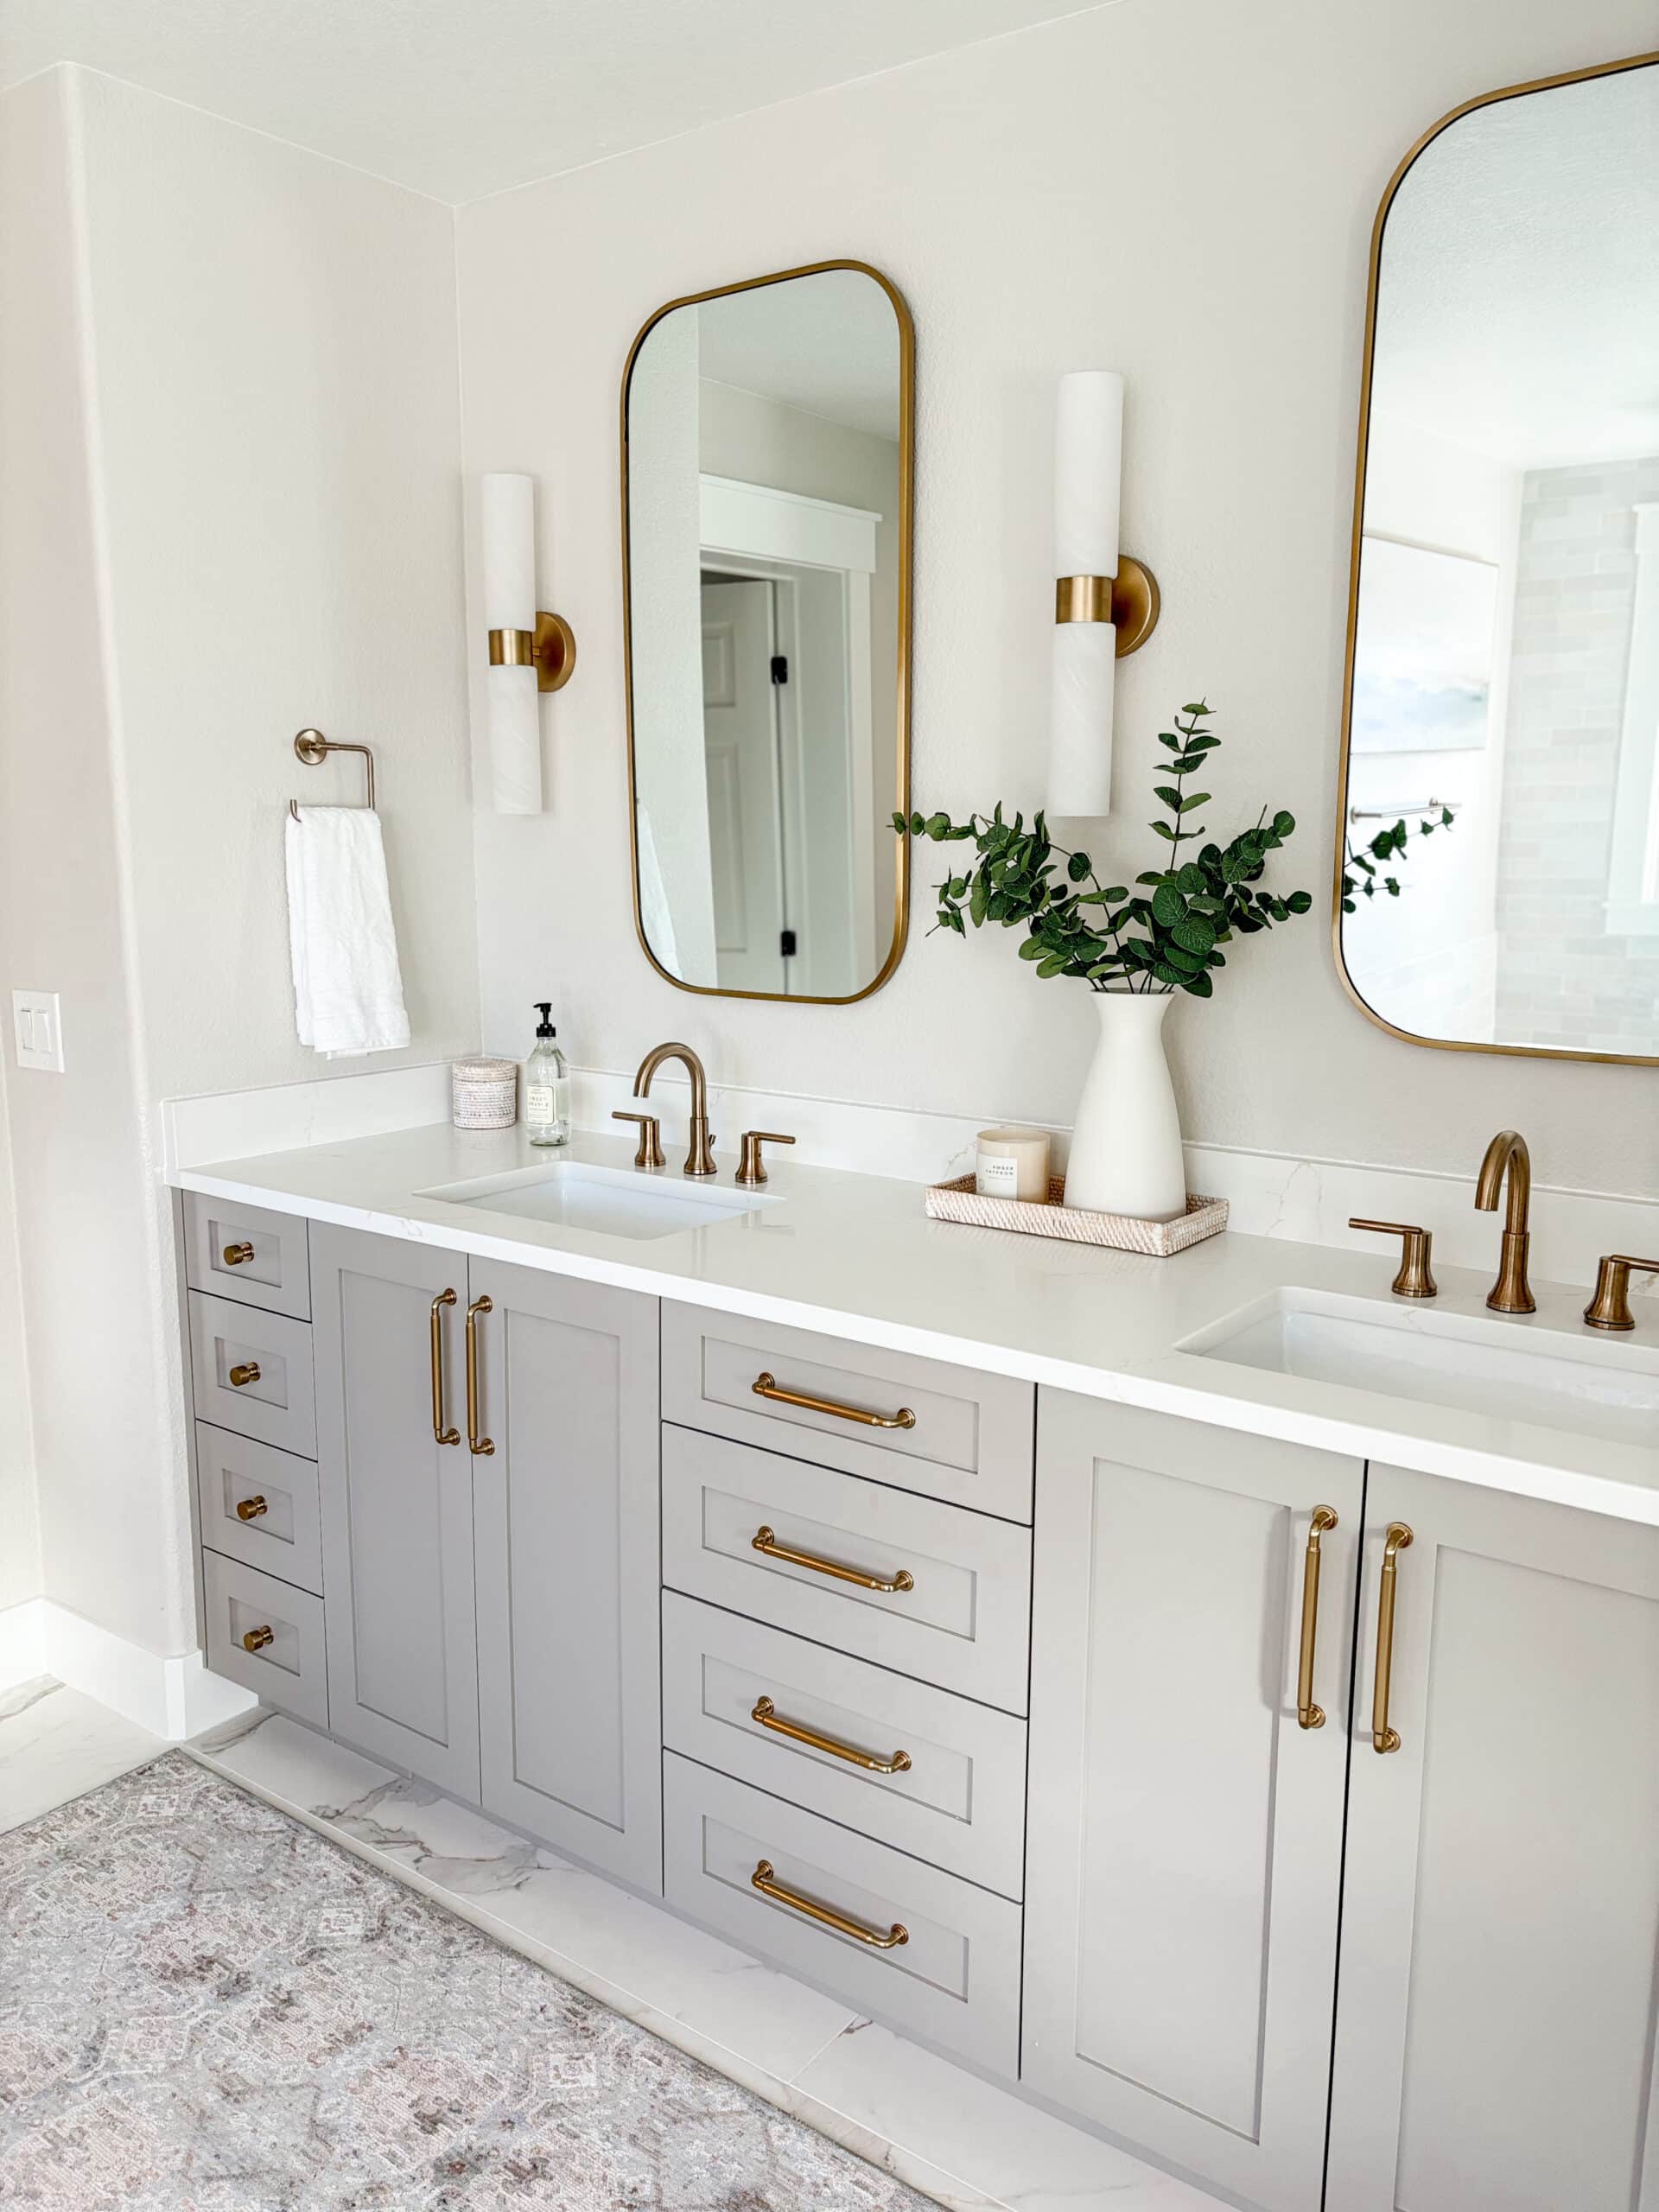
Vanity & Countertop
The vanity is another major transformation in our bathroom before and after story.
We replaced the old, two-tier vanity with custom, frameless shaker-style cabinets and drawers. They’re painted Sherwin-Williams Intellectual Gray, a warm gray with a subtle green undertone that plays so nicely with our floor tile and brass fixtures.
- Cabinet style: custom frameless shaker
- Cabinet paint color: SW Intellectual Gray
- Countertops: MSI Calacatta Miraggio Gold quartz
When it comes to countertops, I love using quartz for bathrooms! It’s non-porous, moisture-resistant, and easy to maintain, which fits perfectly with our real-life daily routine. The quartz we chose has a soft white background with delicate gold and gray veining, which adds just enough interest without competing with the floor or shower tiles.
The new single-level countertop instantly modernized the space and gives us plenty of usable surface area on top and lots of drawer storage below.
The runner rug (Amber Lewis x Loloi Zuma Silver Runner) perfectly ties all of the colors in the bathroom together, while adding some pattern and personality.

Faucets | Vanity Paint Color | Sinks | Rug | Wall Paint Color | Tava Woven Tray | White Carafe Vase | Eucalyptus Stems
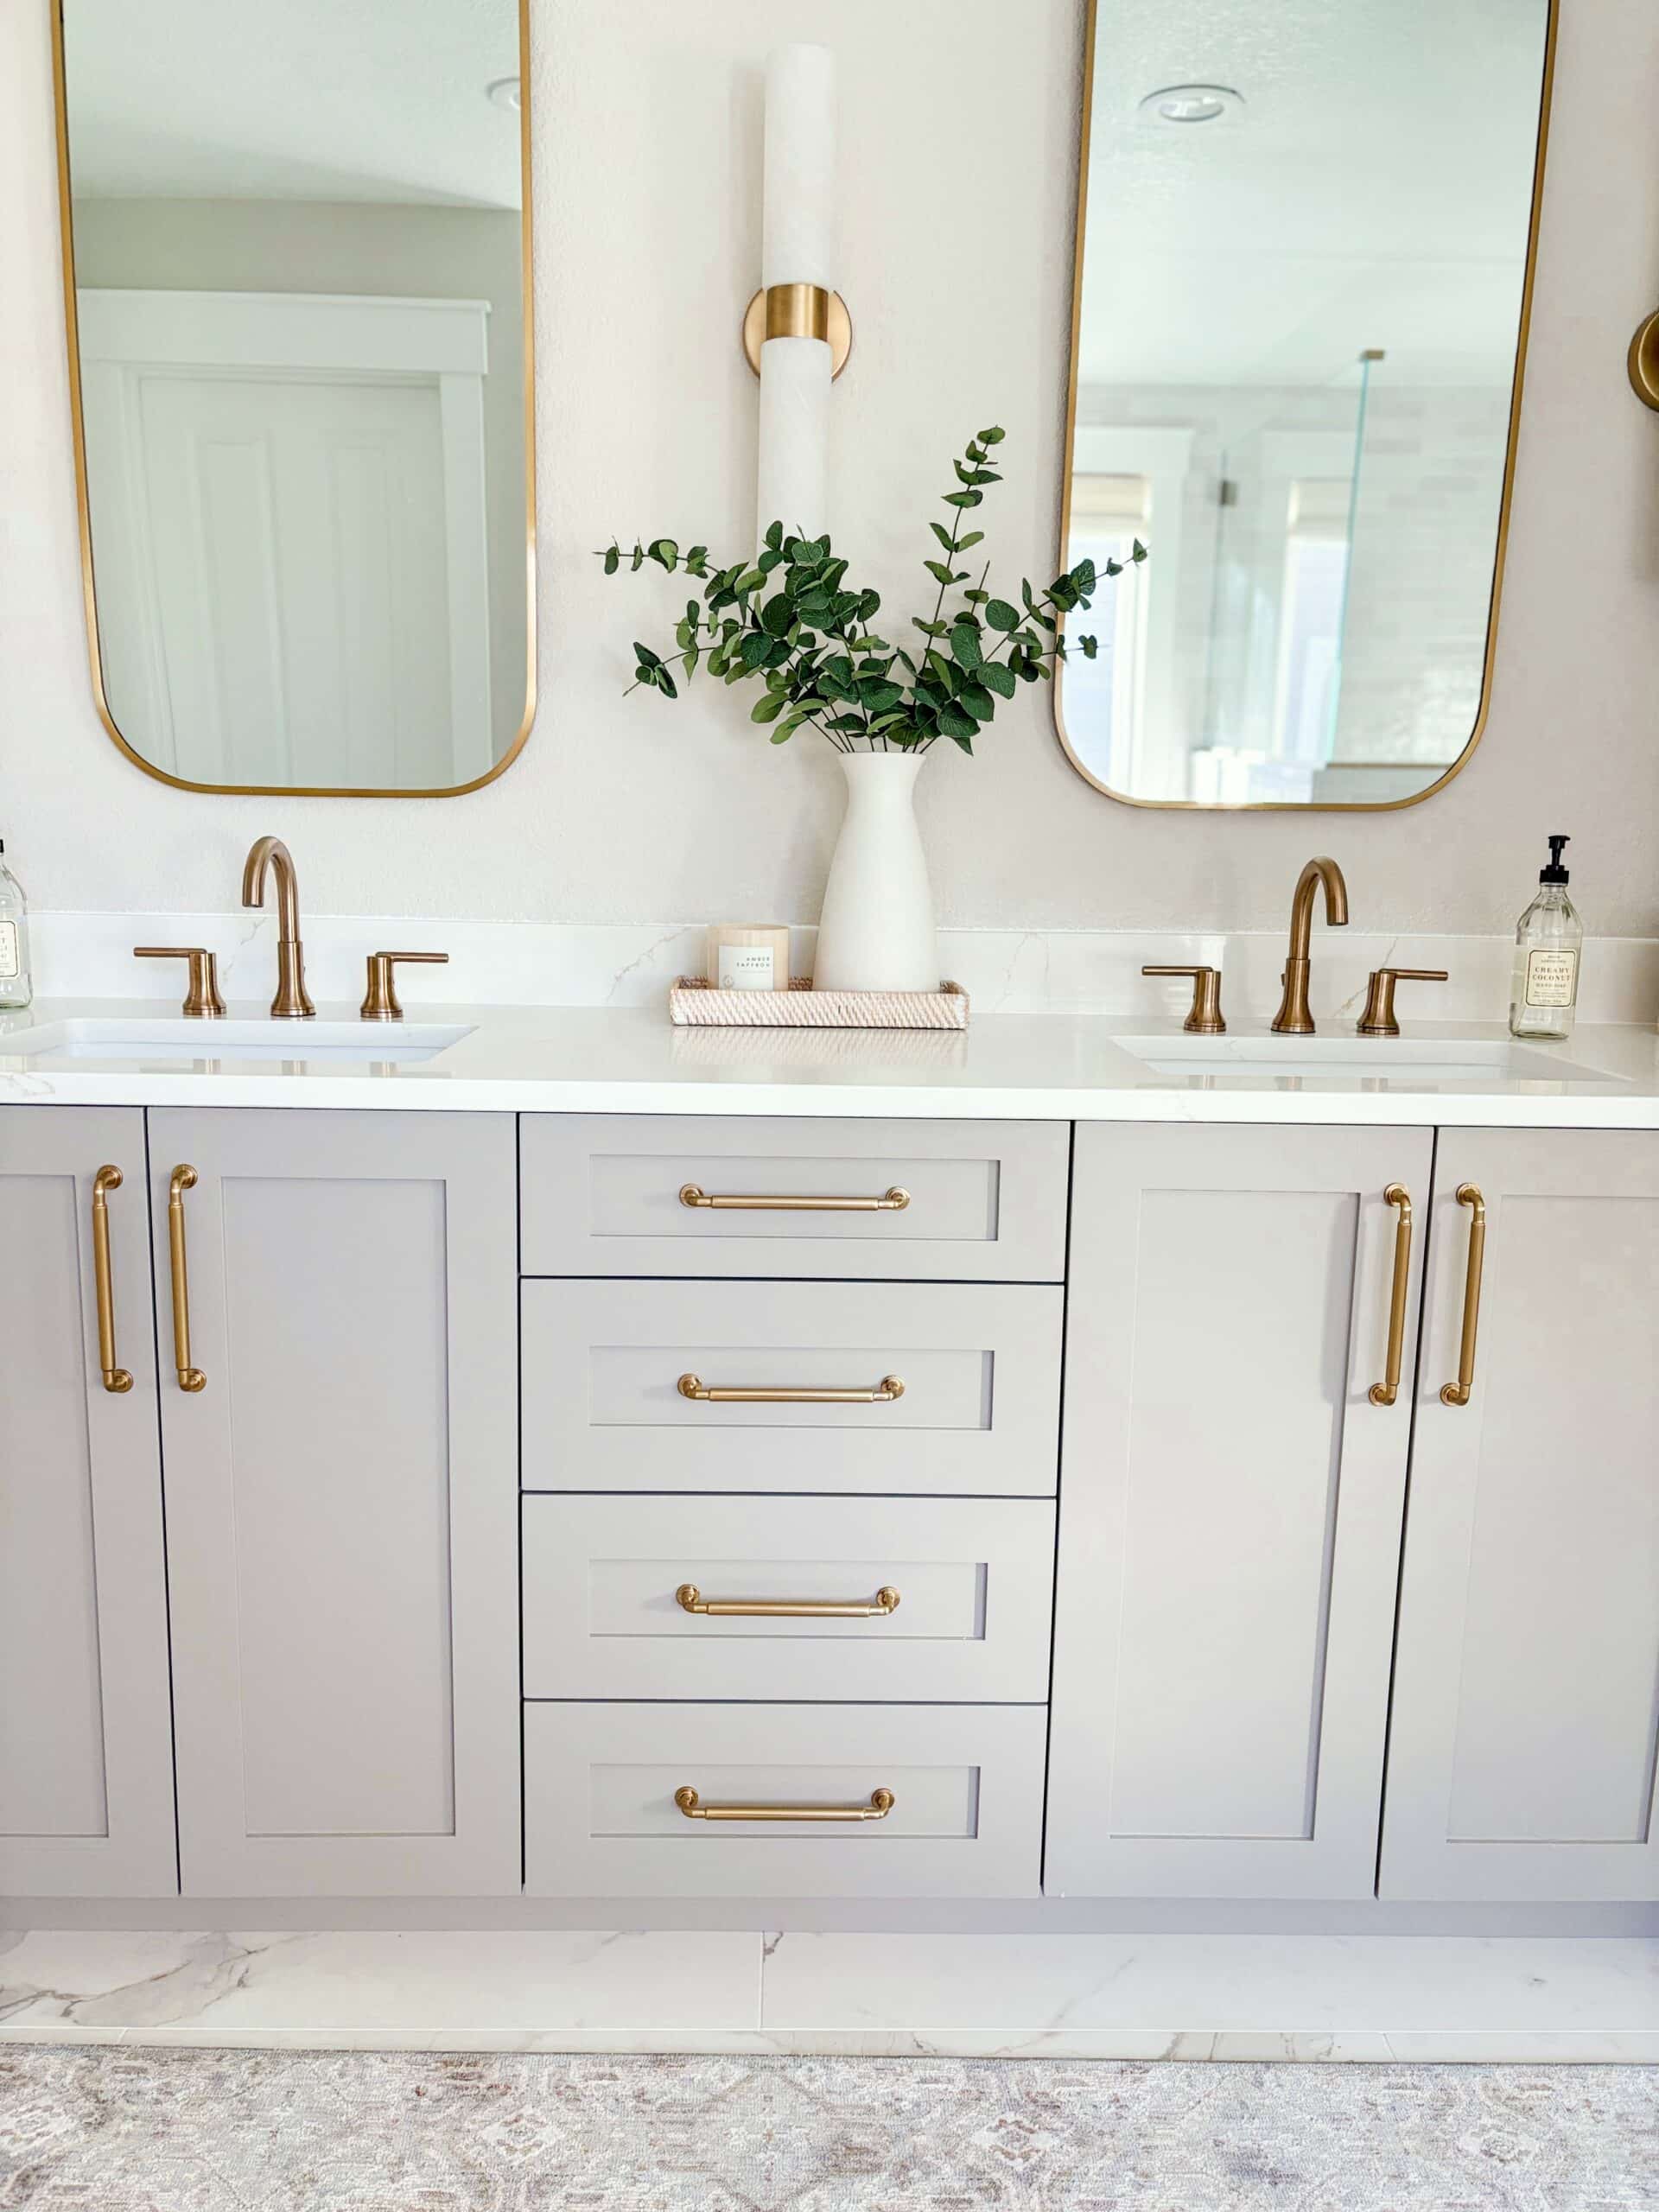
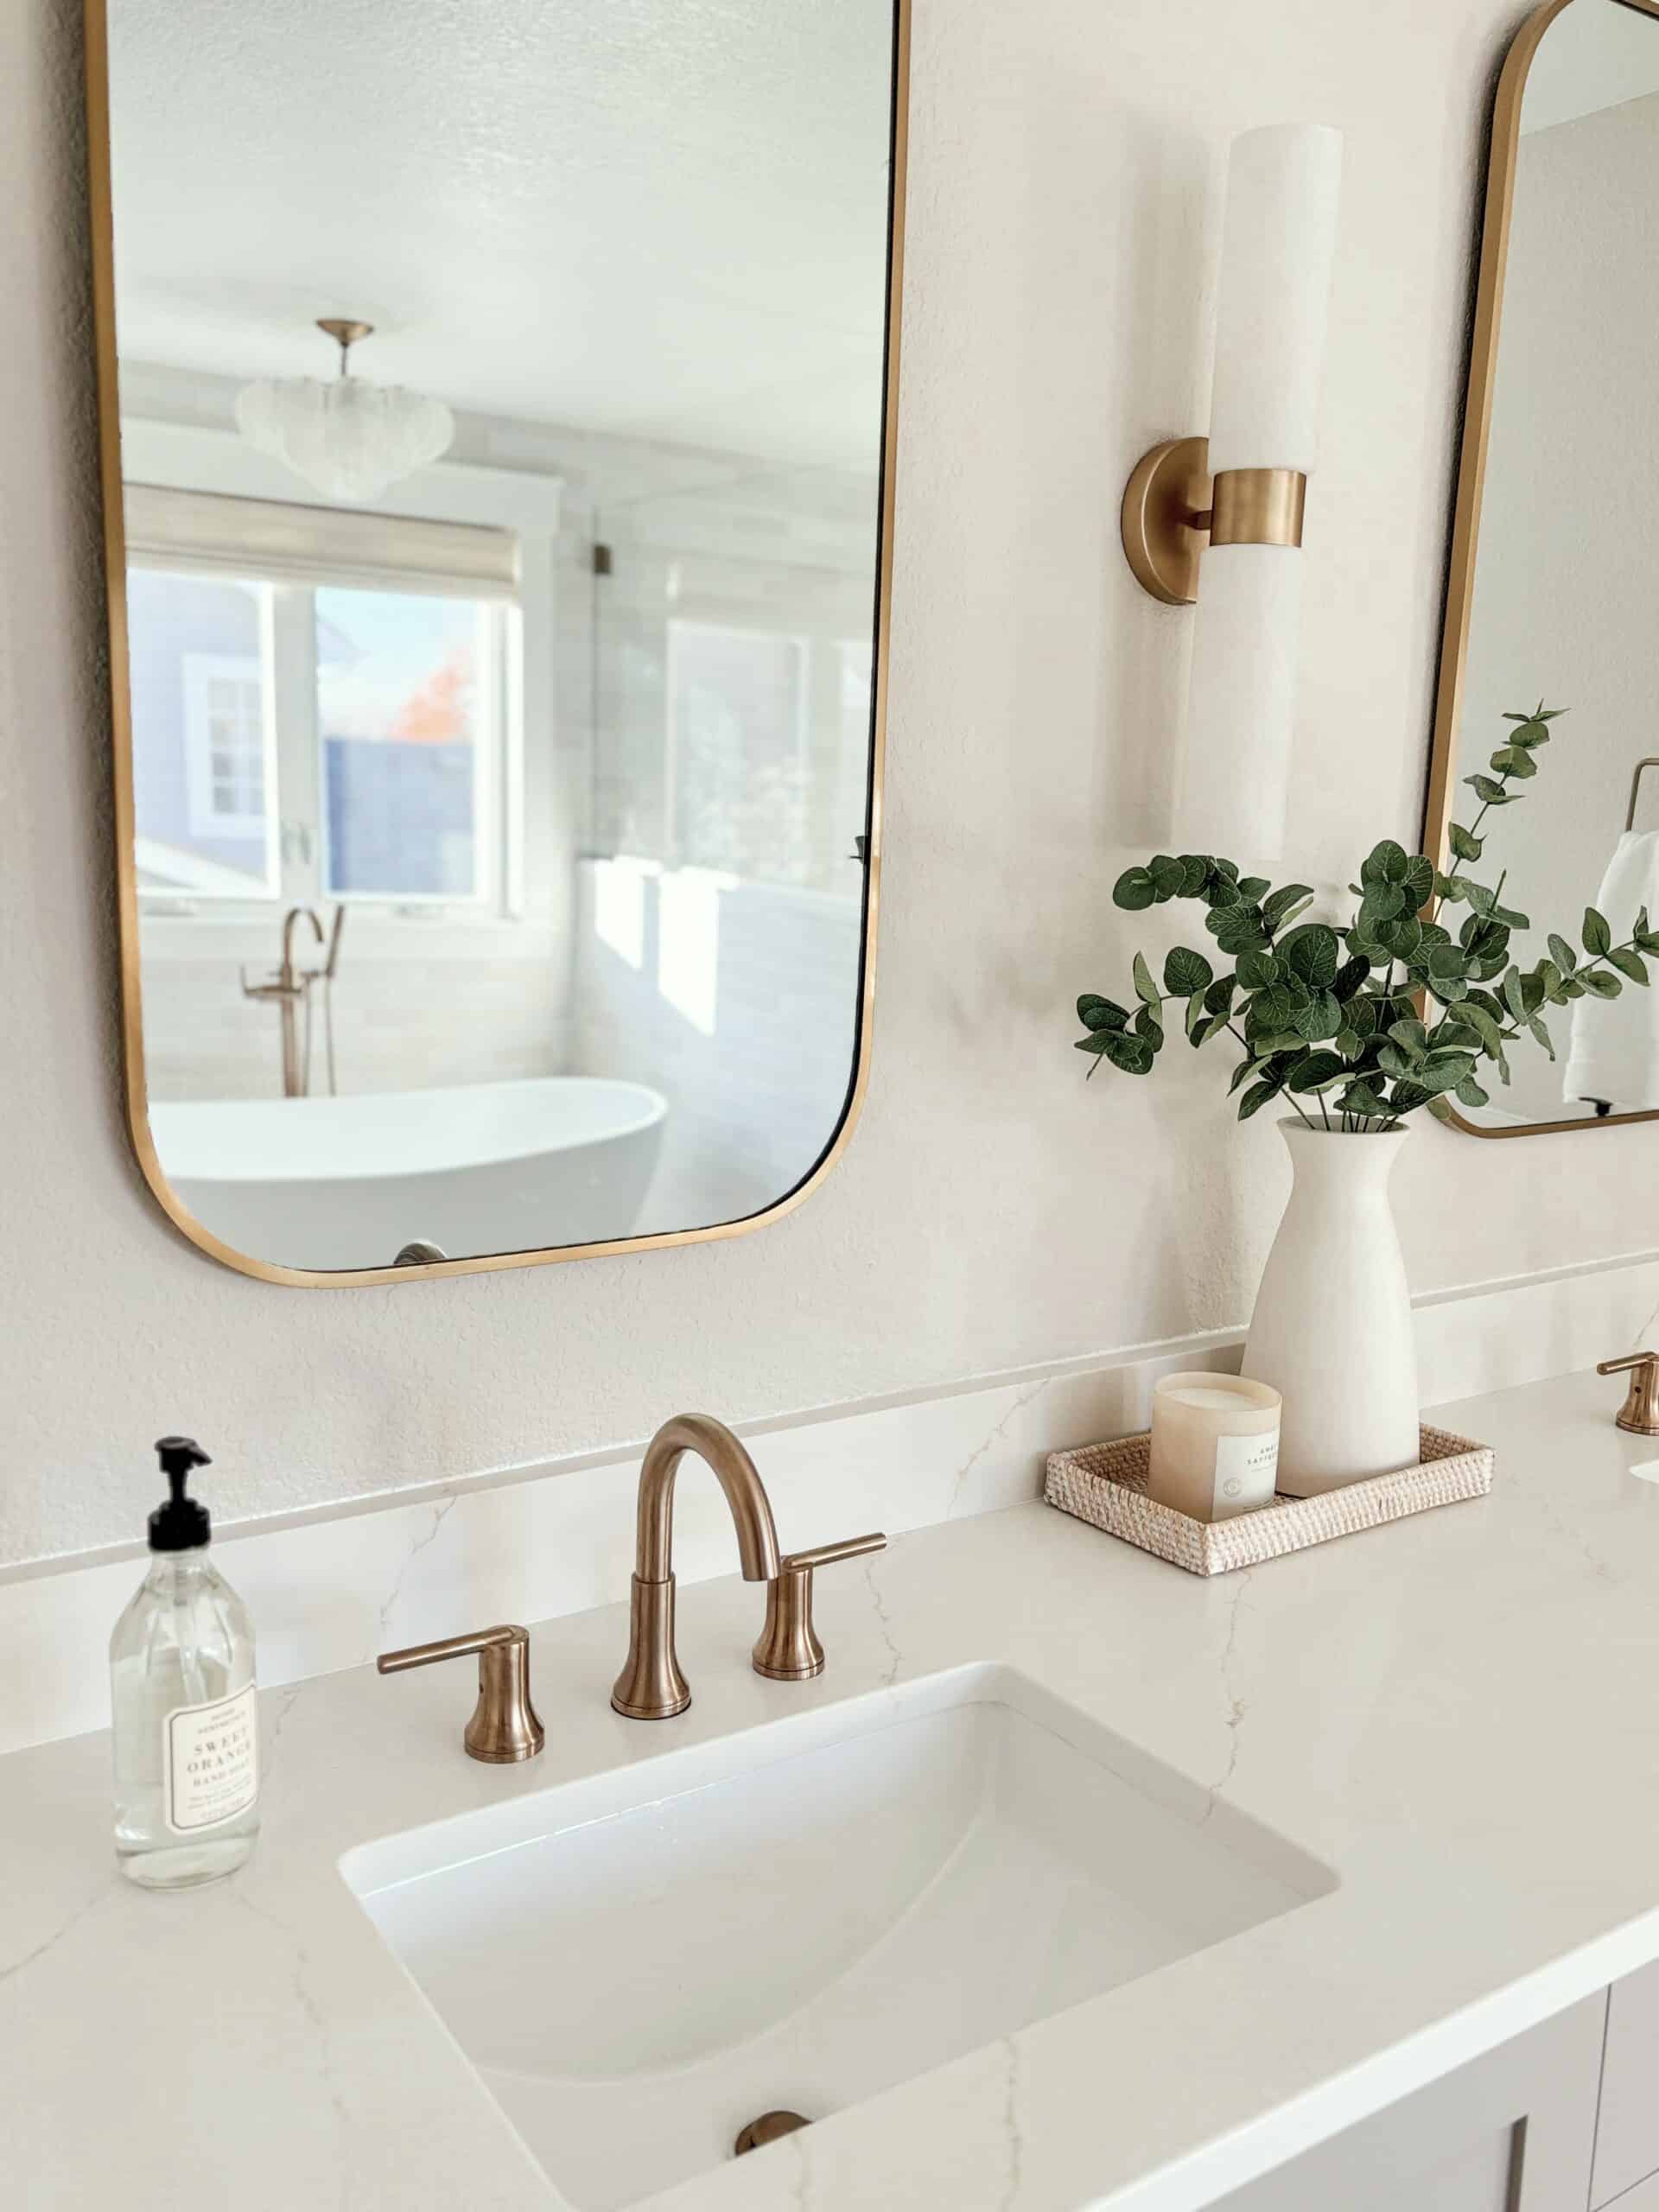
Light Fixtures, Mirrors & Brass Hardware
Lighting might be one of my favorite design upgrades in any room, and our light fixtures made a huge impact in this bathroom makeover.
We added new wall sconces with alabaster glass and a warm brass finish over the vanity. Over the freestanding tub, we added a new overhead light fixture that added a beautiful design moment and some wow factor. The light fixture has cascading opaque glass “shells” that provide an organic shape and a little glam.
Above the vanity, we chose to go with two tall, rounded-edge mirrors, rather than a single large mirror. With two mirrors, we could add another sconce in the middle, which provides better lighting for hair and makeup.
The warm brass on the sconces, cabinet hardware, mirrors, and plumbing fixtures brings in that California Casual/Modern Coastal mix I love! It looks elevated, but not fussy. The brass tones also echo the warm tones in the floor tile veining and quartz countertops, so everything feels intentional and cohesive.
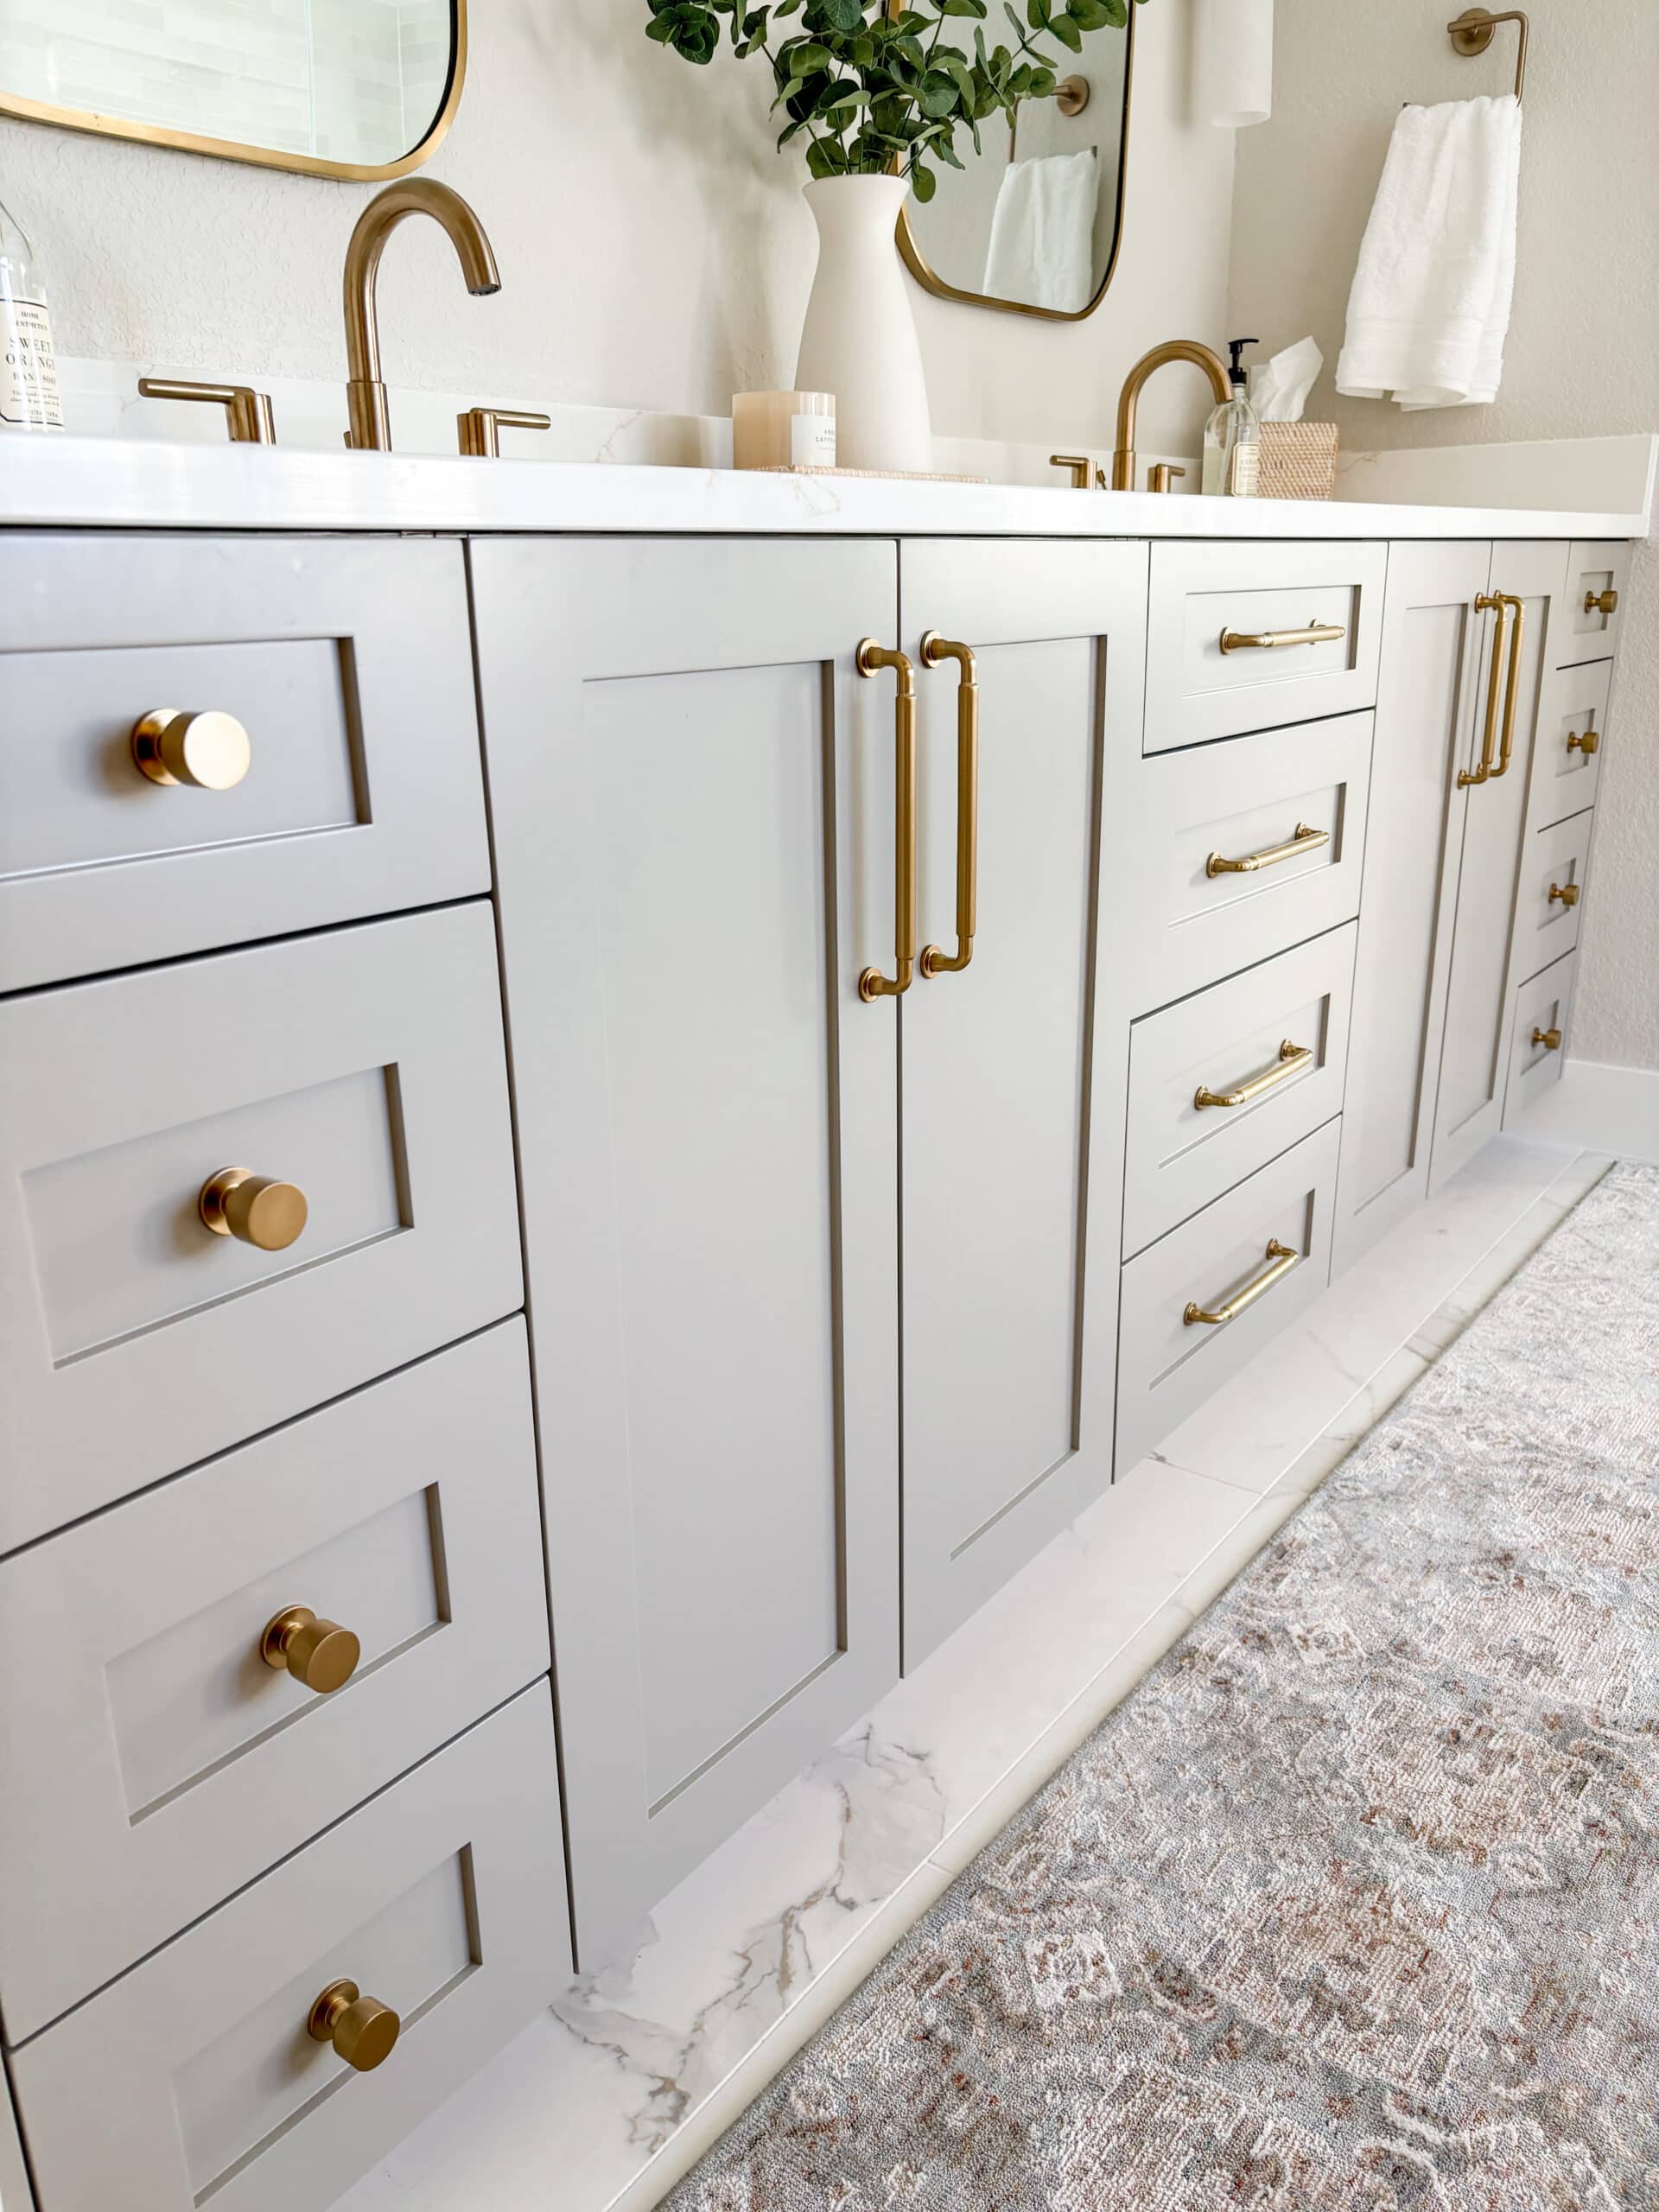
Light Fixture Over Tub | Alyssa Wall Sconces | Taft Mirrors | Lily Drawer Knobs | Lily Cabinet & Drawer Pulls (7 9/16″ Center to Center) | Towel Rings
The Water Closet
Our private water closet (aka toilet room) didn’t change location, but it did get a serious upgrade in functionality.
The change? We swapped the old swing door for a pocket door, which makes a huge difference in a tight space. No more door swinging inward, while you’re trying to step around it to get to the toilet (super awkward!)
Inside the water closet, we continued the same paint and trim details so it feels like part of the overall primary bathroom, not an afterthought. It’s a small change on paper, but in daily life, it works so much better.
Paint Colors & The Overall Bathroom Feel
To tie everything together, we painted the walls Benjamin Moore Pale Oak, a soft, light greige with just enough warmth to keep the room from feeling cold. It works beautifully with our tile, quartz, and cabinet color.
The trim color in the bathroom (and throughout the house) is Benjamin Moore Chantilly Lace. It’s a bright, neutral white that works with everything!
The combination of Pale Oak and Chantilly Lace keeps the room feeling bright and airy while still adding just enough contrast around doors, windows, and trim. It’s the perfect backdrop for the textures and finishes in the space.
The overall bathroom feel is exactly what I hoped for: a modern coastal retreat with natural materials, warm metals, and a light, relaxed vibe.
What’s the best part of our new primary bathroom?
So what’s the best part of this whole bathroom renovation?
For starters, it’s walking into the room every morning and having it feel like a calm, beautiful retreat instead of a dated space that felt uninspiring. But honestly, the best change is all the new drawers that we added into the vanity! Beautiful finishes are only half the story…how a bathroom works with your daily routine matters just as much.
The new walk-in shower, the freestanding tub, the large floor tile, the lighting, and finishes all work together to make the room feel bigger, brighter, and more like “us.” It still fits the existing floor plan, which helped us save money, but now it feels like a bathroom we actually look forward to using every day.
Every choice had to balance style and practicality, and I’m SO happy with how it all came together!
If you’re planning your own bathroom remodel, I hope this post gives you some fresh ideas and inspiration. Let me know in the comments what your favorite change is, or what you’re most excited to tackle in your next bathroom makeover!
This post contains affiliate links. That means I may earn a small commission at no extra cost to you if you make a purchase through my links. Thank you for supporting my blog!


Hi Melissa,
You and your team did excellent work in your primary bathroom. I love your choices in colors and finishes. Thank you for linking the products you chose as I am in the middle of a kitchen remodel. Again, very beautiful and classy bathroom. Thank you for all the ideas you provide to those of us struggling with our projects.
This is absolutely stunning, you did an incredible job! I can’t wait to someday update our primary! Happy New Year!
Thank you so much! We are loving it. Happy New Year!!
Such an inspiring transformation! The primary bathroom before-and-after is stunning. I love how the updated layout, materials, and finishes make the space feel brighter, more functional, and luxurious without feeling overdone. Thanks for sharing the details and photos they’re super helpful for anyone planning their own remodel!
I really love the color palette and finish selections you went with. Thanks so much for sharing the product links too — I’m currently renovating my kitchen, so they’re super helpful. Your bathroom looks absolutely elegant and beautifully designed. I also appreciate all the inspiration and ideas you share for people like us who are trying to figure out our own projects