
I’ve been waiting a long time to finally share our kitchen renovation before and after with you! This space has been one of the biggest projects in our new house remodel, and today I’m revealing the finished result. We are so thrilled with the transformation, from the dated old kitchen to the bright, functional, and timeless new kitchen we get to enjoy every day.
This post walks you through the entire kitchen renovation, including the layout changes, cabinetry, countertops, range hood, kitchen island, light fixtures, and finishing details. I’ll also share what made a huge difference visually and functionally, along with lessons learned that I know will help if you’re planning your own kitchen renovation.
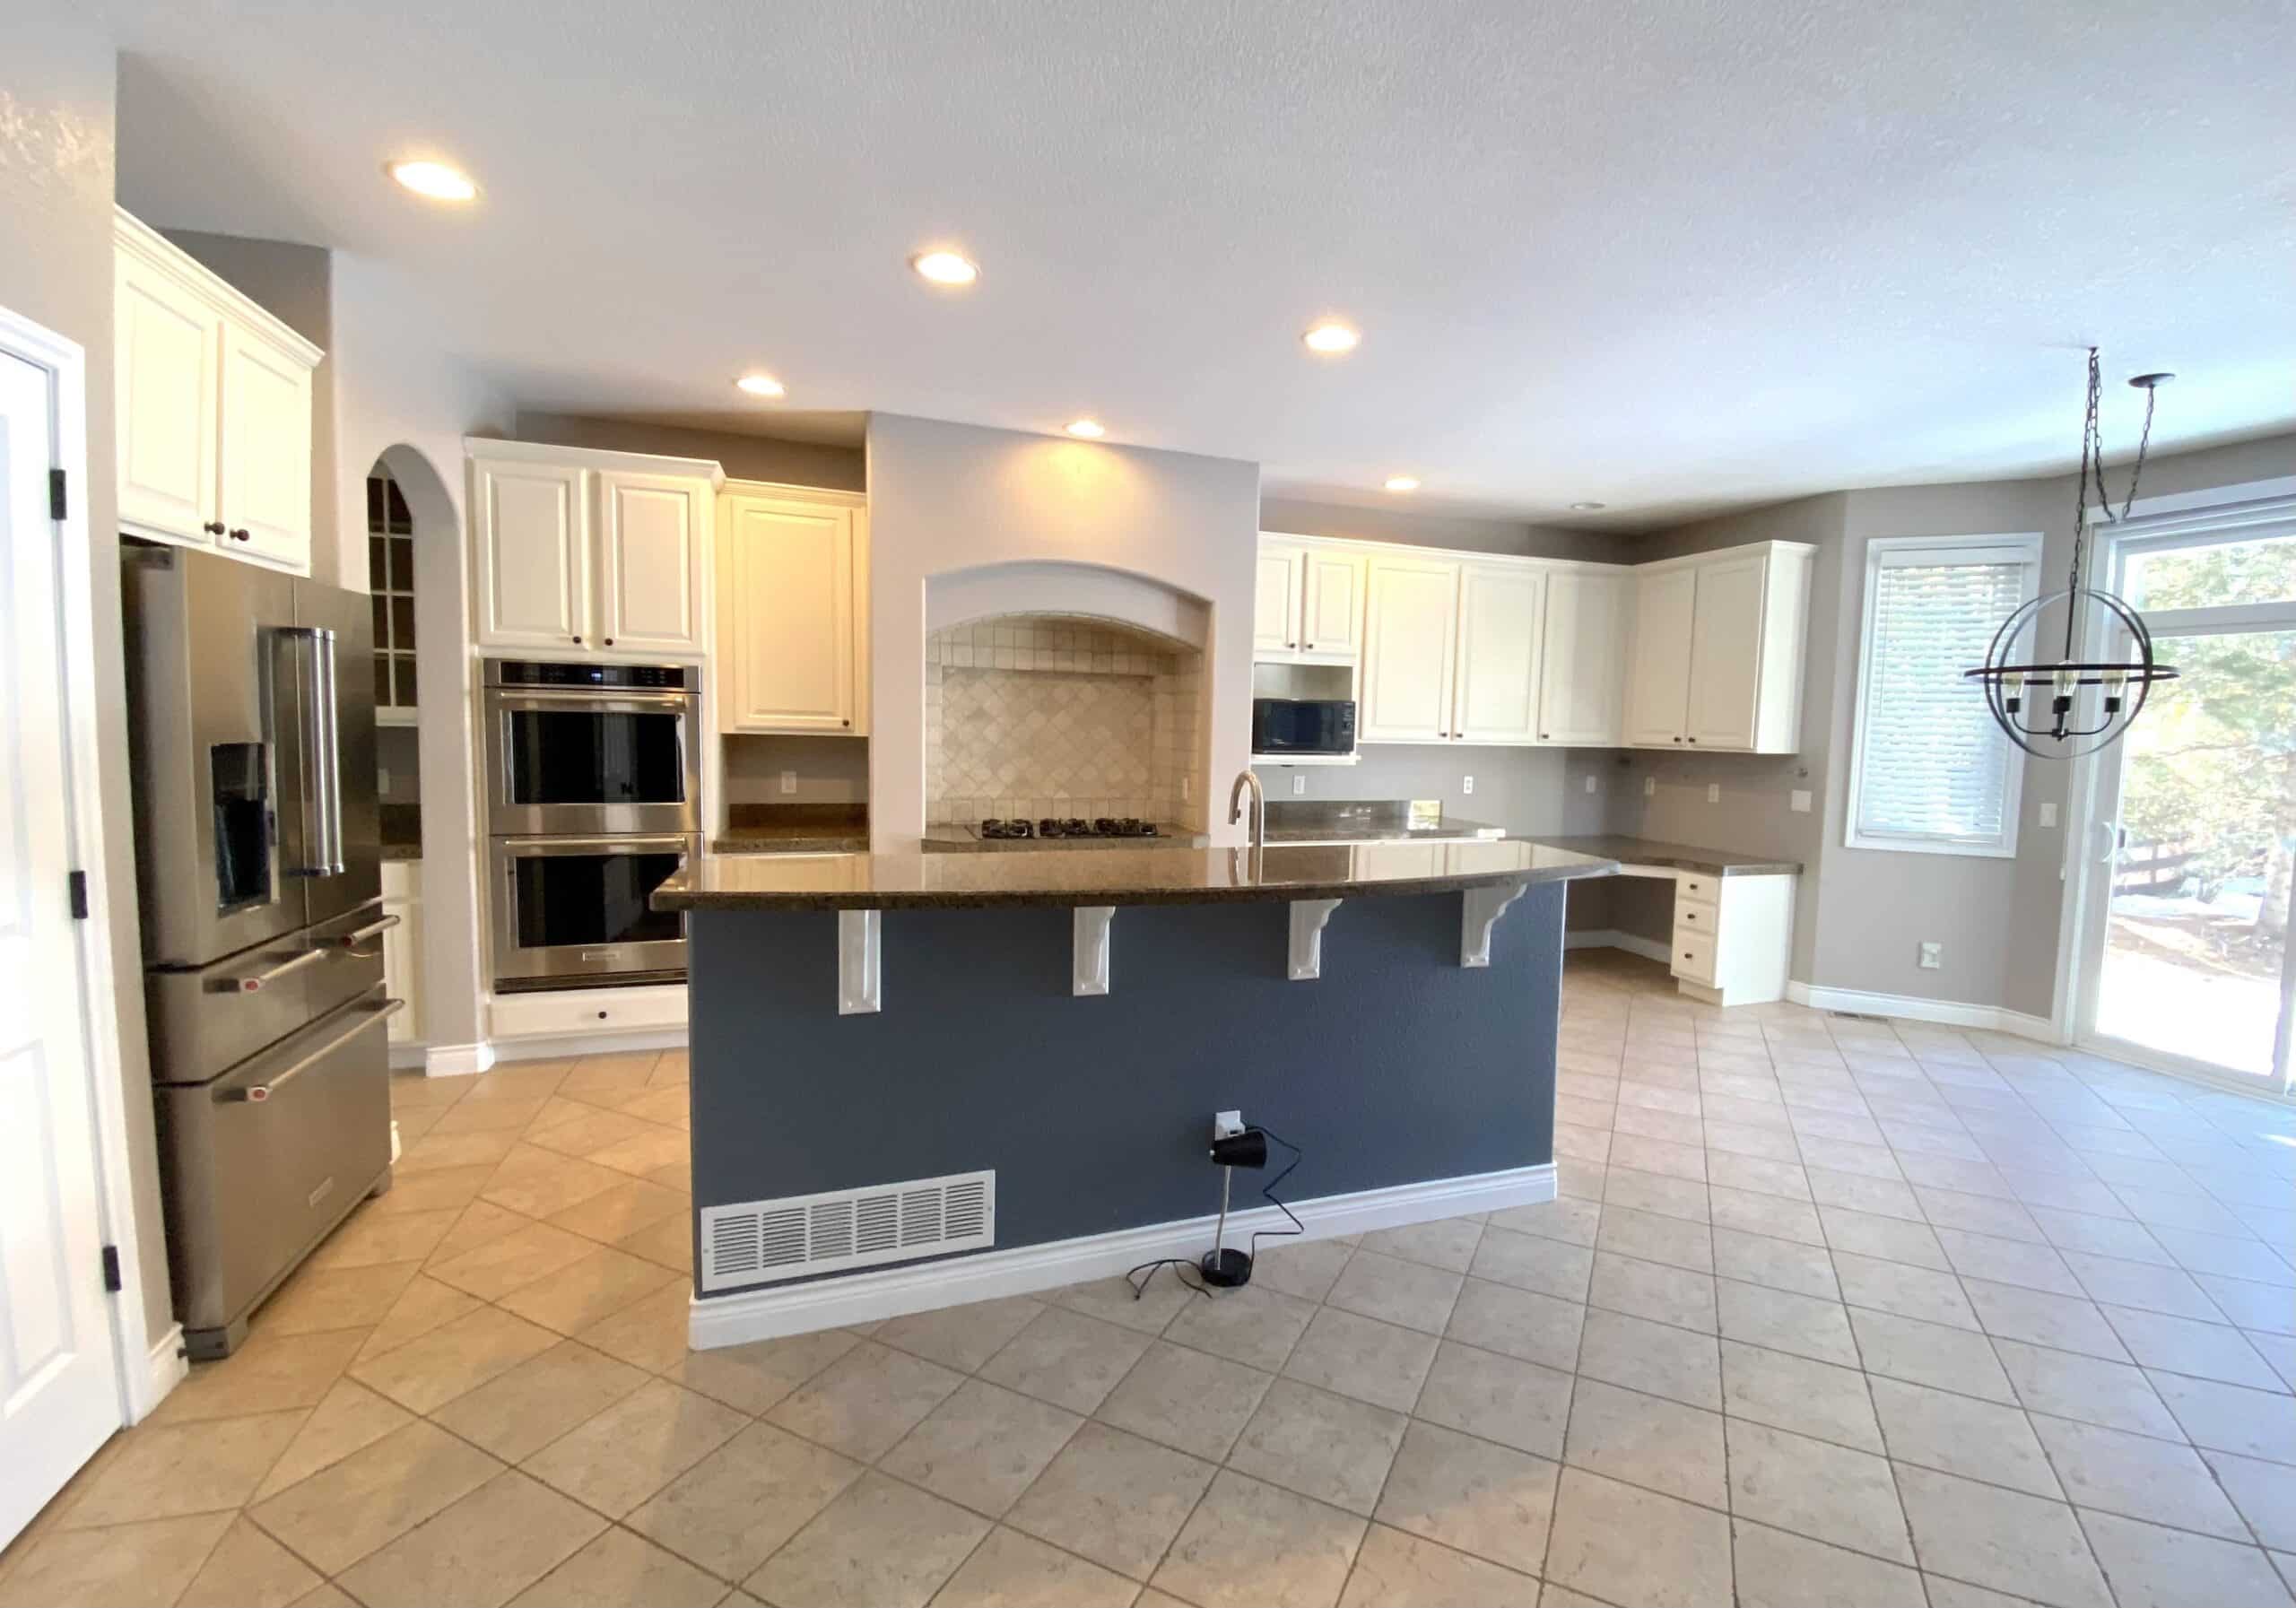
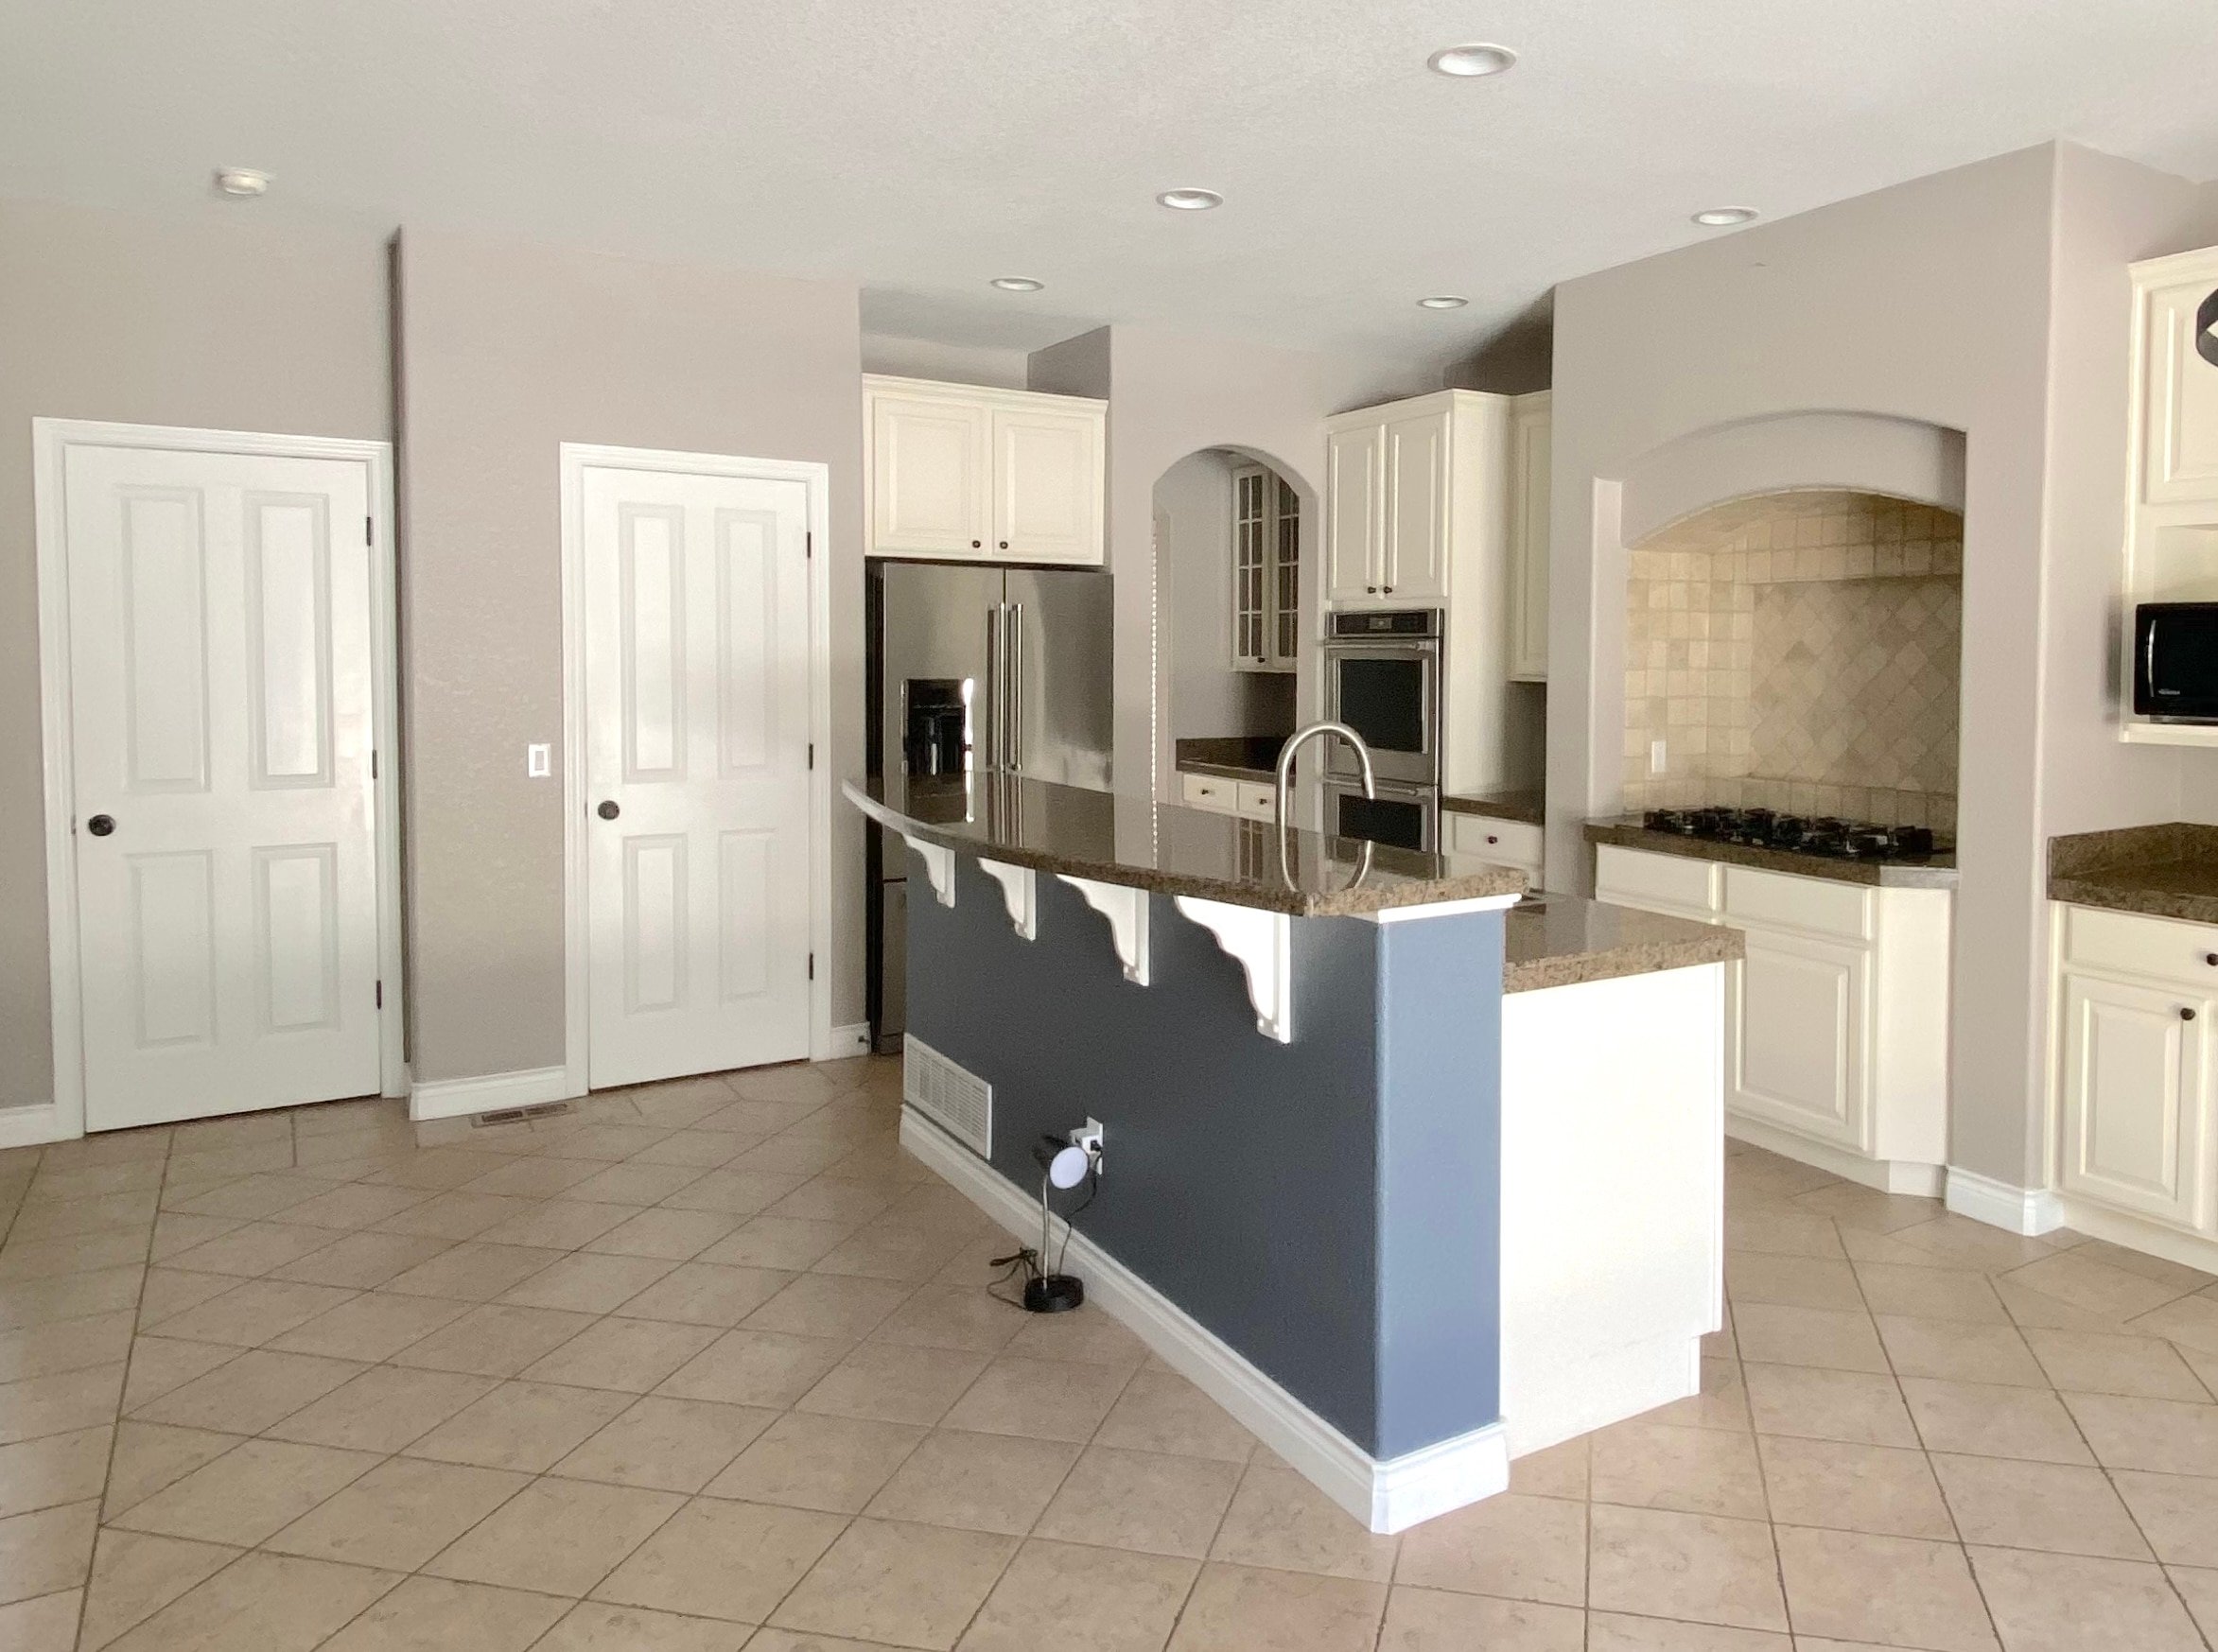
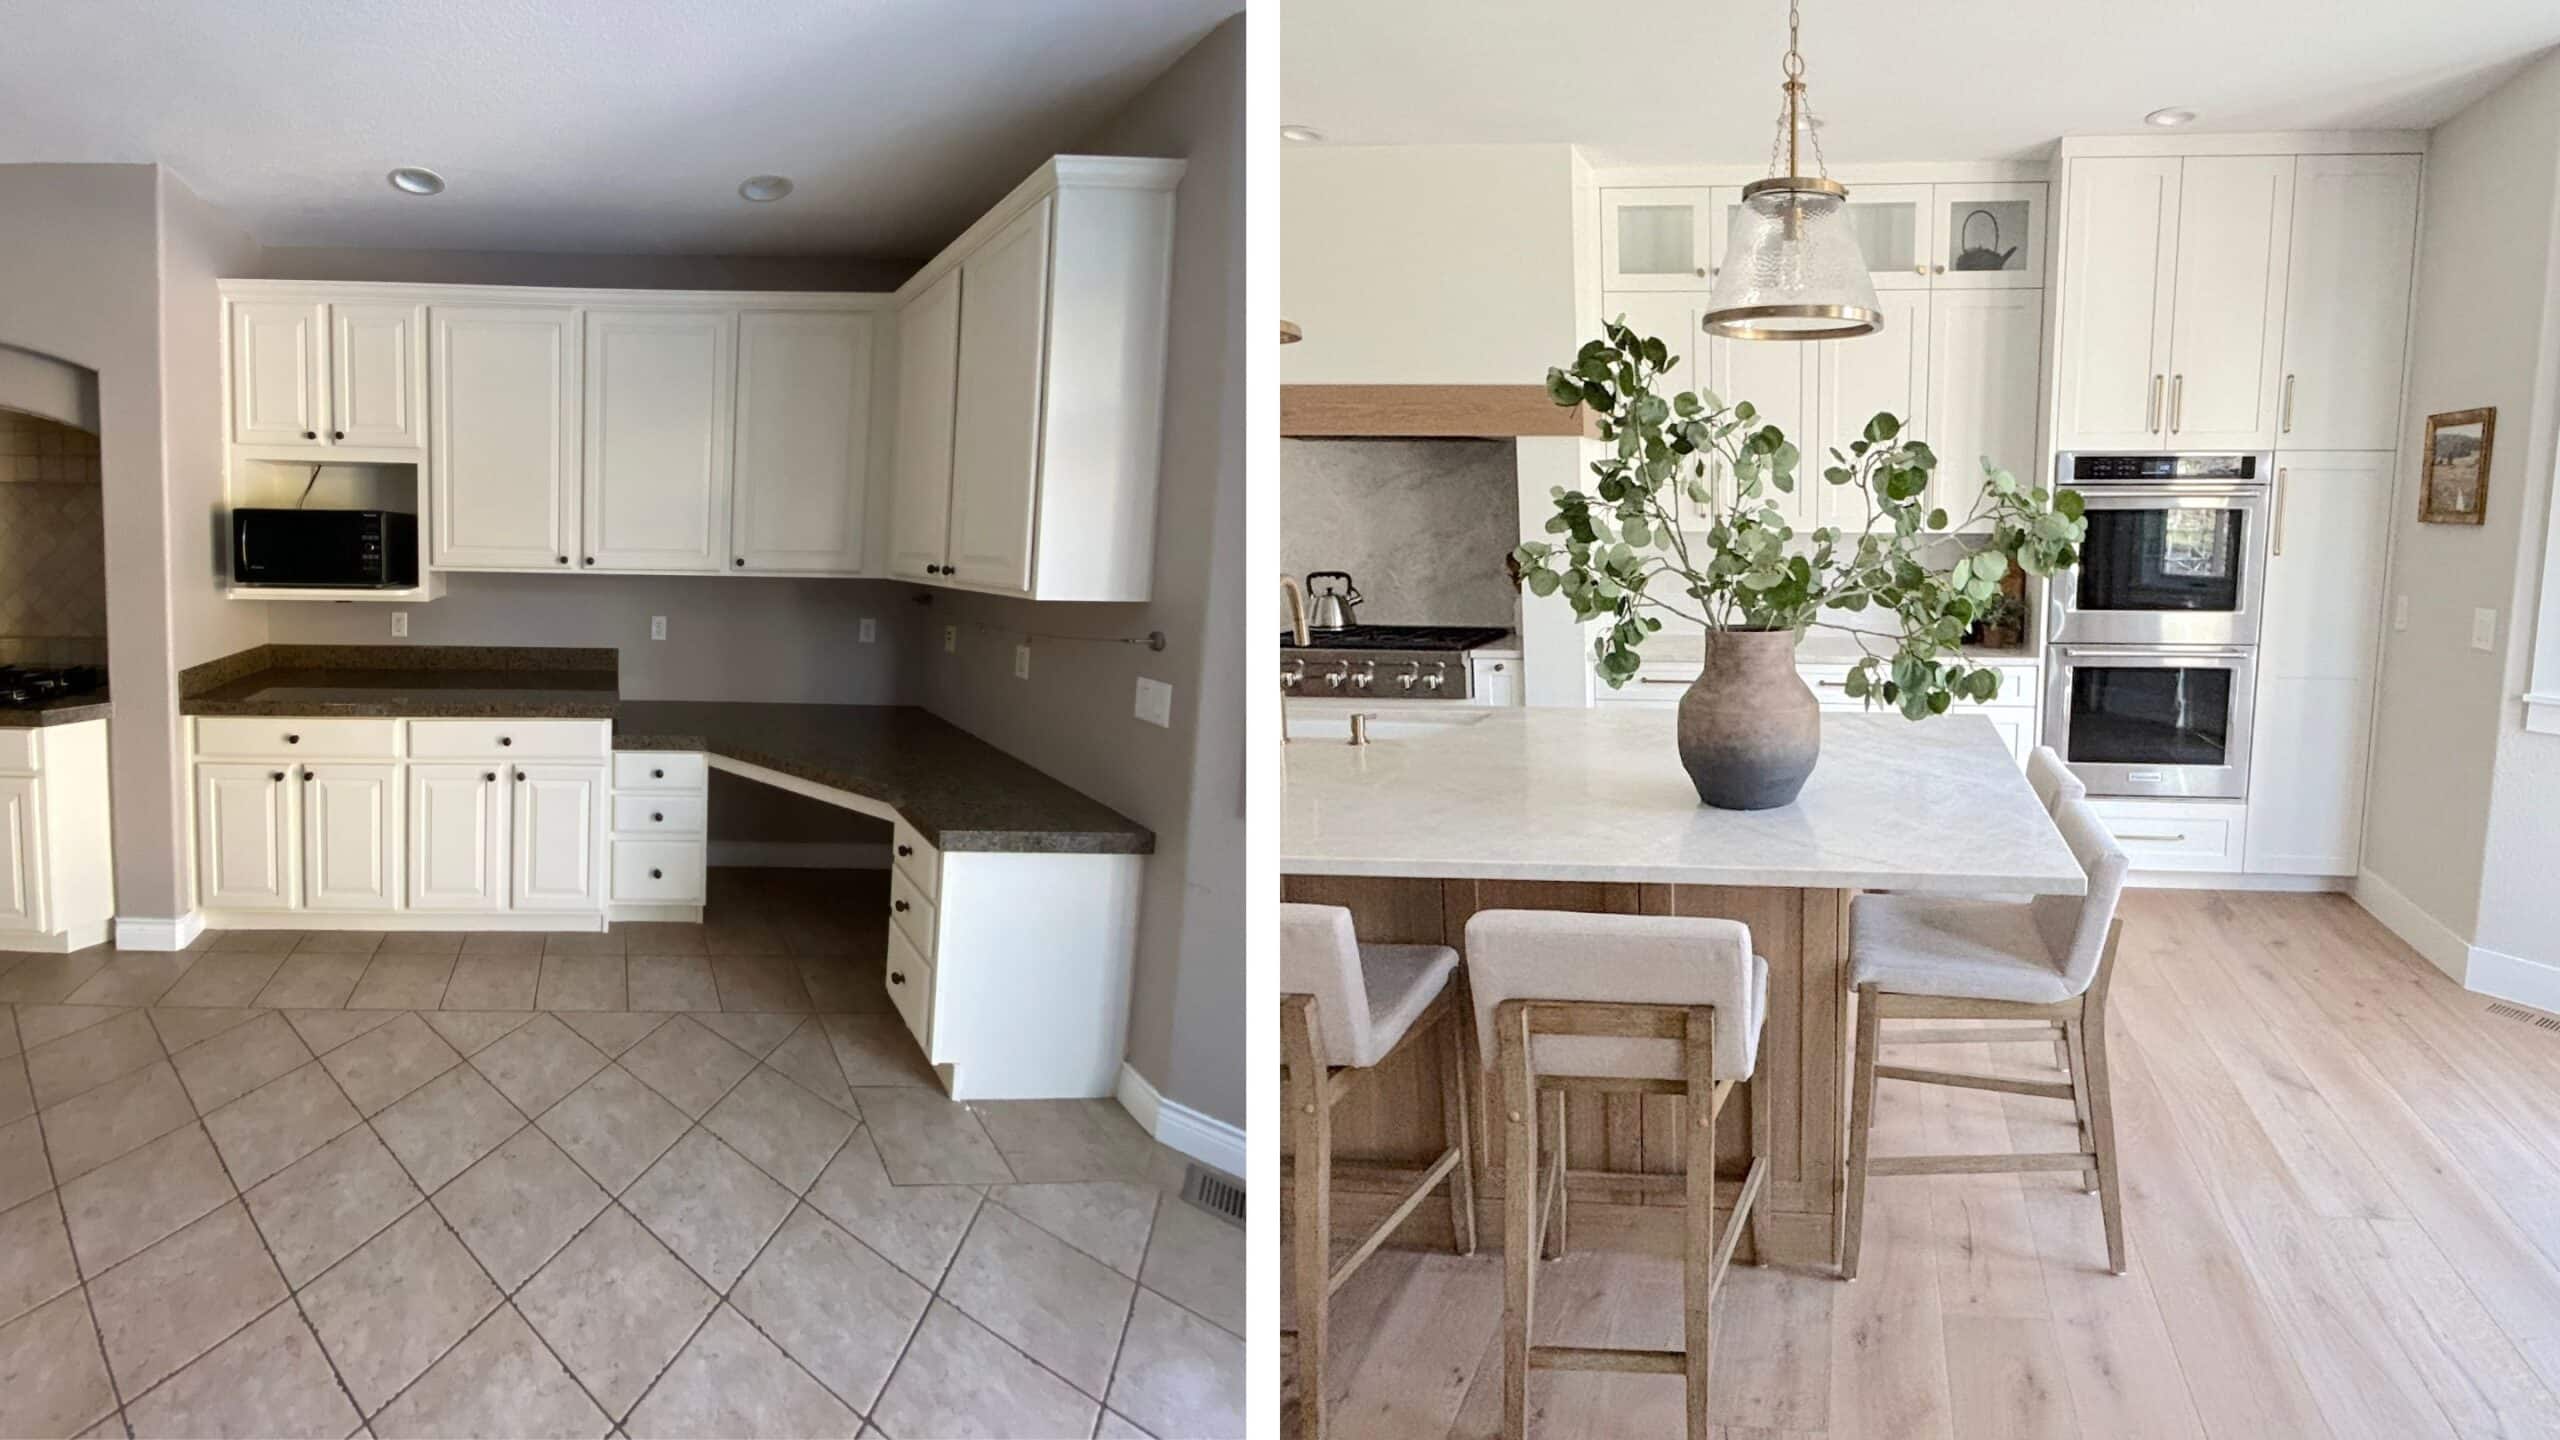
Our Kitchen Before
Let’s start with the before, because the contrast really tells the story.
While the old kitchen was a decent size, almost every finish felt dated. We had granite tile countertops (not even a slab 😬), awkward storage, a two-level island, and cabinetry that didn’t take advantage of the room’s height. The layout technically worked, but it didn’t feel good, didn’t make great use of the space, and it definitely didn’t reflect my personal style.
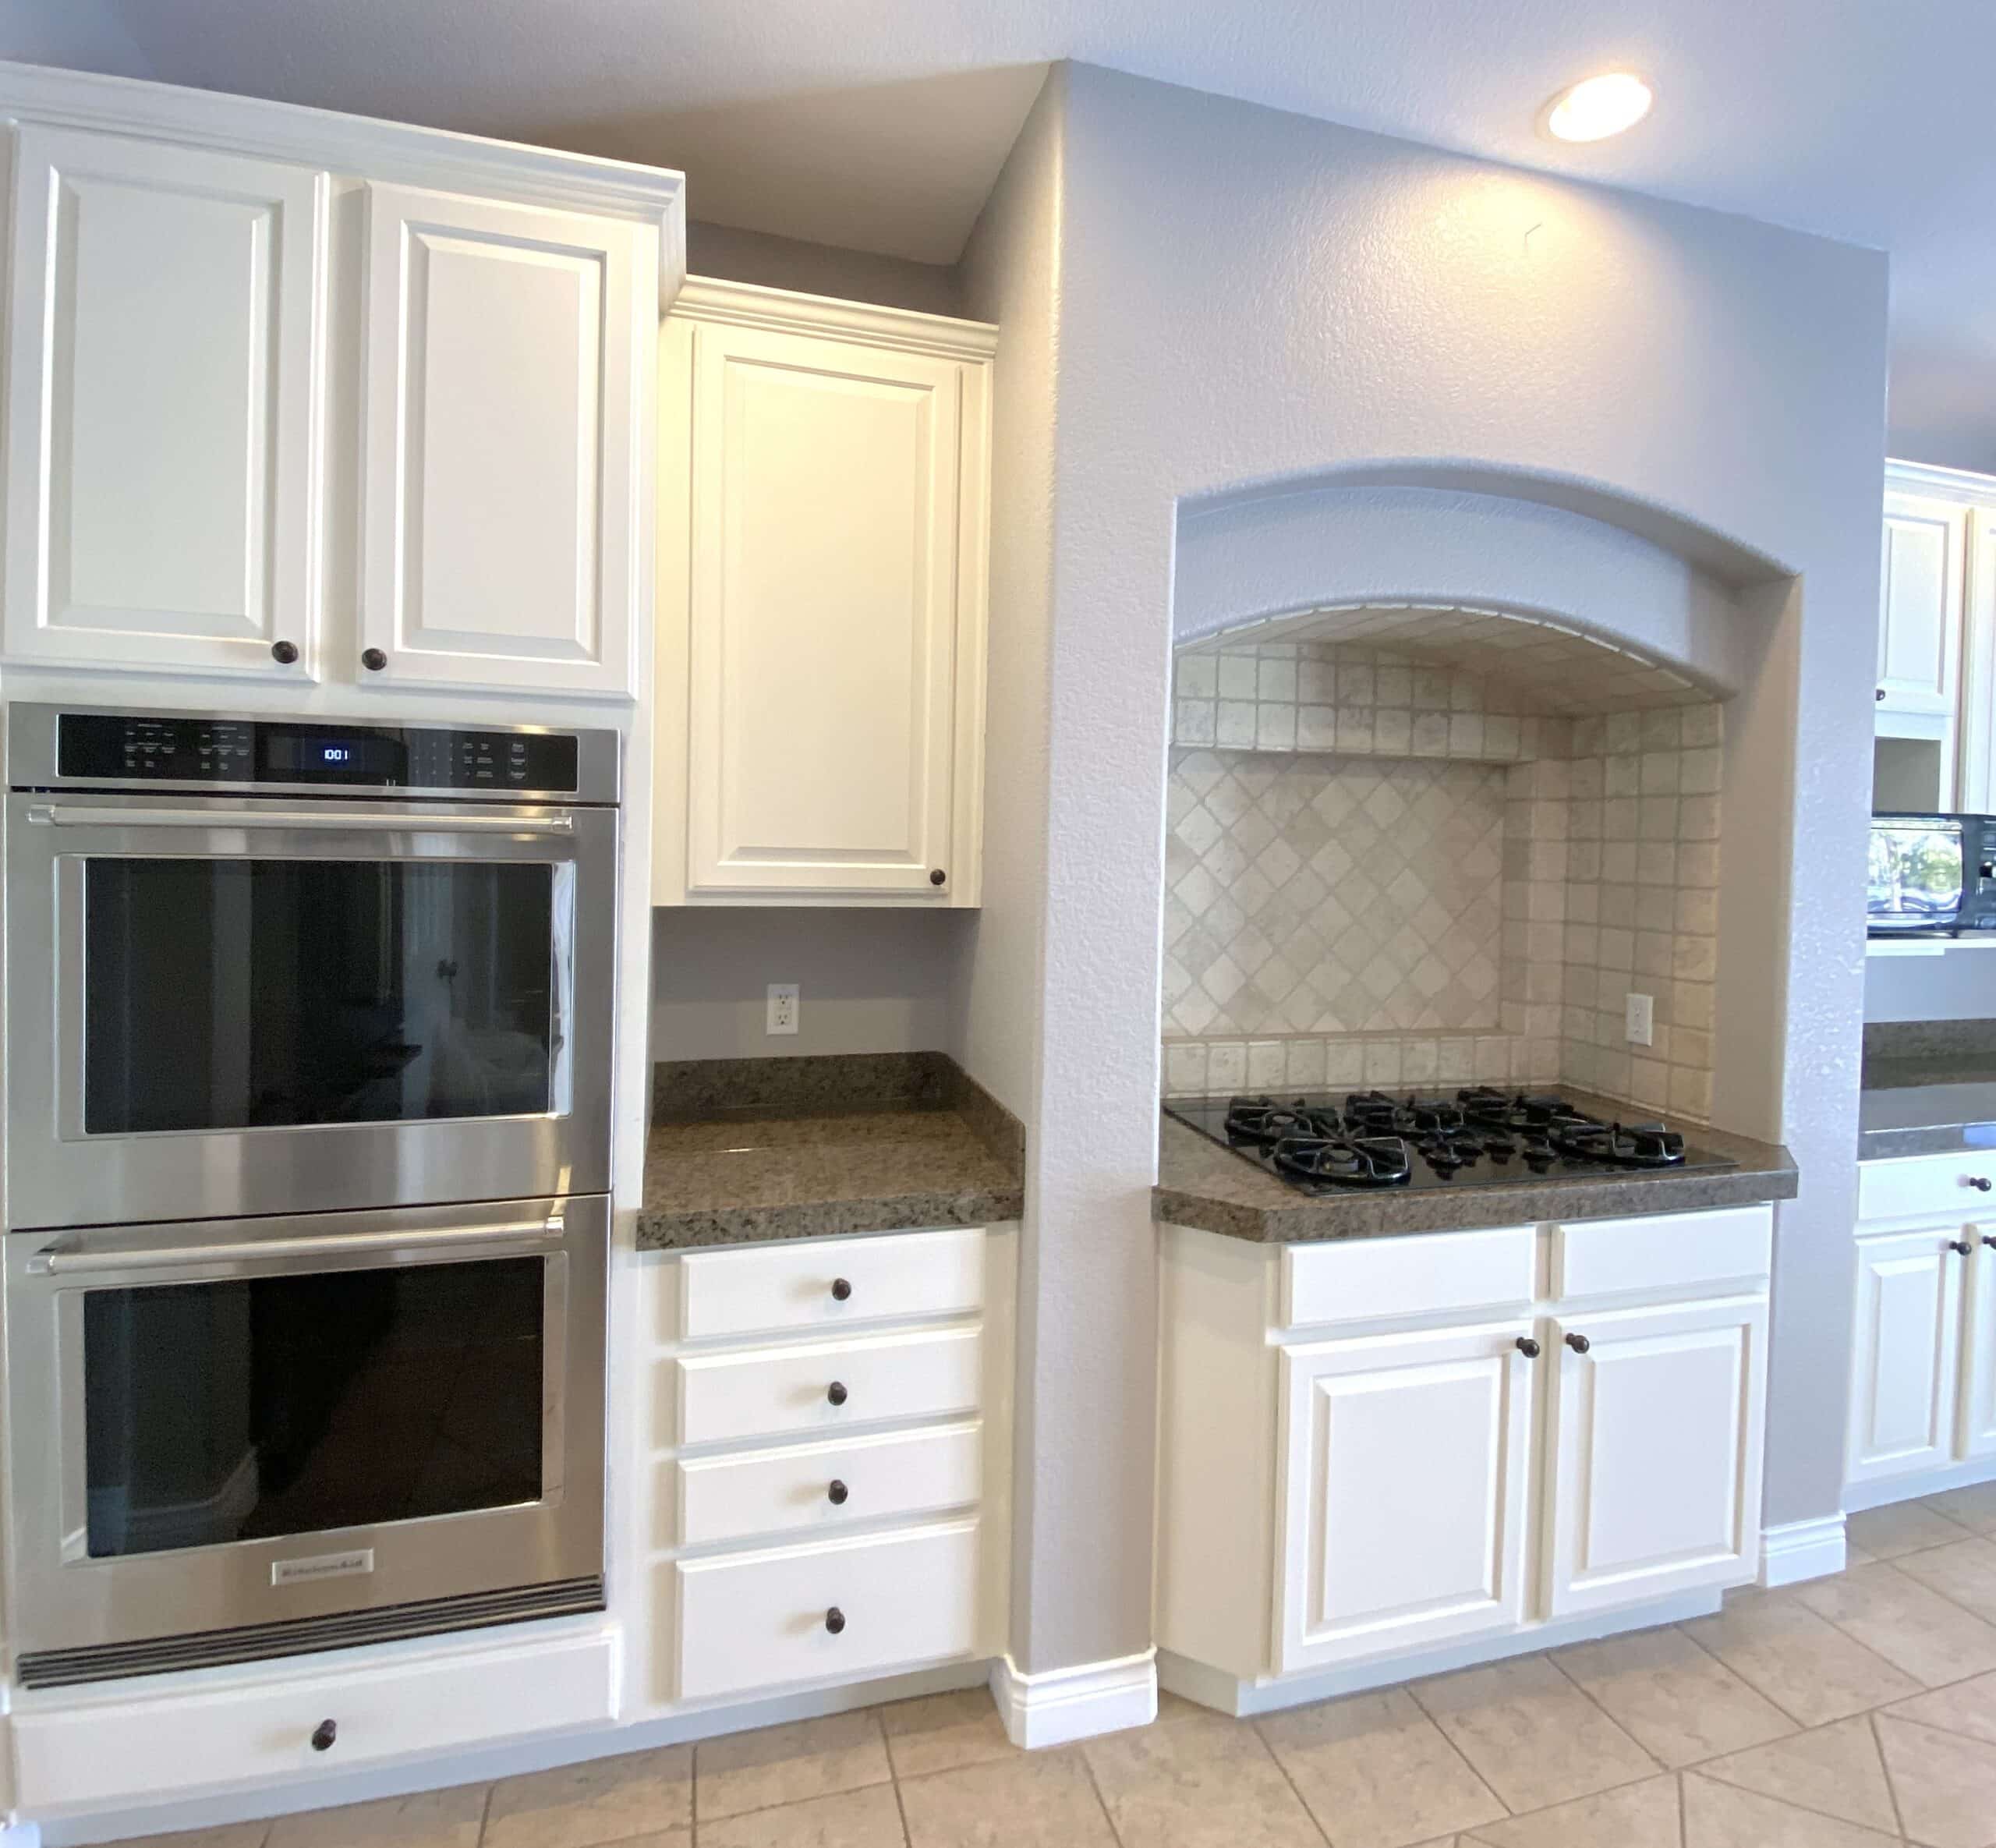
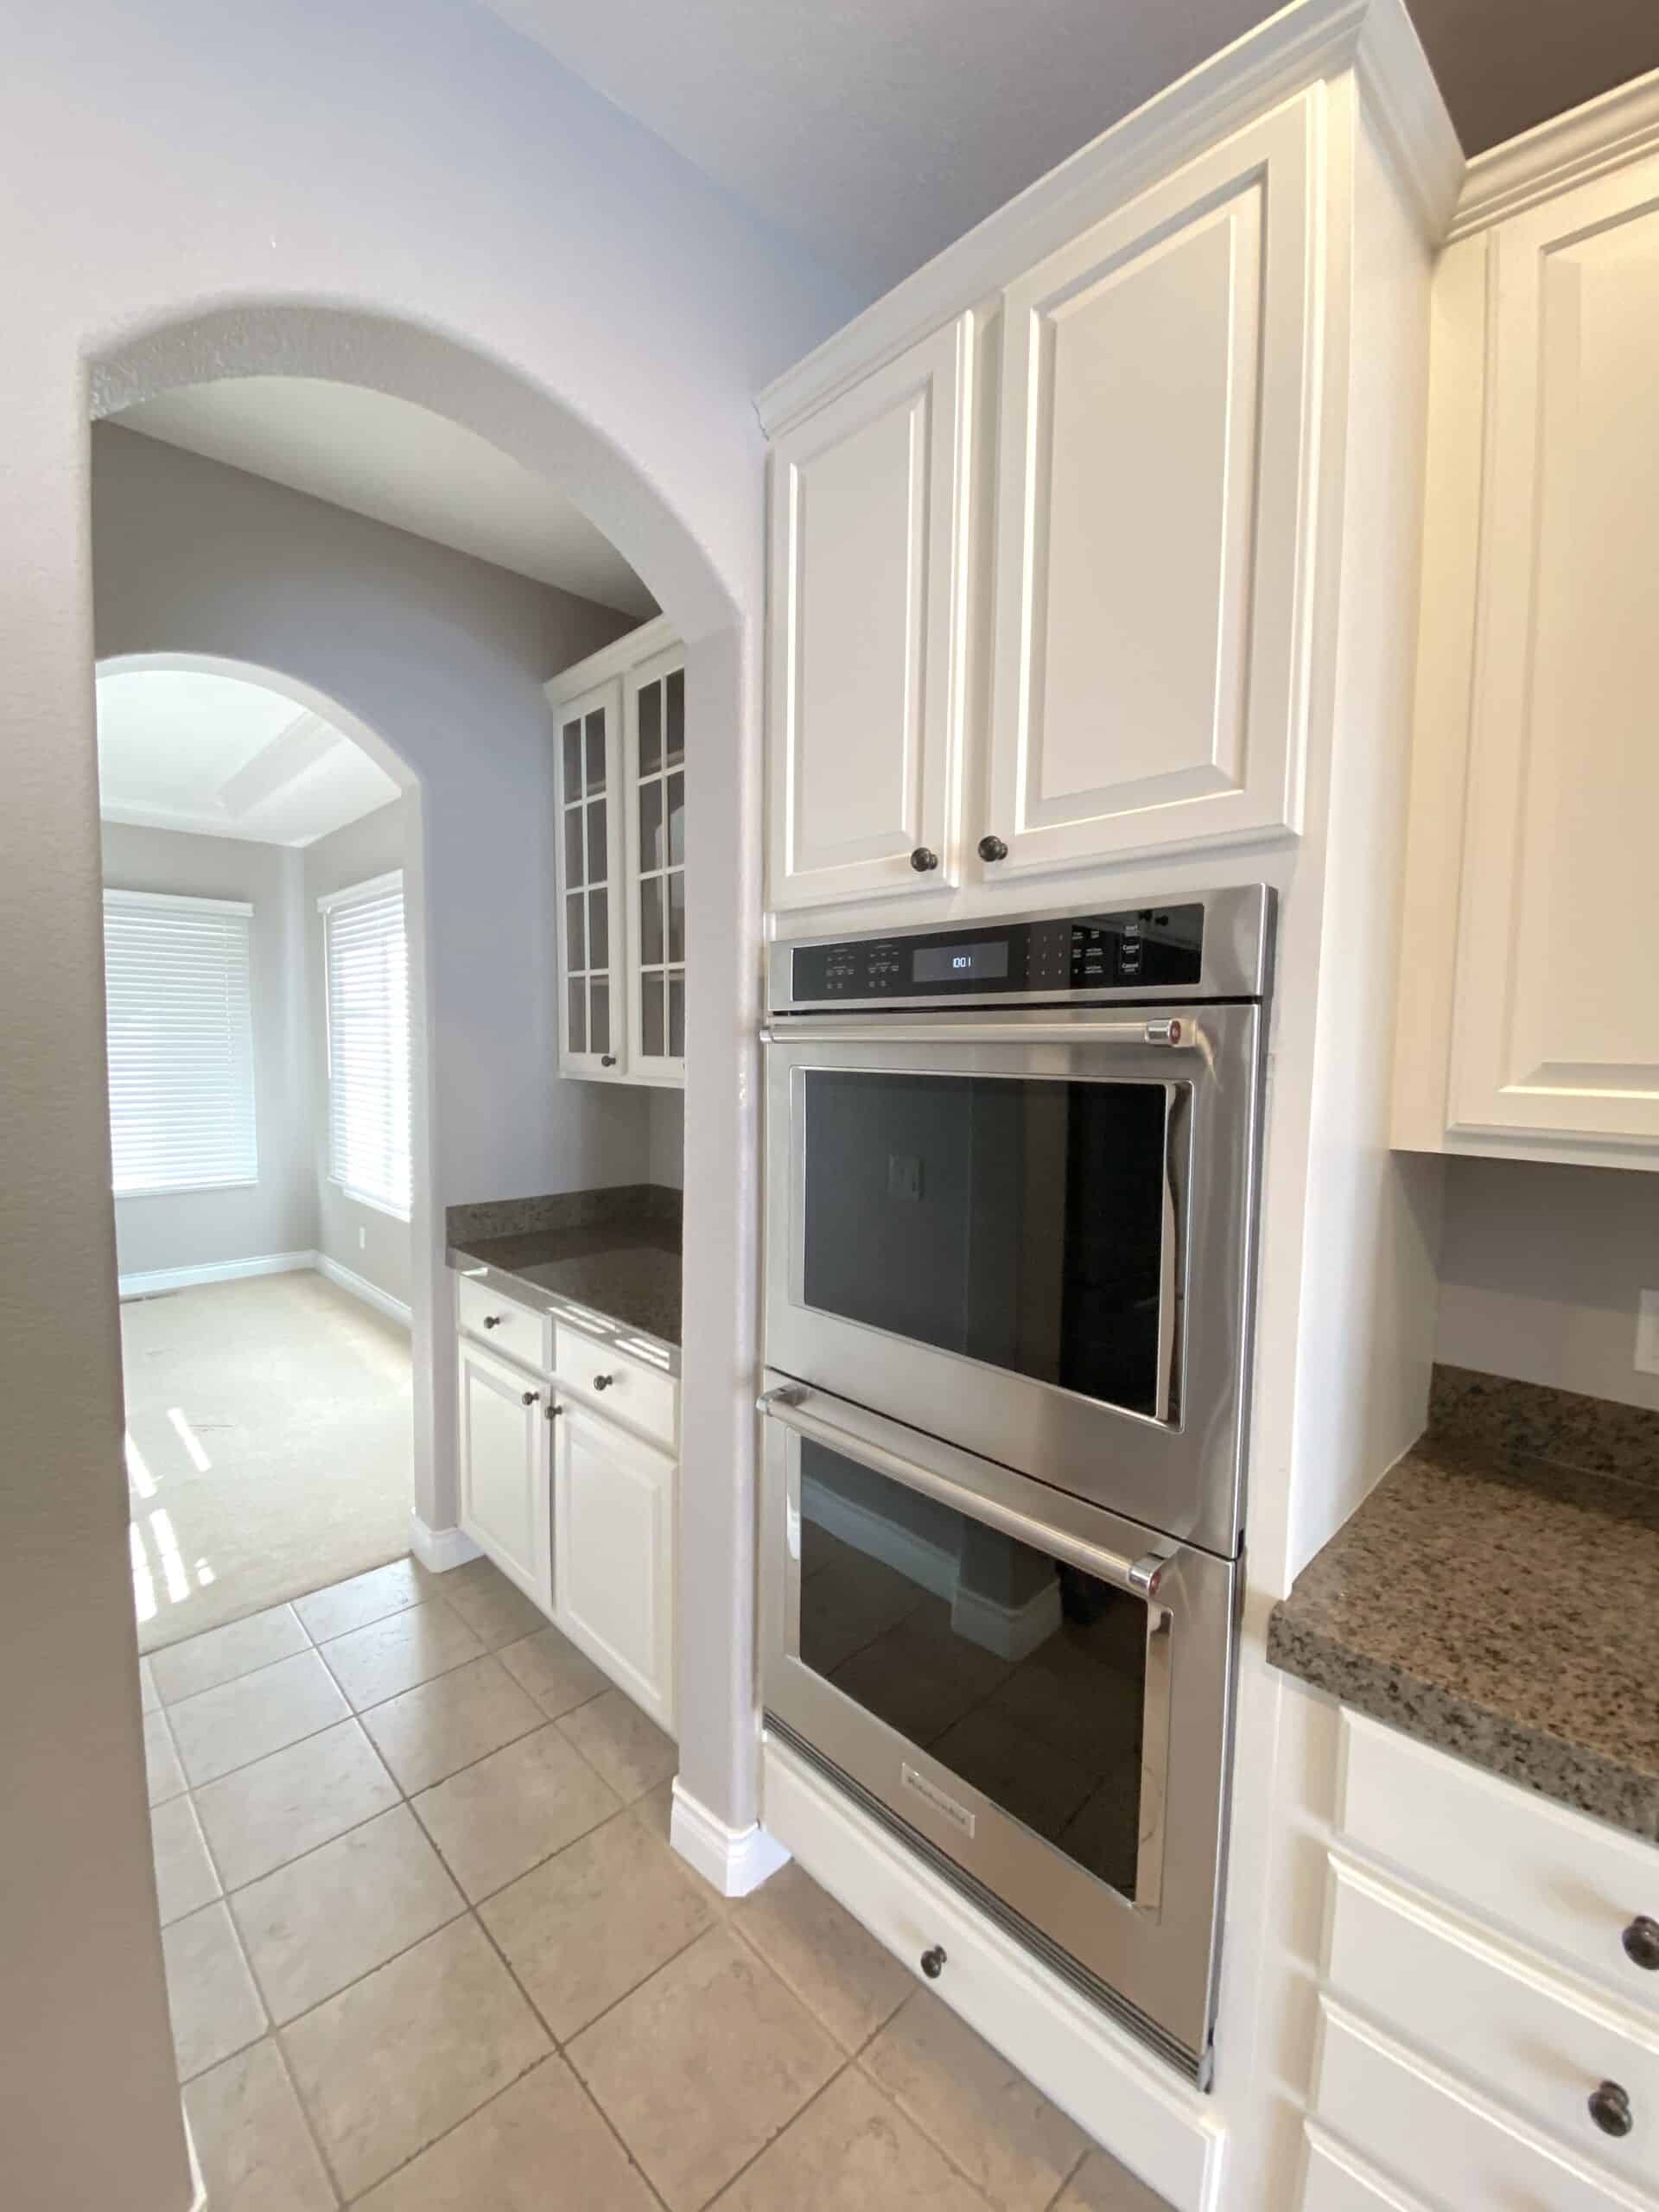
One bright spot? The alcove above the stove. From day one, I knew that space had the potential to become a beautiful focal point with the right range hood and design.
Here’s are a few pictures of our kitchen – BEFORE we started the remodel.

The Vision for Our Dream Kitchen
Our goal was to create a kitchen that feels timeless but current – light and bright, warm and inviting, and highly functional for everyday life. I wanted a space that blends California Casual style with classic elements, like warm wood tones, soft white cabinets, and brass accents.
If you followed along during the planning phase, you’ll recognize this original mood board (below). It became our guiding roadmap for the entire renovation.

The New Kitchen Layout & Overall Feel
We didn’t reinvent the wheel, but we did make a few smart layout changes that created a huge difference in how the kitchen functions:
- The breakfast nook was removed, allowing the kitchen island to enlarge and take center stage. We have a dining room just off the kitchen, so it won’t be missed
- The desk area of the kitchen was scrapped…because it was completely uneccessary
- The island was shifted slightly for better traffic flow near the refrigerator
- Wall ovens were relocated for improved symmetry
- Storage was dramatically upgraded with more efficient cabinetry
- The pantry closet next to the refrigerator was converted into cabinetry with pull-out shelves – much better use of space
- We kept some of the existing stainless steel appliances (ovens, dishwasher) to help keep costs down
The result? A kitchen that finally feels more balanced, open, and high-end.
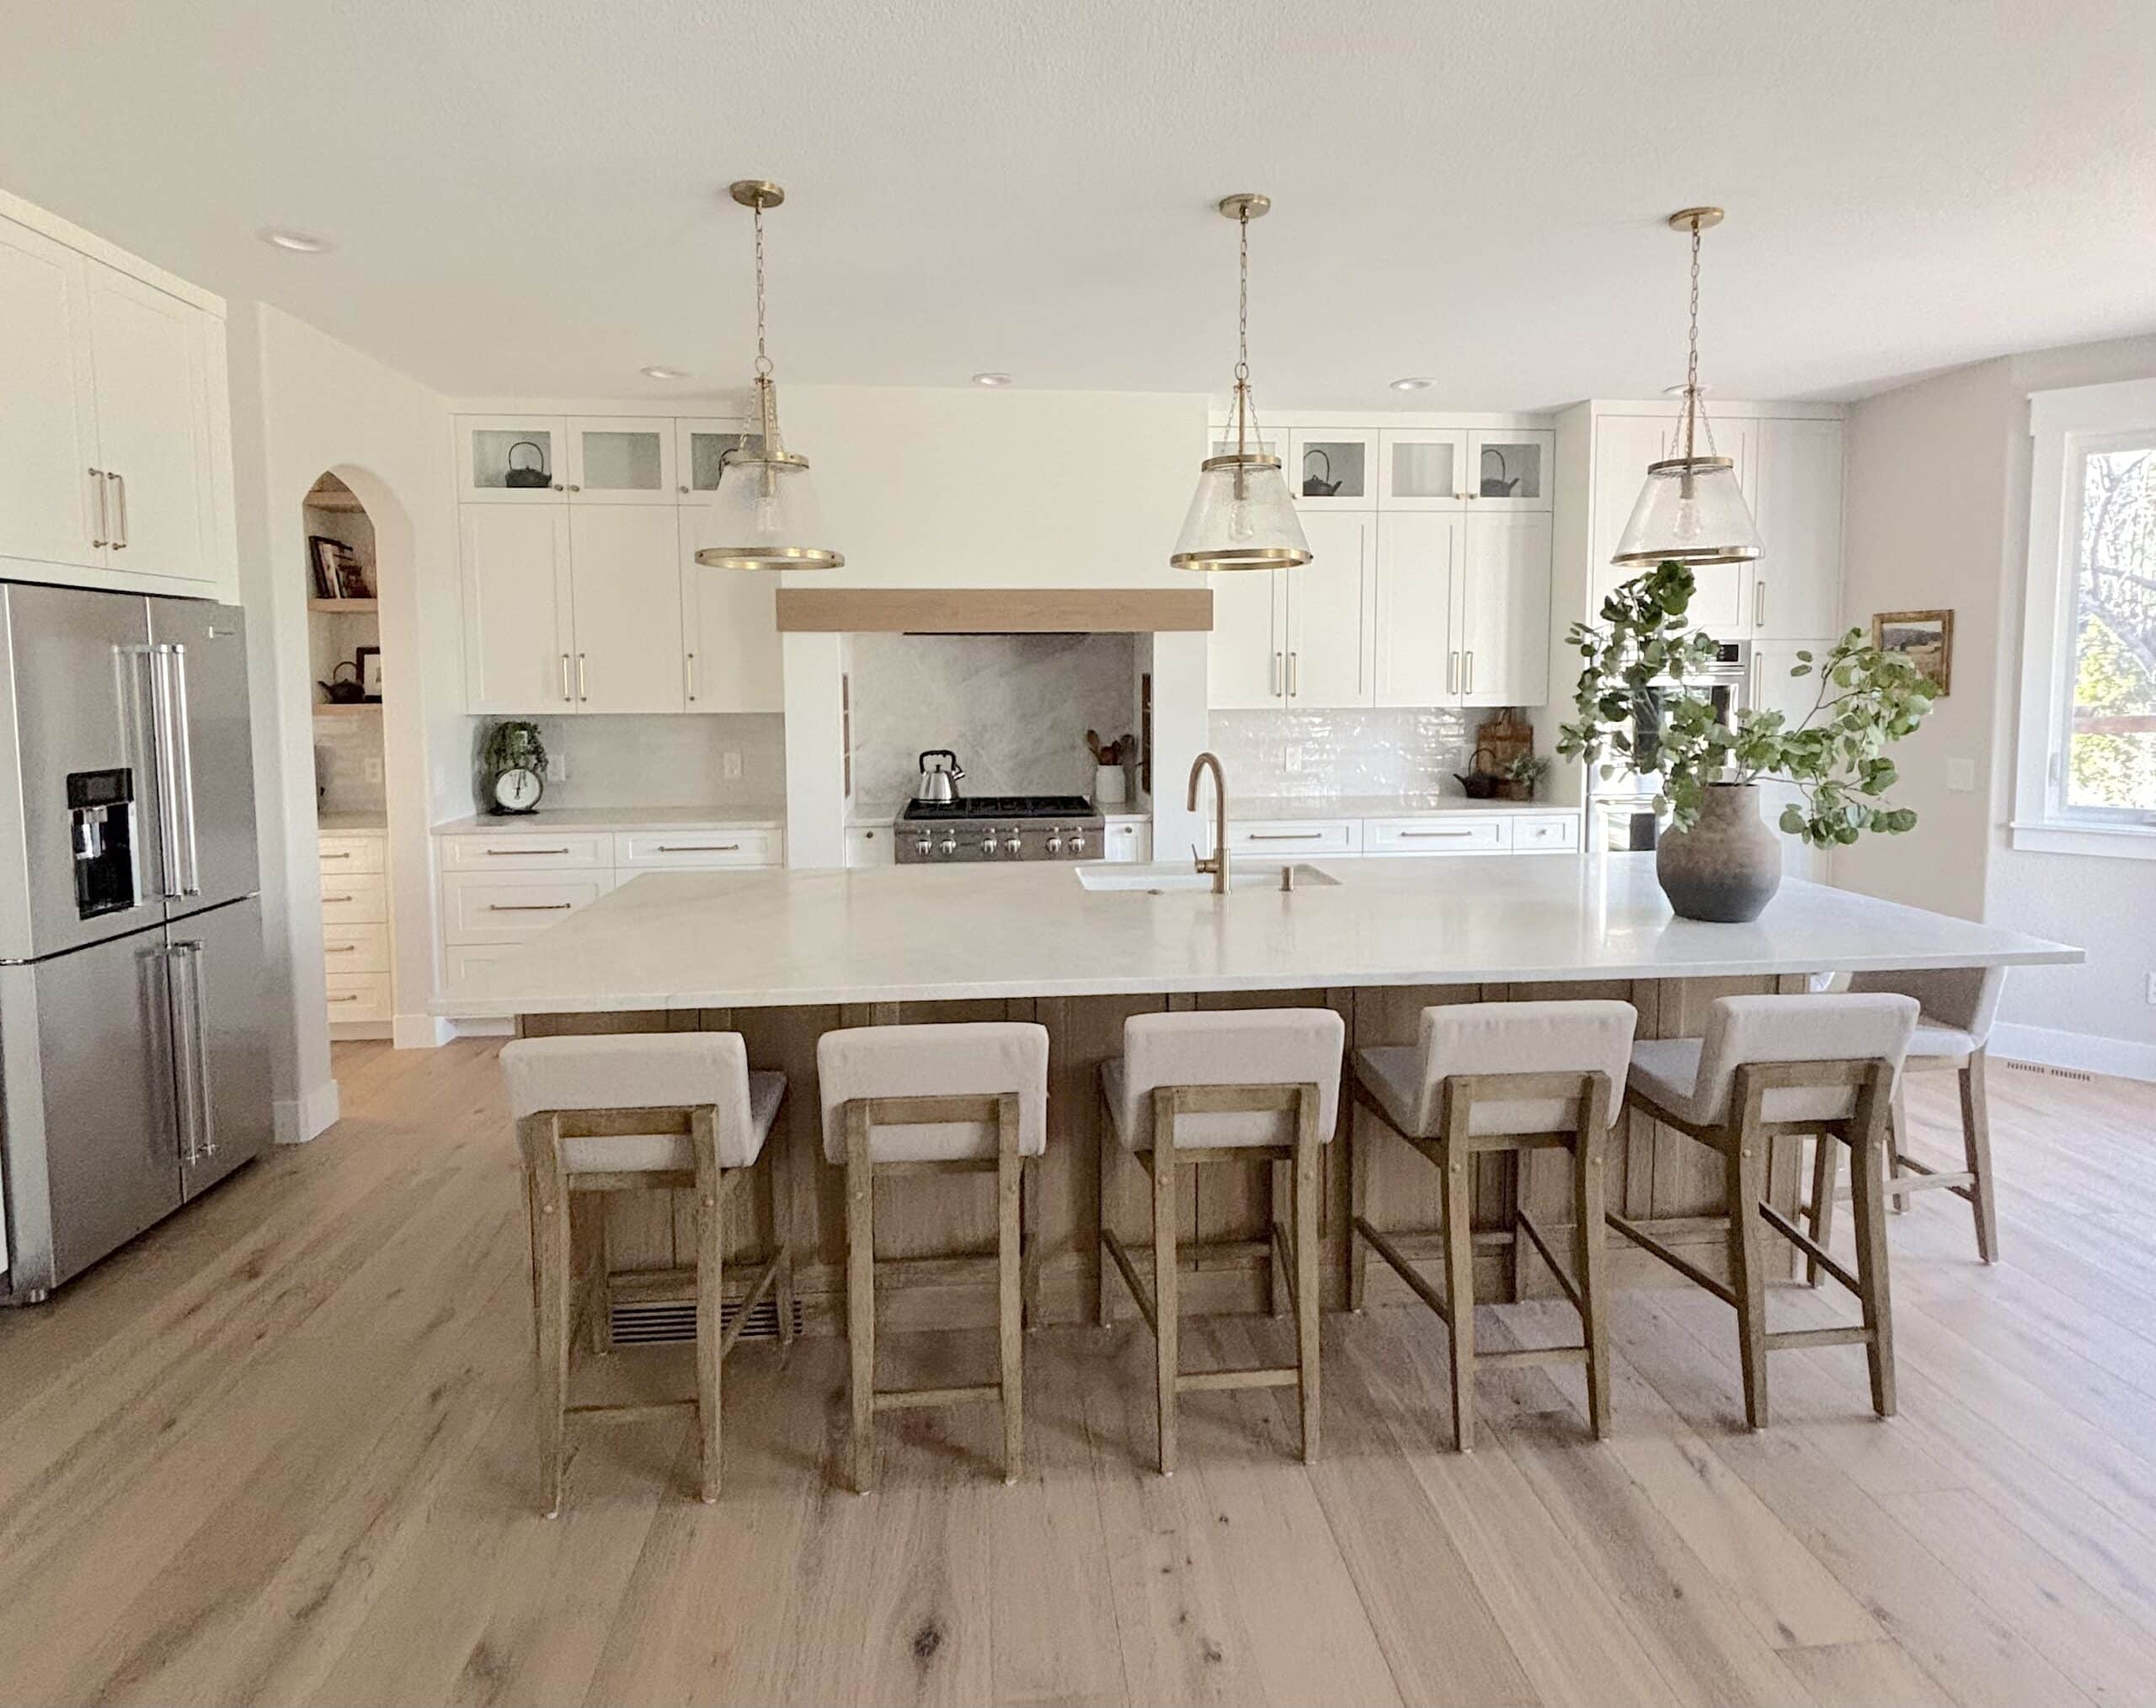

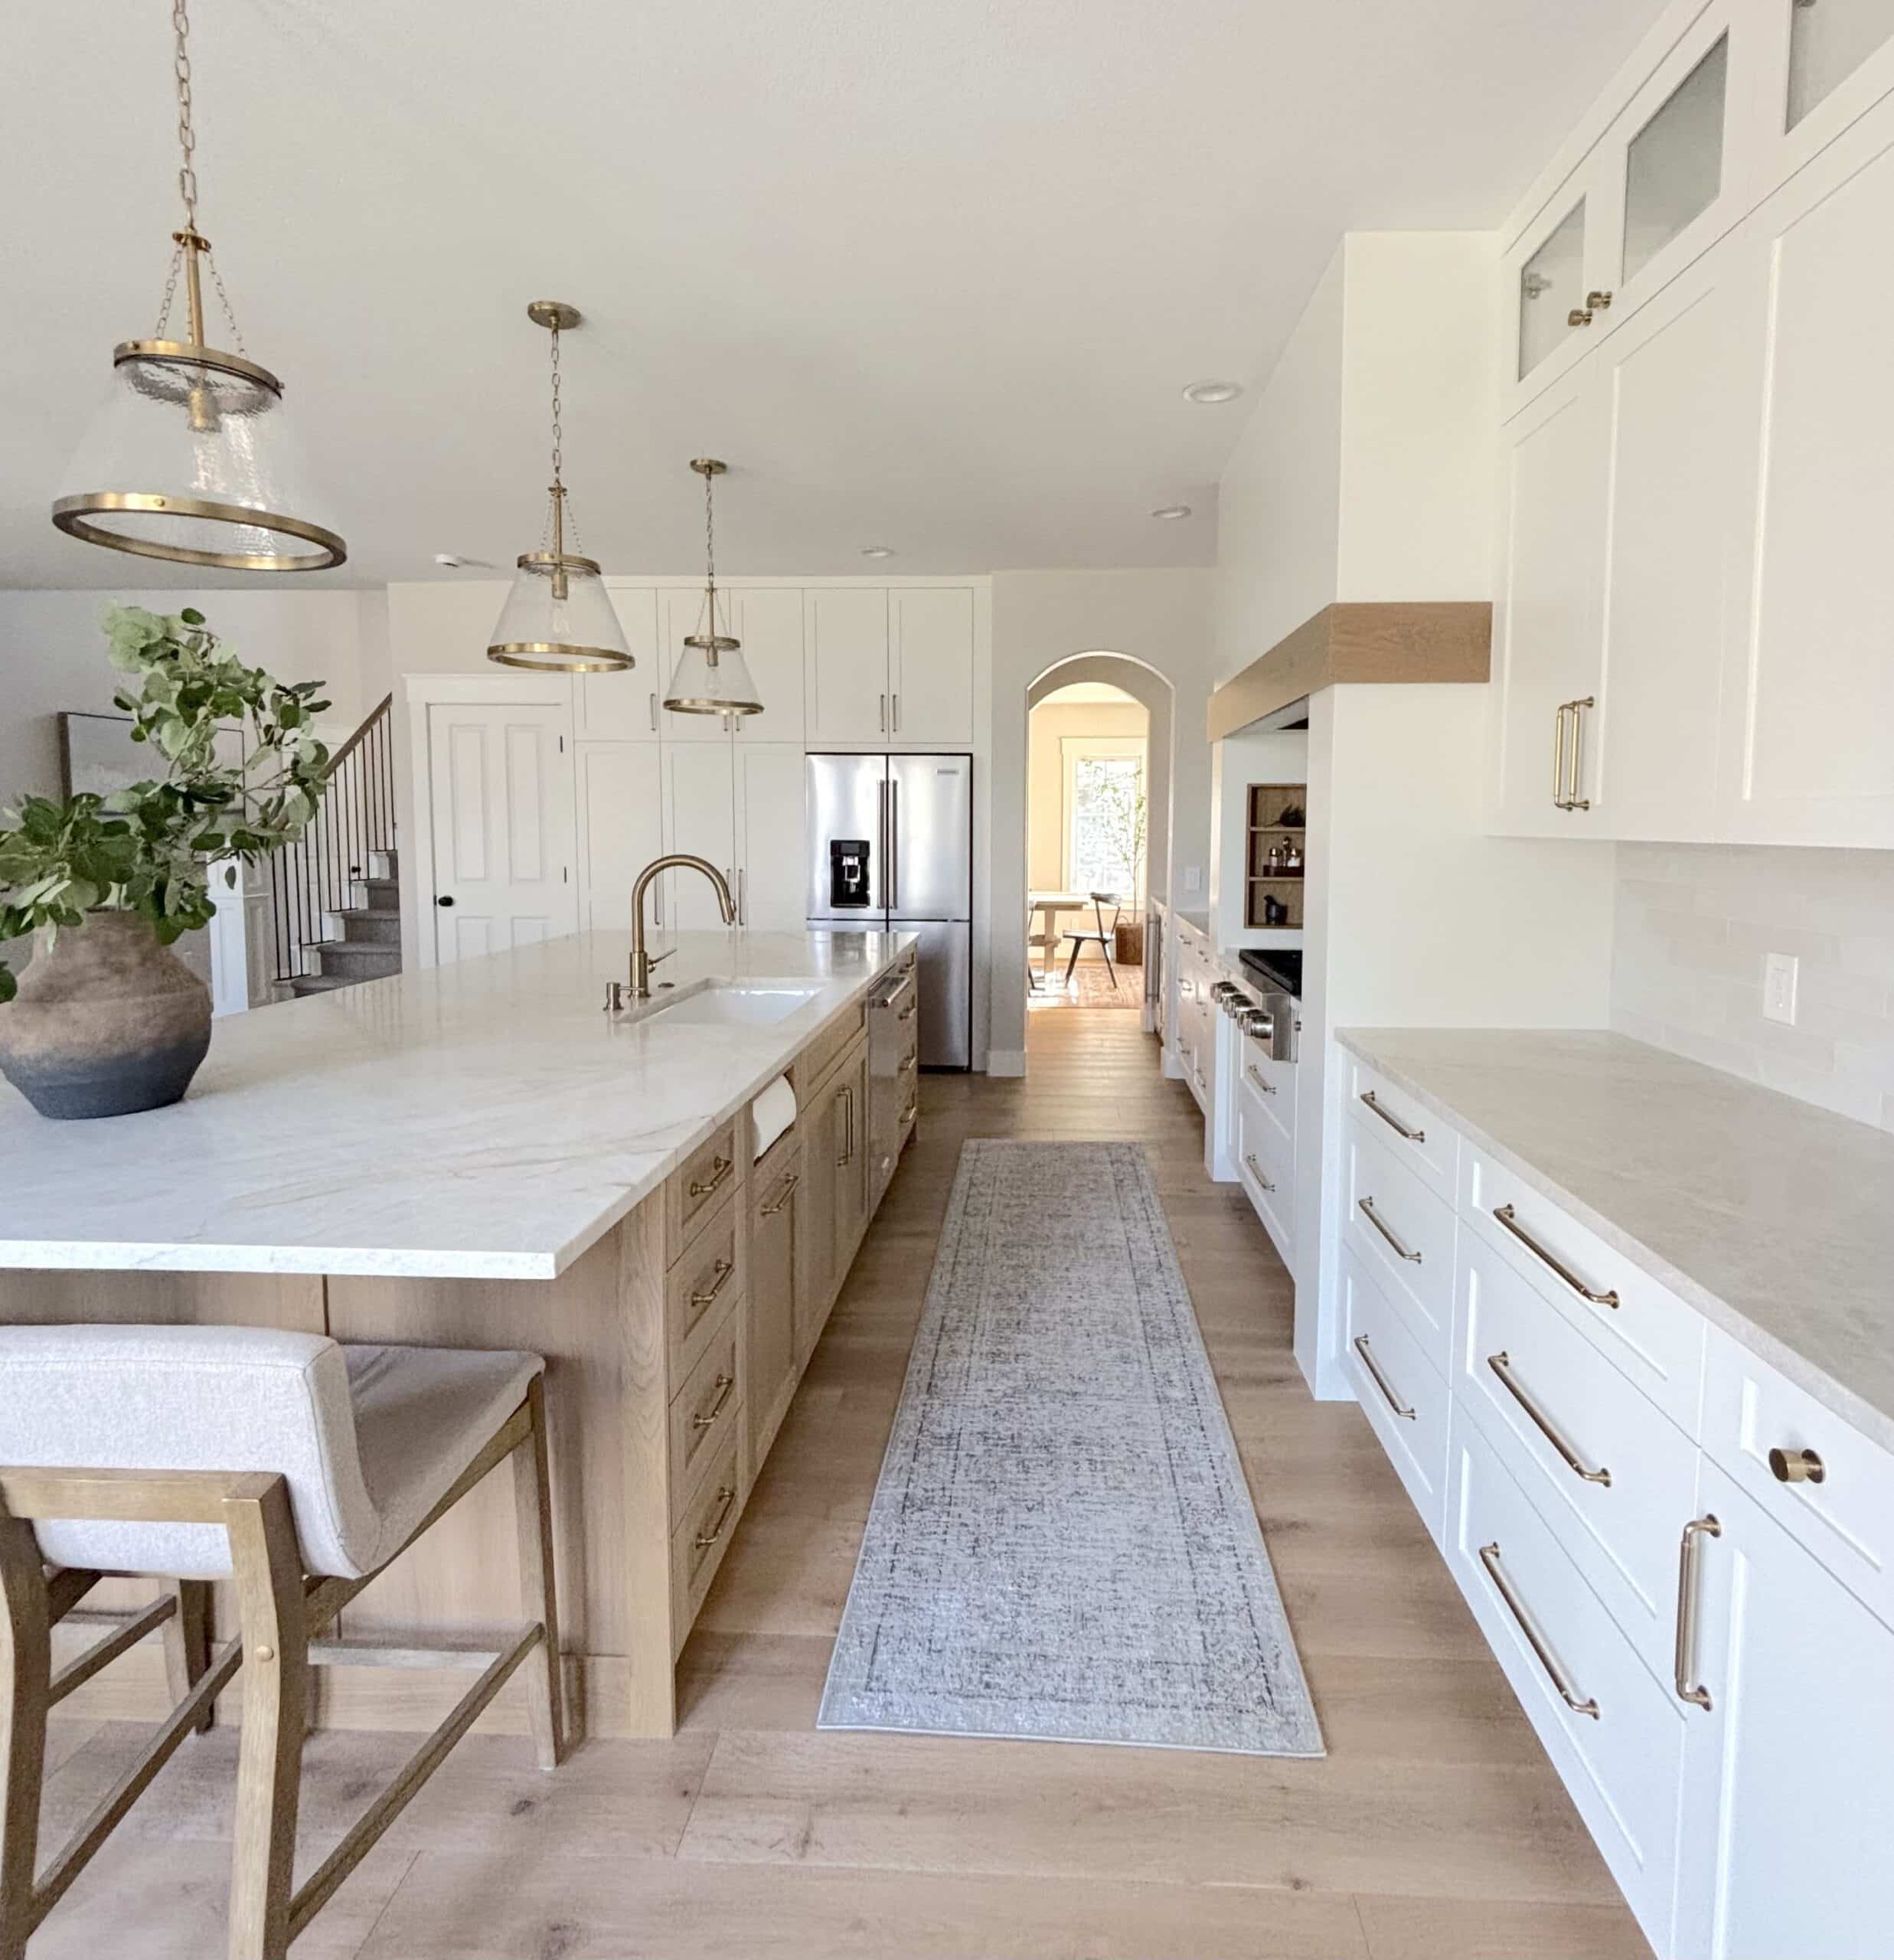
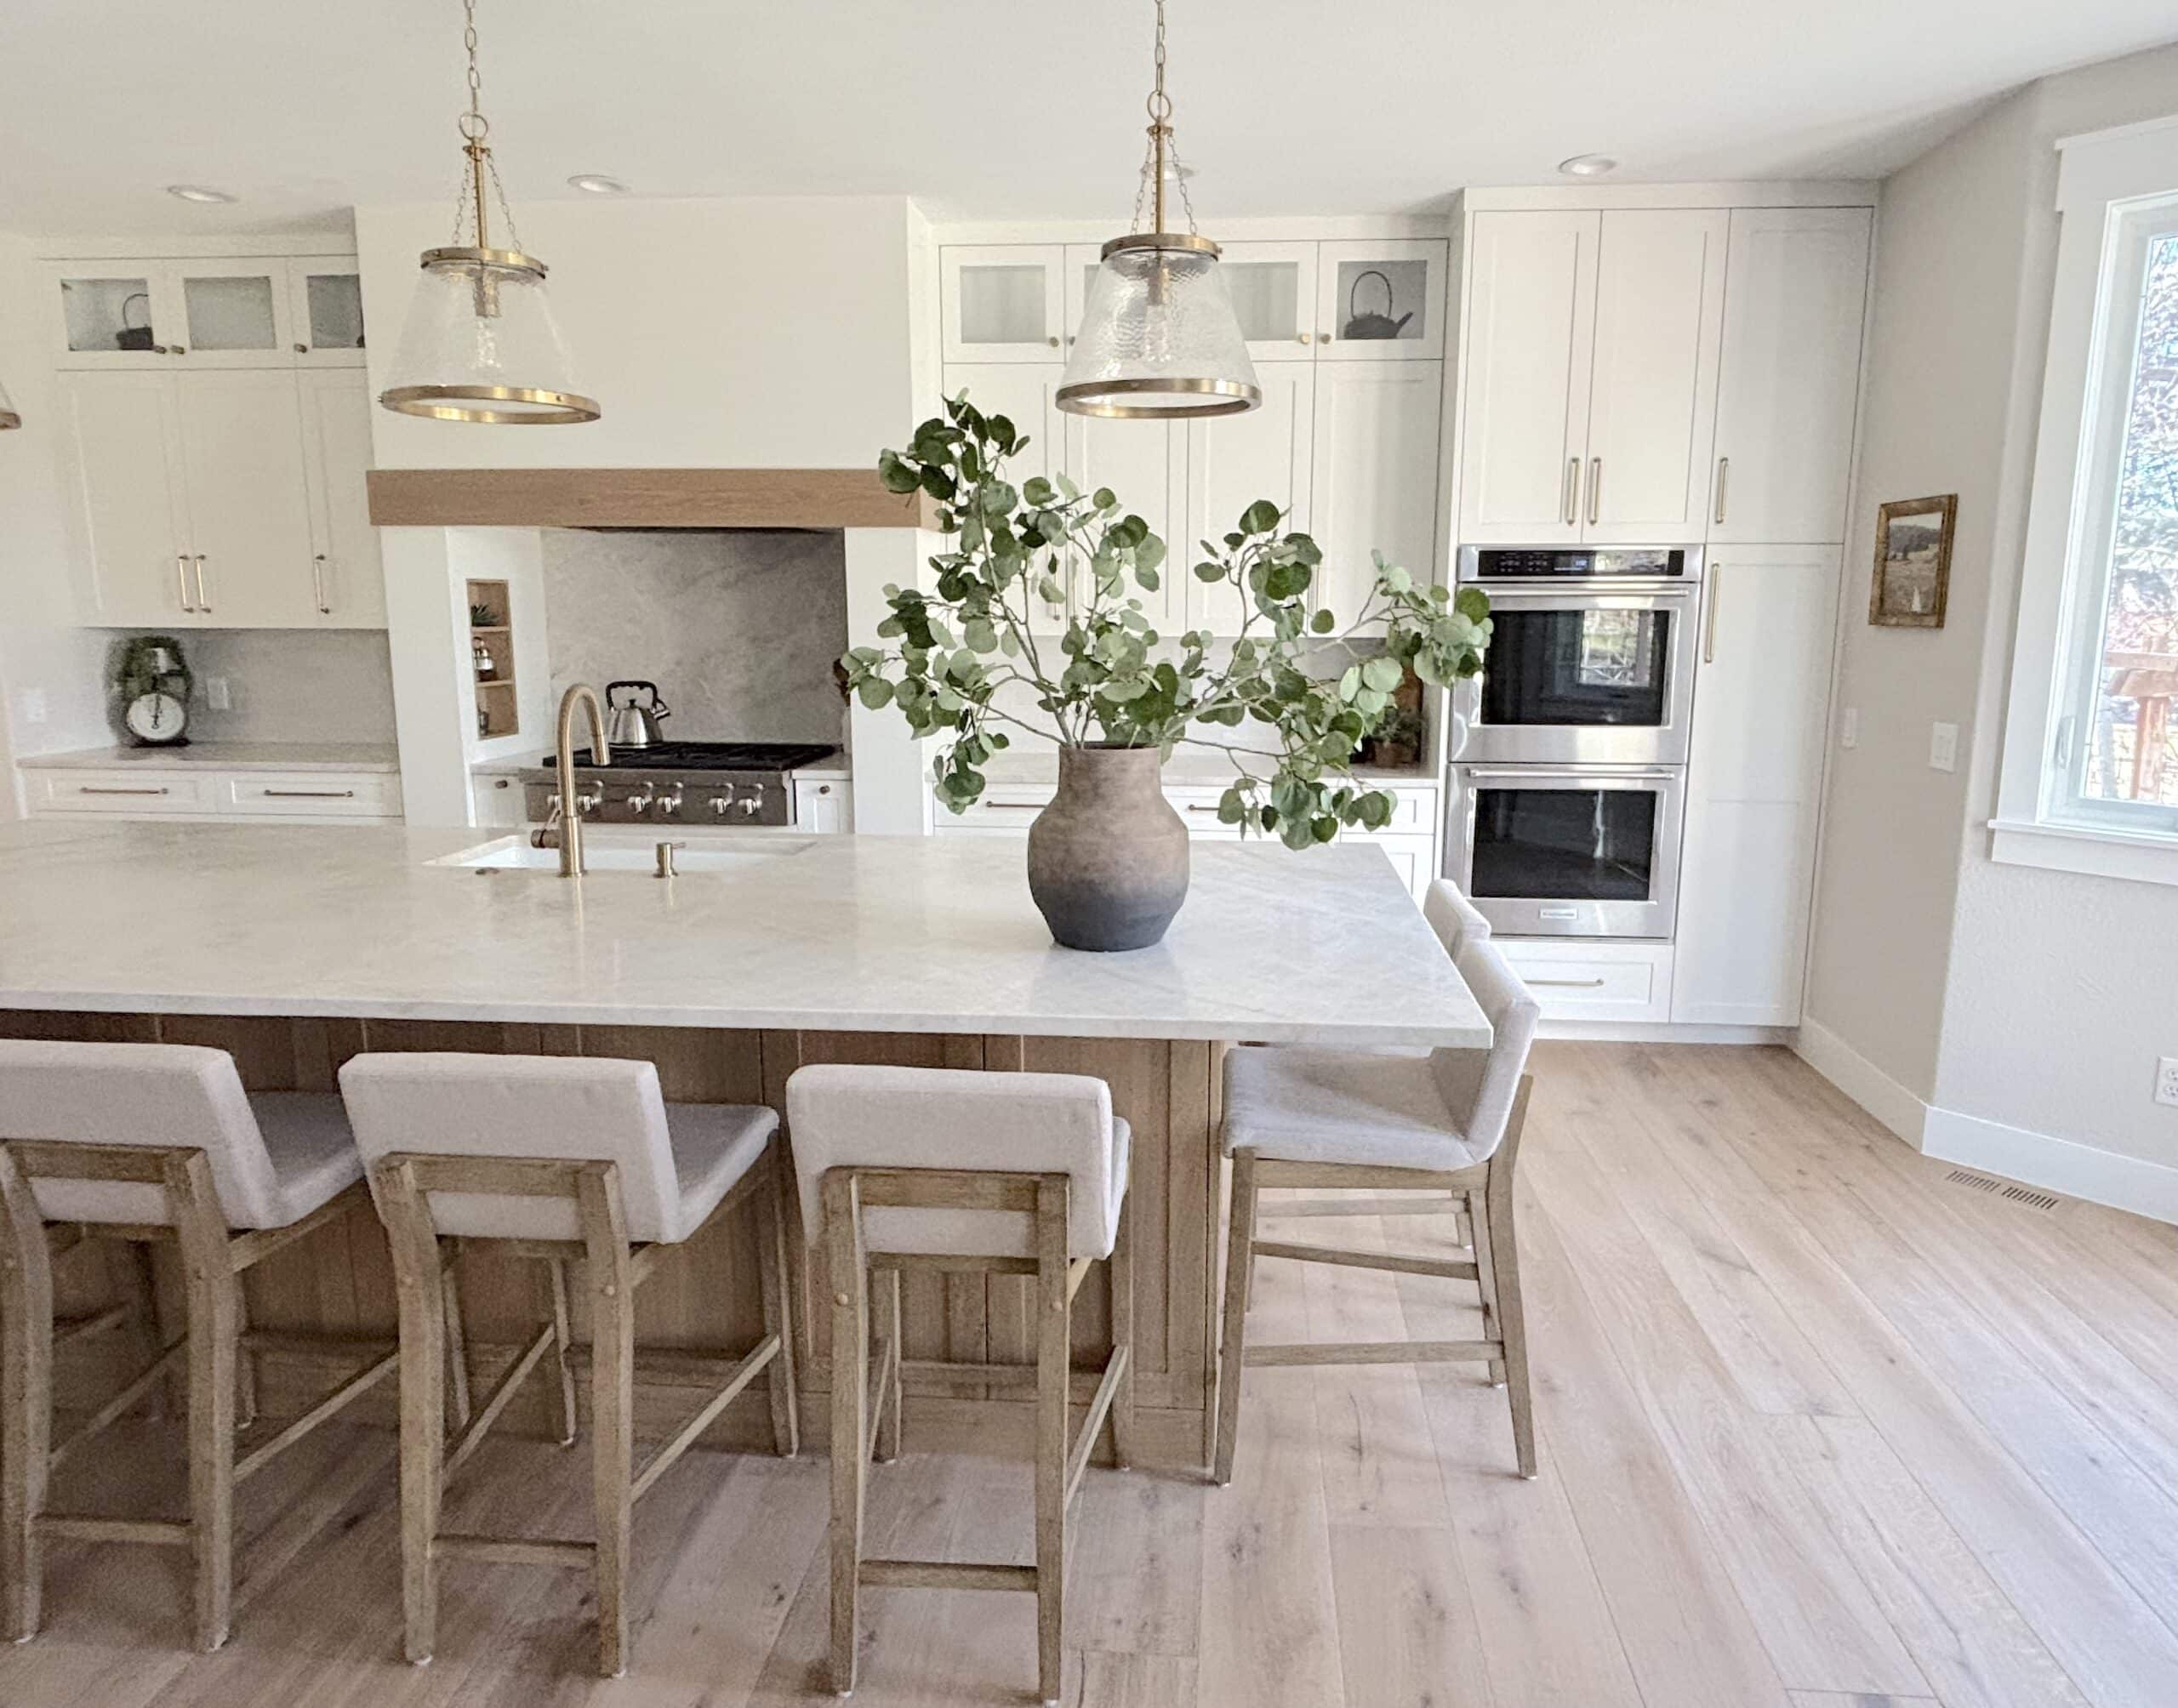
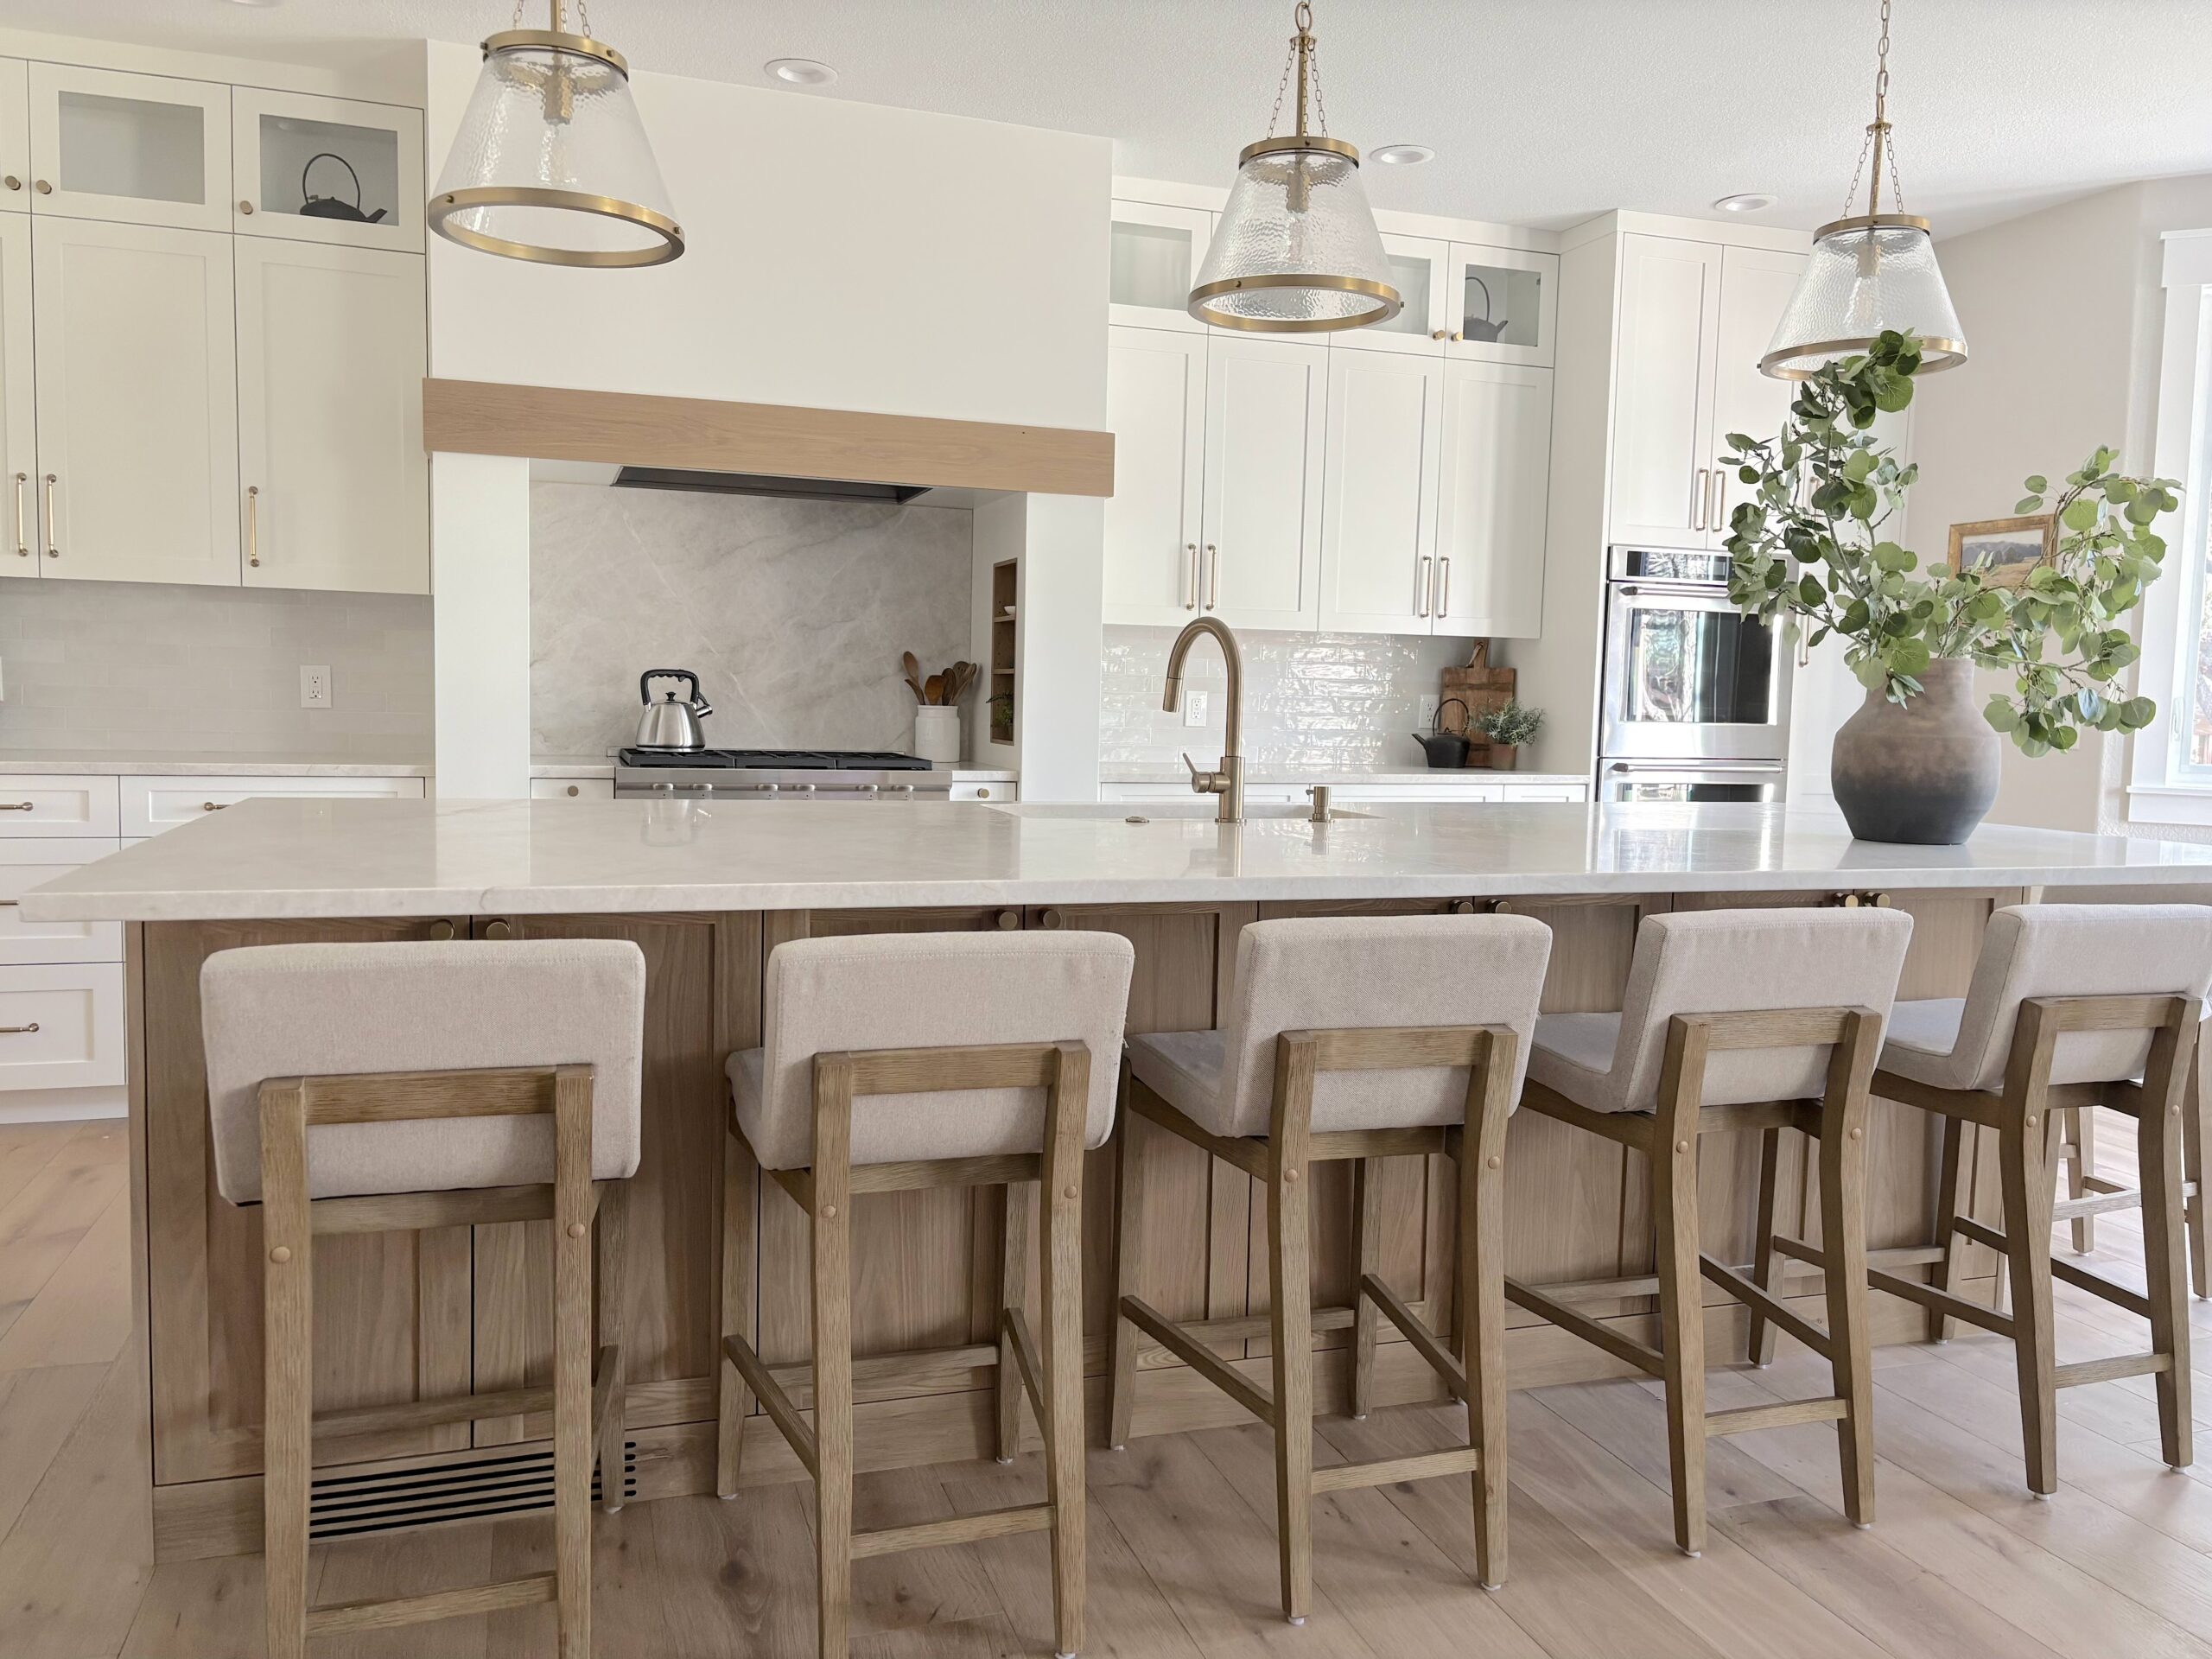
The Cabinetry
Cabinetry sets the tone for the entire kitchen, and this was one of the most important decisions we made.
We chose white cabinets for the perimeter to keep things light and bright. We chose custom, frameless shaker cabinets painted Benjamin Moore White Dove. It’s a soft, warm white that never feels stark and works beautifully with both natural stone and wood tones.

For contrast, we chose to go with white oak on the island. I debated painted vs. stained for a long time (side note: there’s no right answer, in my opinion), but the warmth of natural wood felt right for this space and my design style.

We also ran the upper cabinets all the way to the ceiling, which is an absolute must if you want your kitchen to feel taller and more custom.
One last thing…we prioritized pull-out drawers over cabinets in every lower cabinet. And, if you take one thing away from this post, let it be this…drawers change everything. When it comes to designing a kitchen, drawers are the way to go – no more digging through dark cabinets!
Cabinets by Ilnicki Woodworks | Construction by Natural Construction
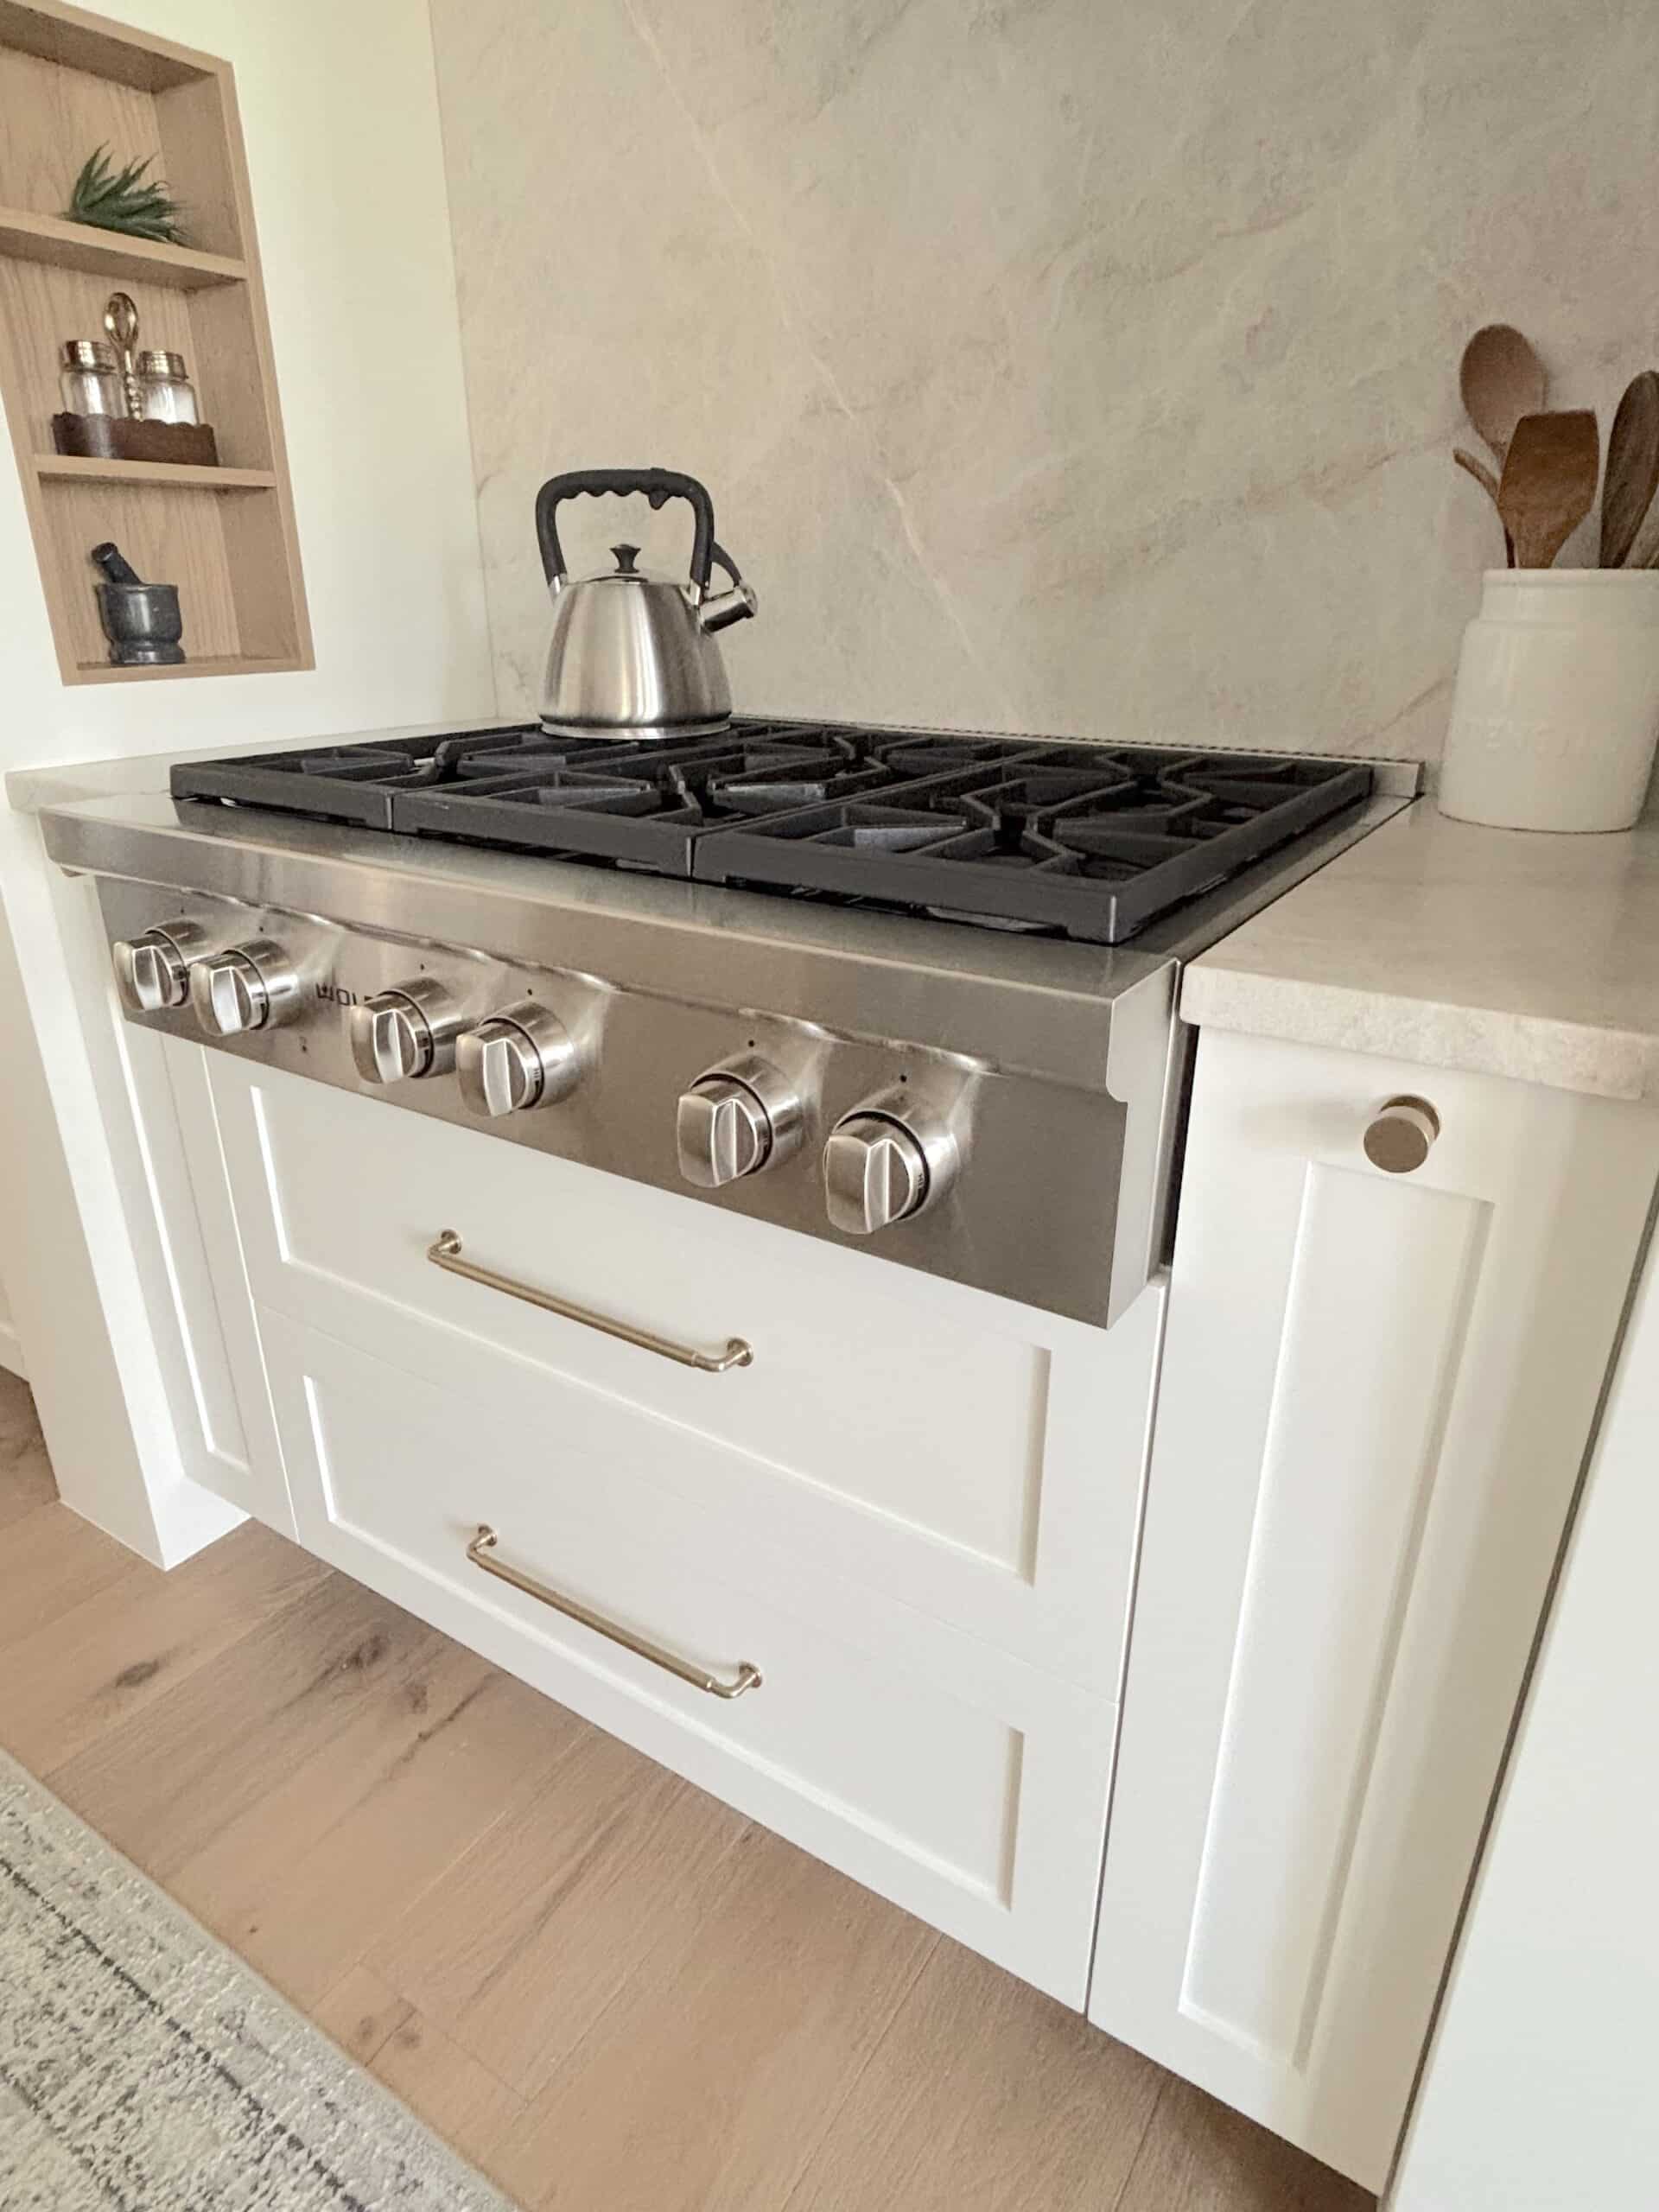
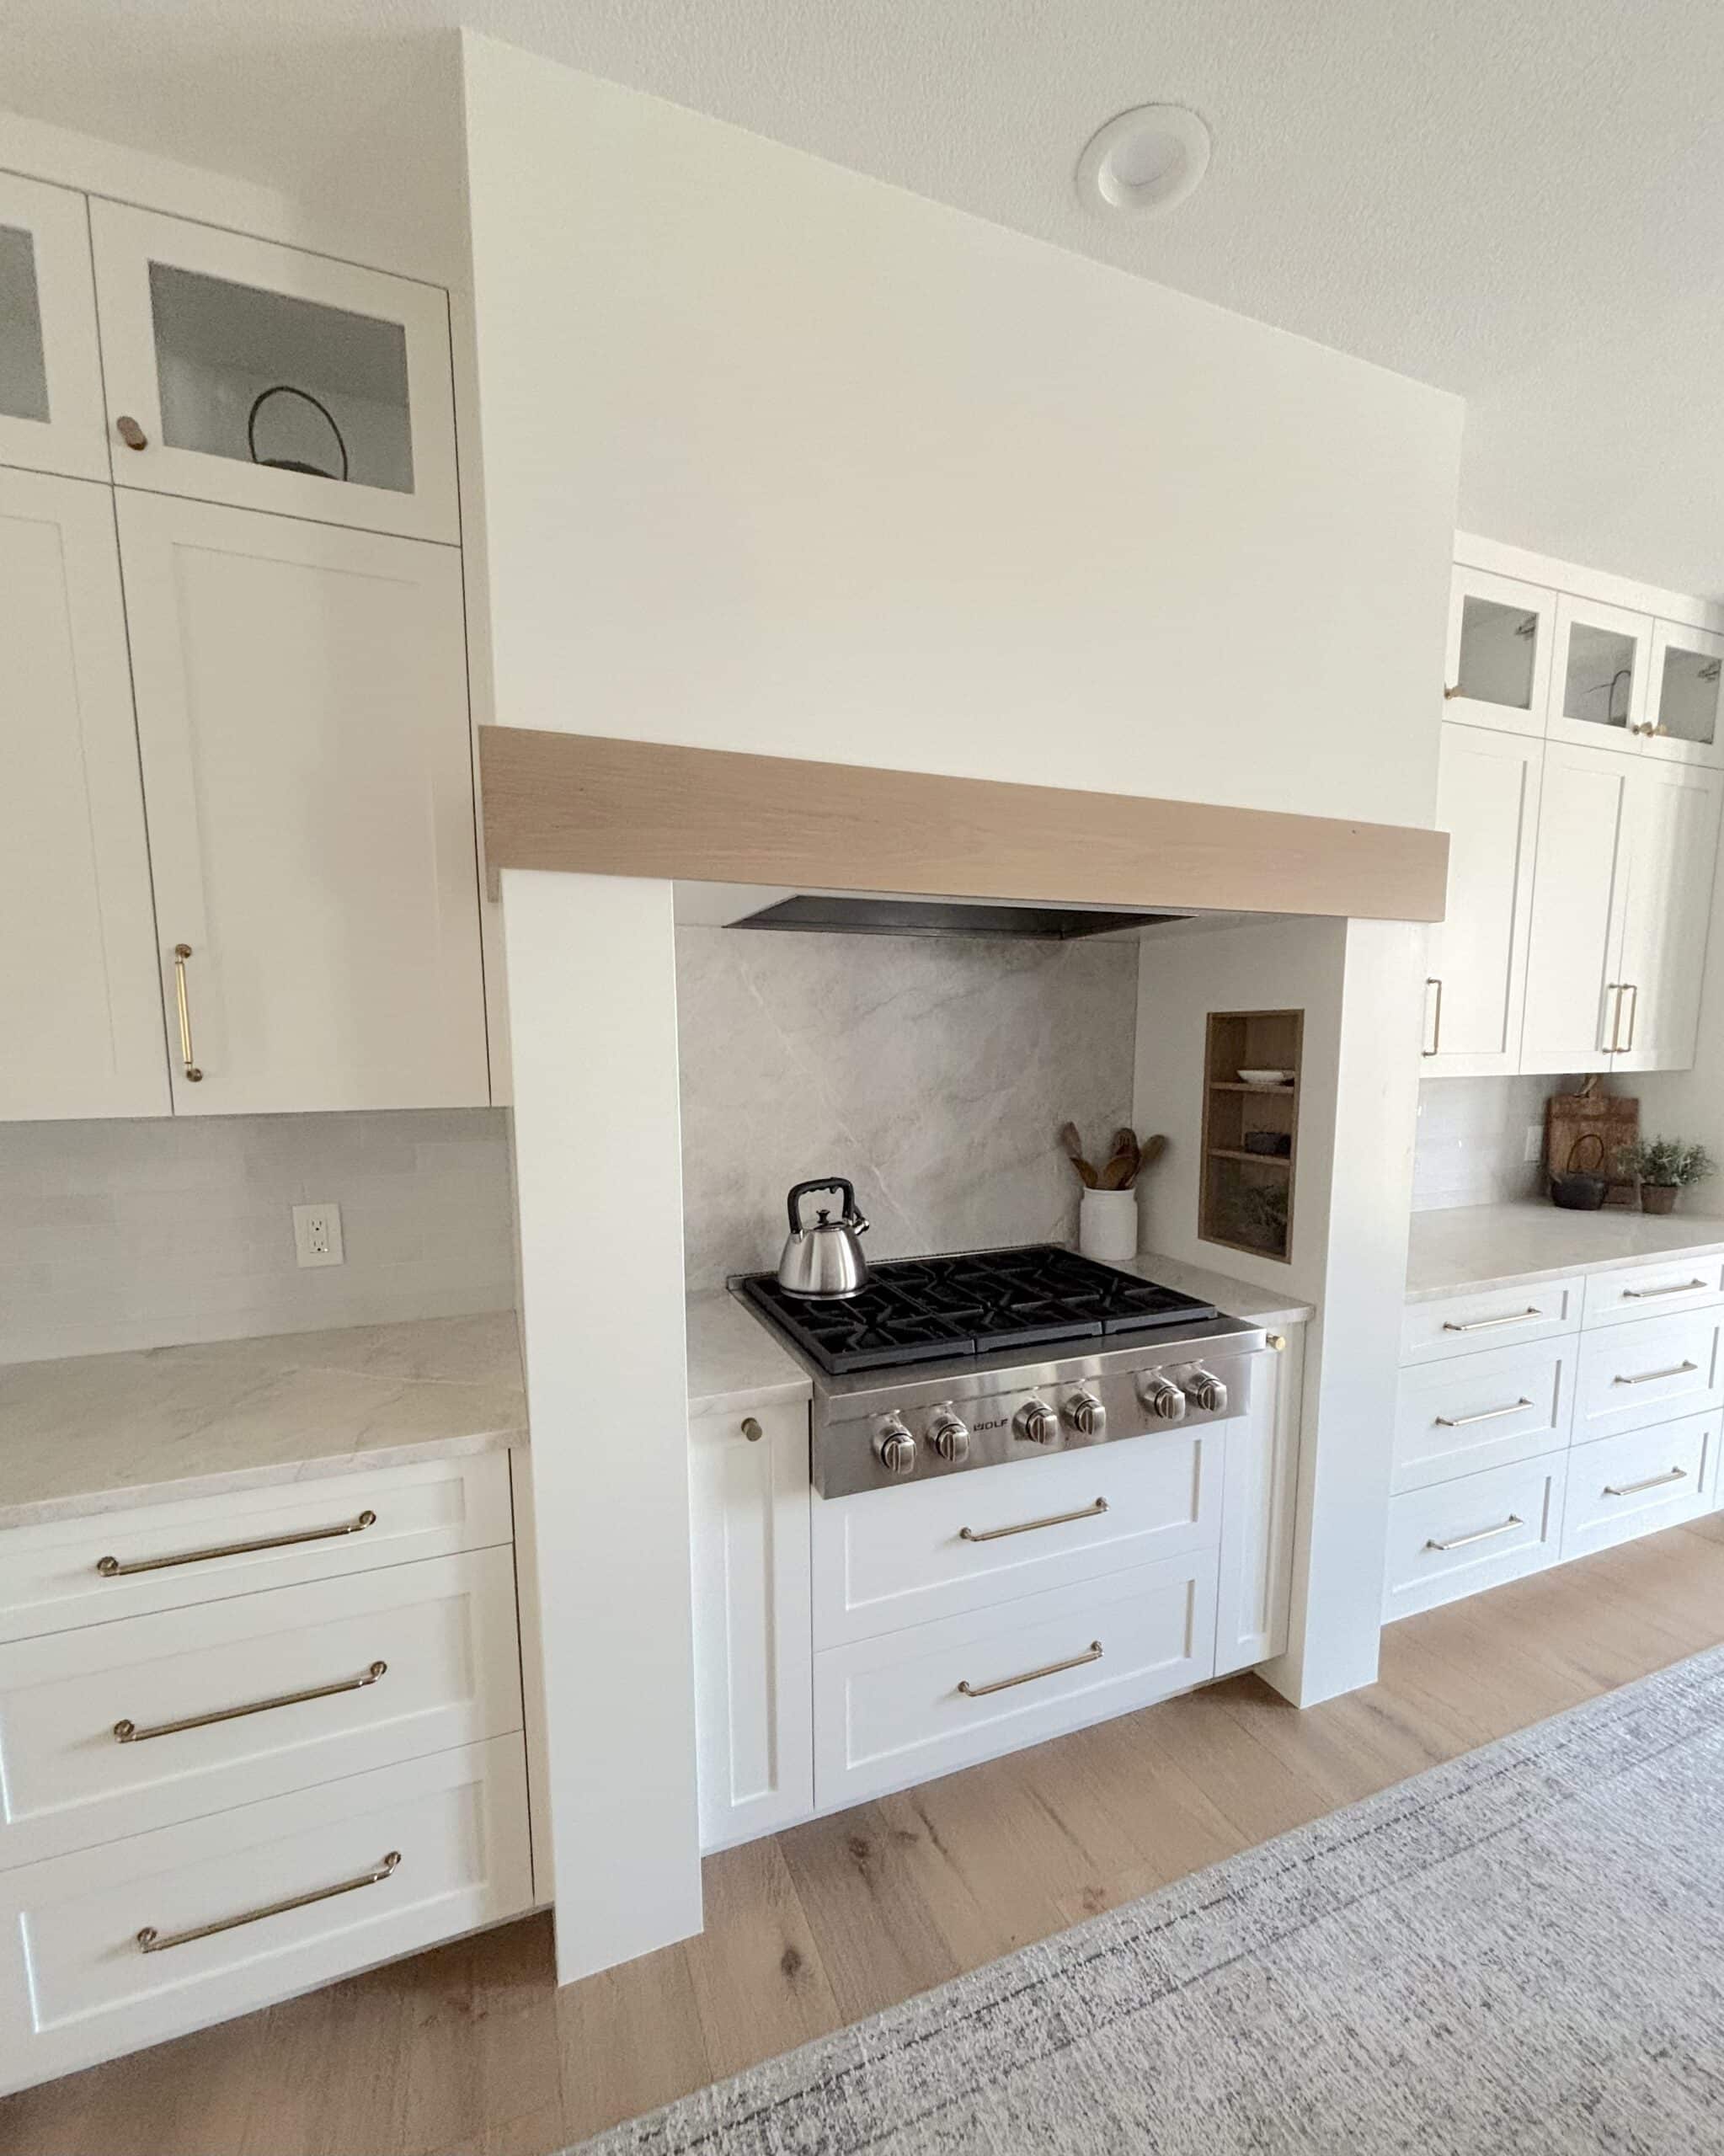
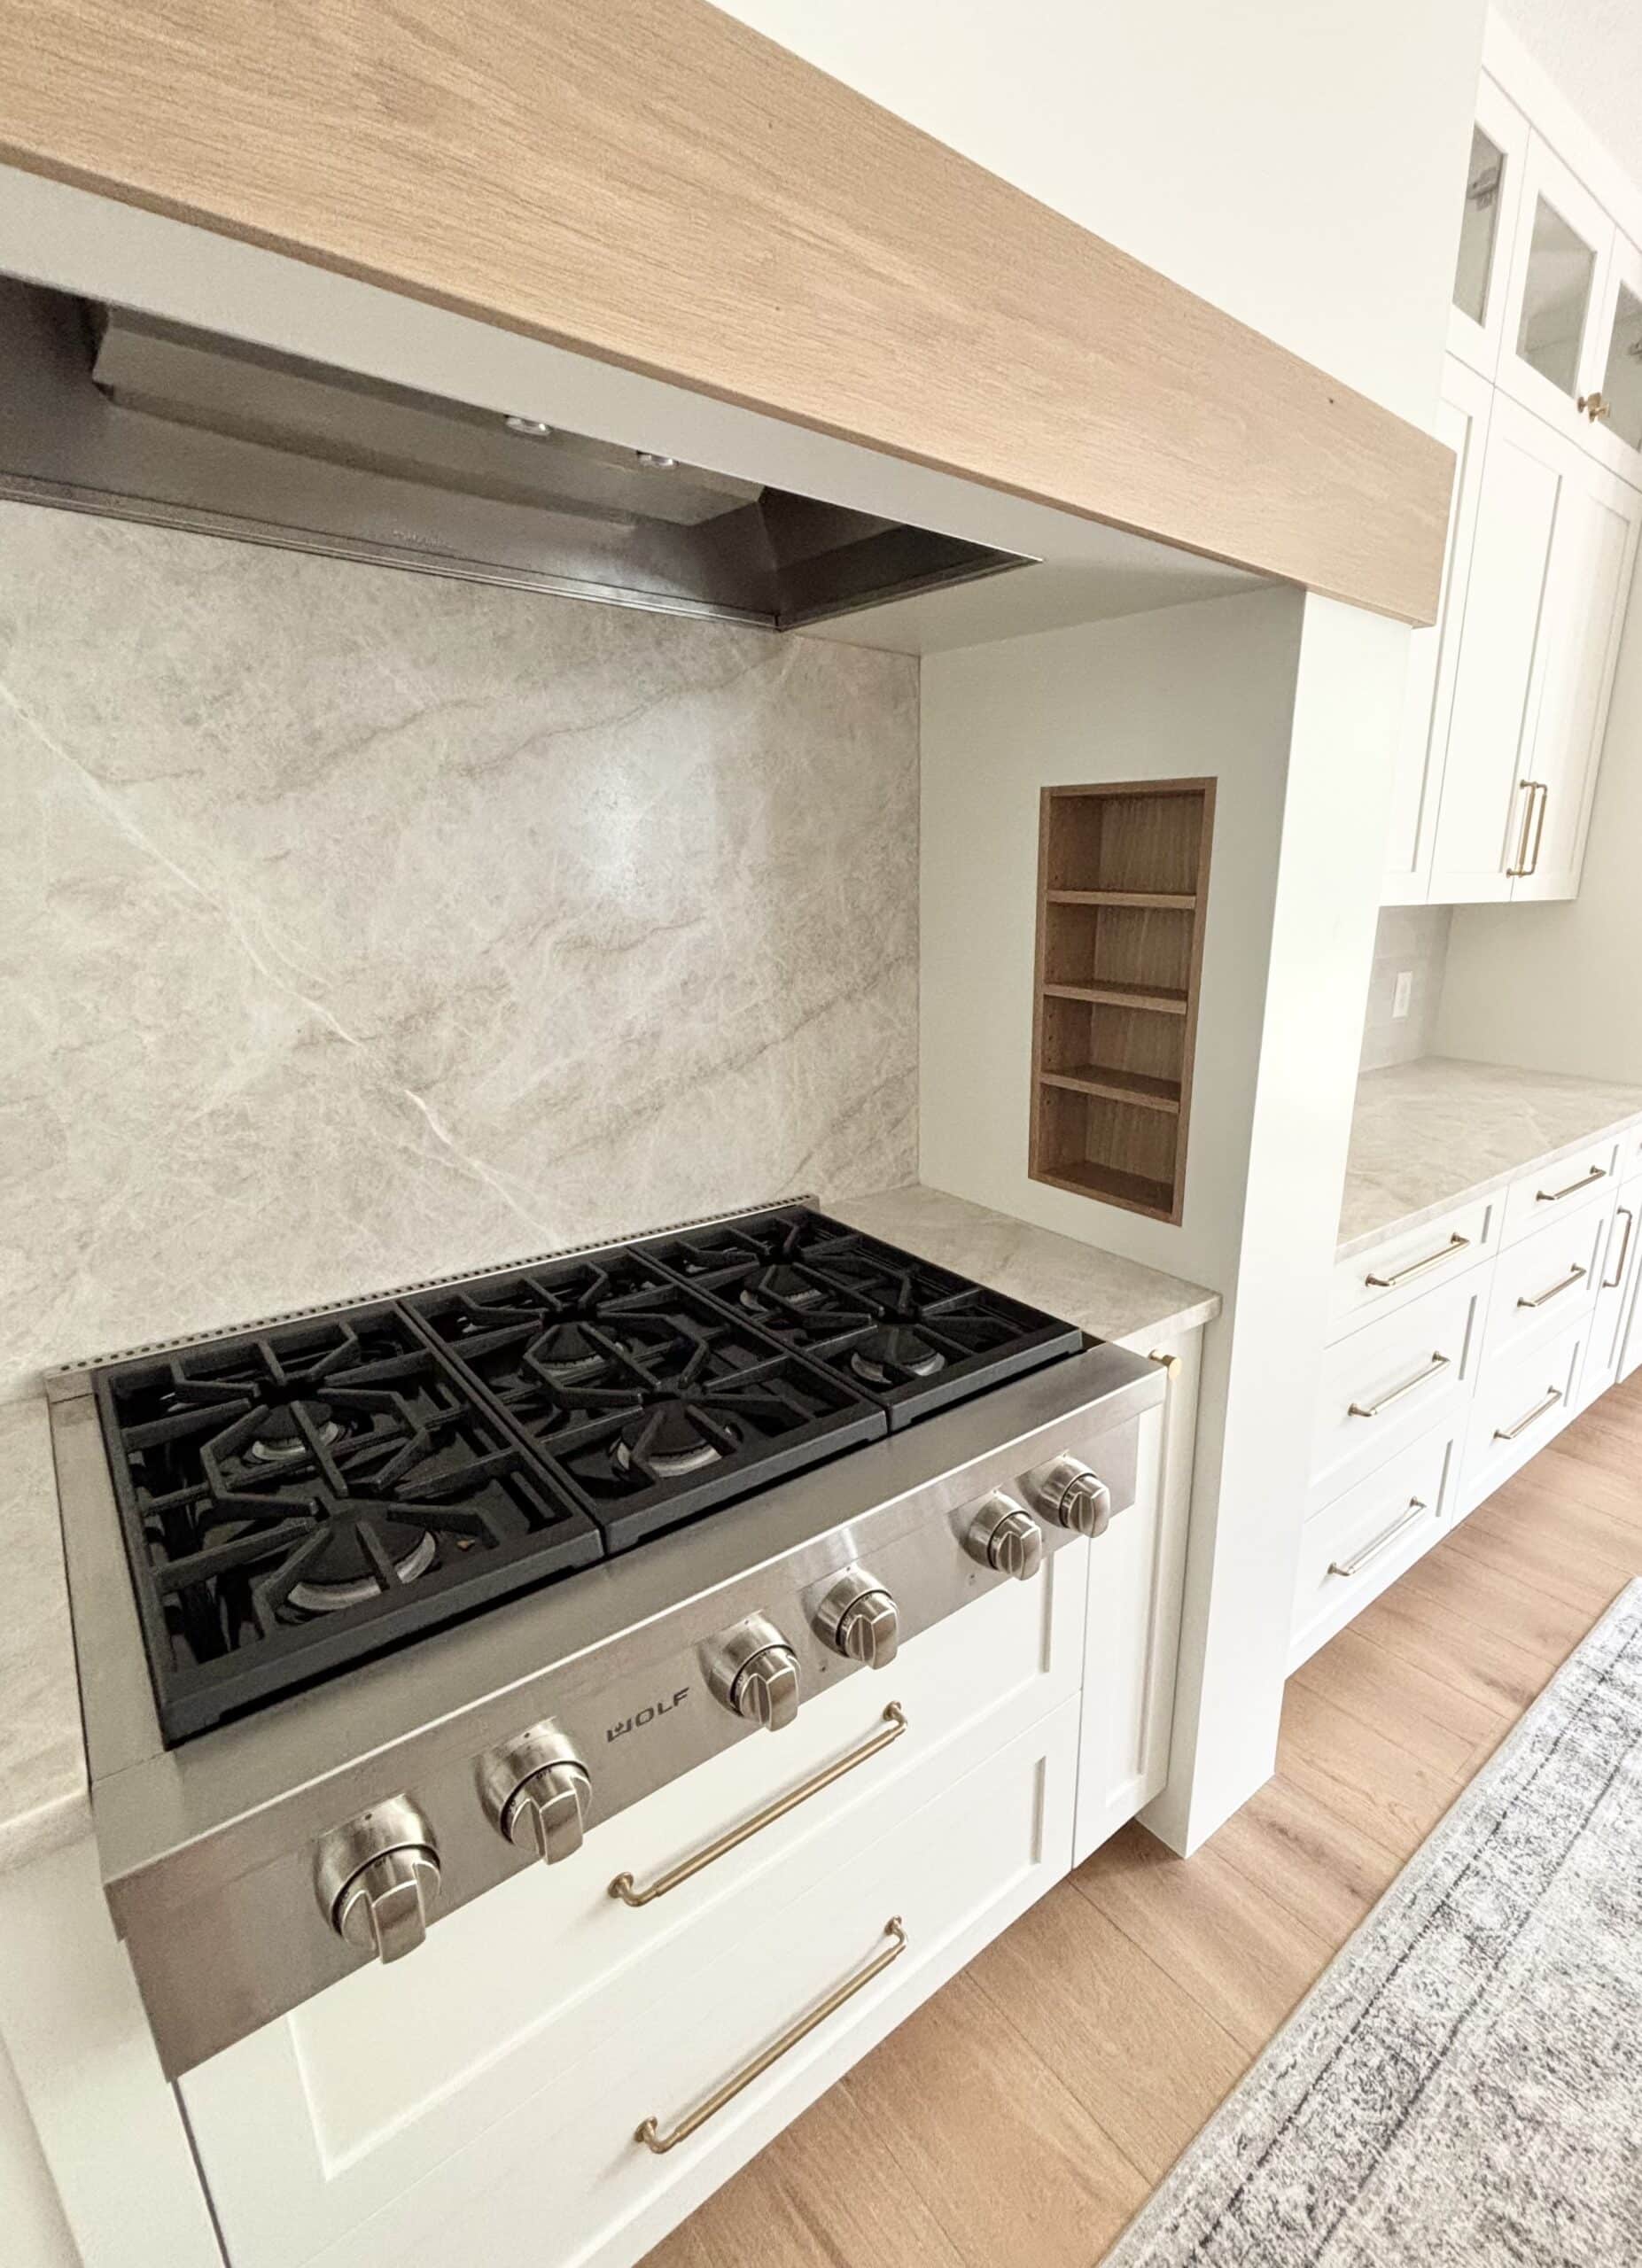
The Range Hood & Alcove
That original alcove above the stove? It was actually one of my favorite features when we toured the home, and is still one of my favorite features in the new kitchen. The original kitchen was uninspiring, but one look at that alcove, and I just knew it could be something so much more.
Together with our cabinet maker, we designed a custom alcove surround and range hood that draws the eye upward, and helps tie the kitchen together with the wood detail. Paired with the countertop slab backsplash, it creates a strong focal point in the kitchen, without overpowering the room.
This one upgrade delivered maximum wow factor, and I was thrilled with how it turned out!
The Kitchen Backsplash
The backsplash was another important design decision in our kitchen renovation, and we took a slightly layered approach to keep things timeless and easy to maintain.
For most of the kitchen, we used a tonal, glossy subway tile backsplash with warm undertones (Bedrosians Celine in White). The subtle variation in color and finish adds just enough texture and depth without competing with the countertops or cabinetry. It’s classic, but not boring…exactly the balanced look we were after.
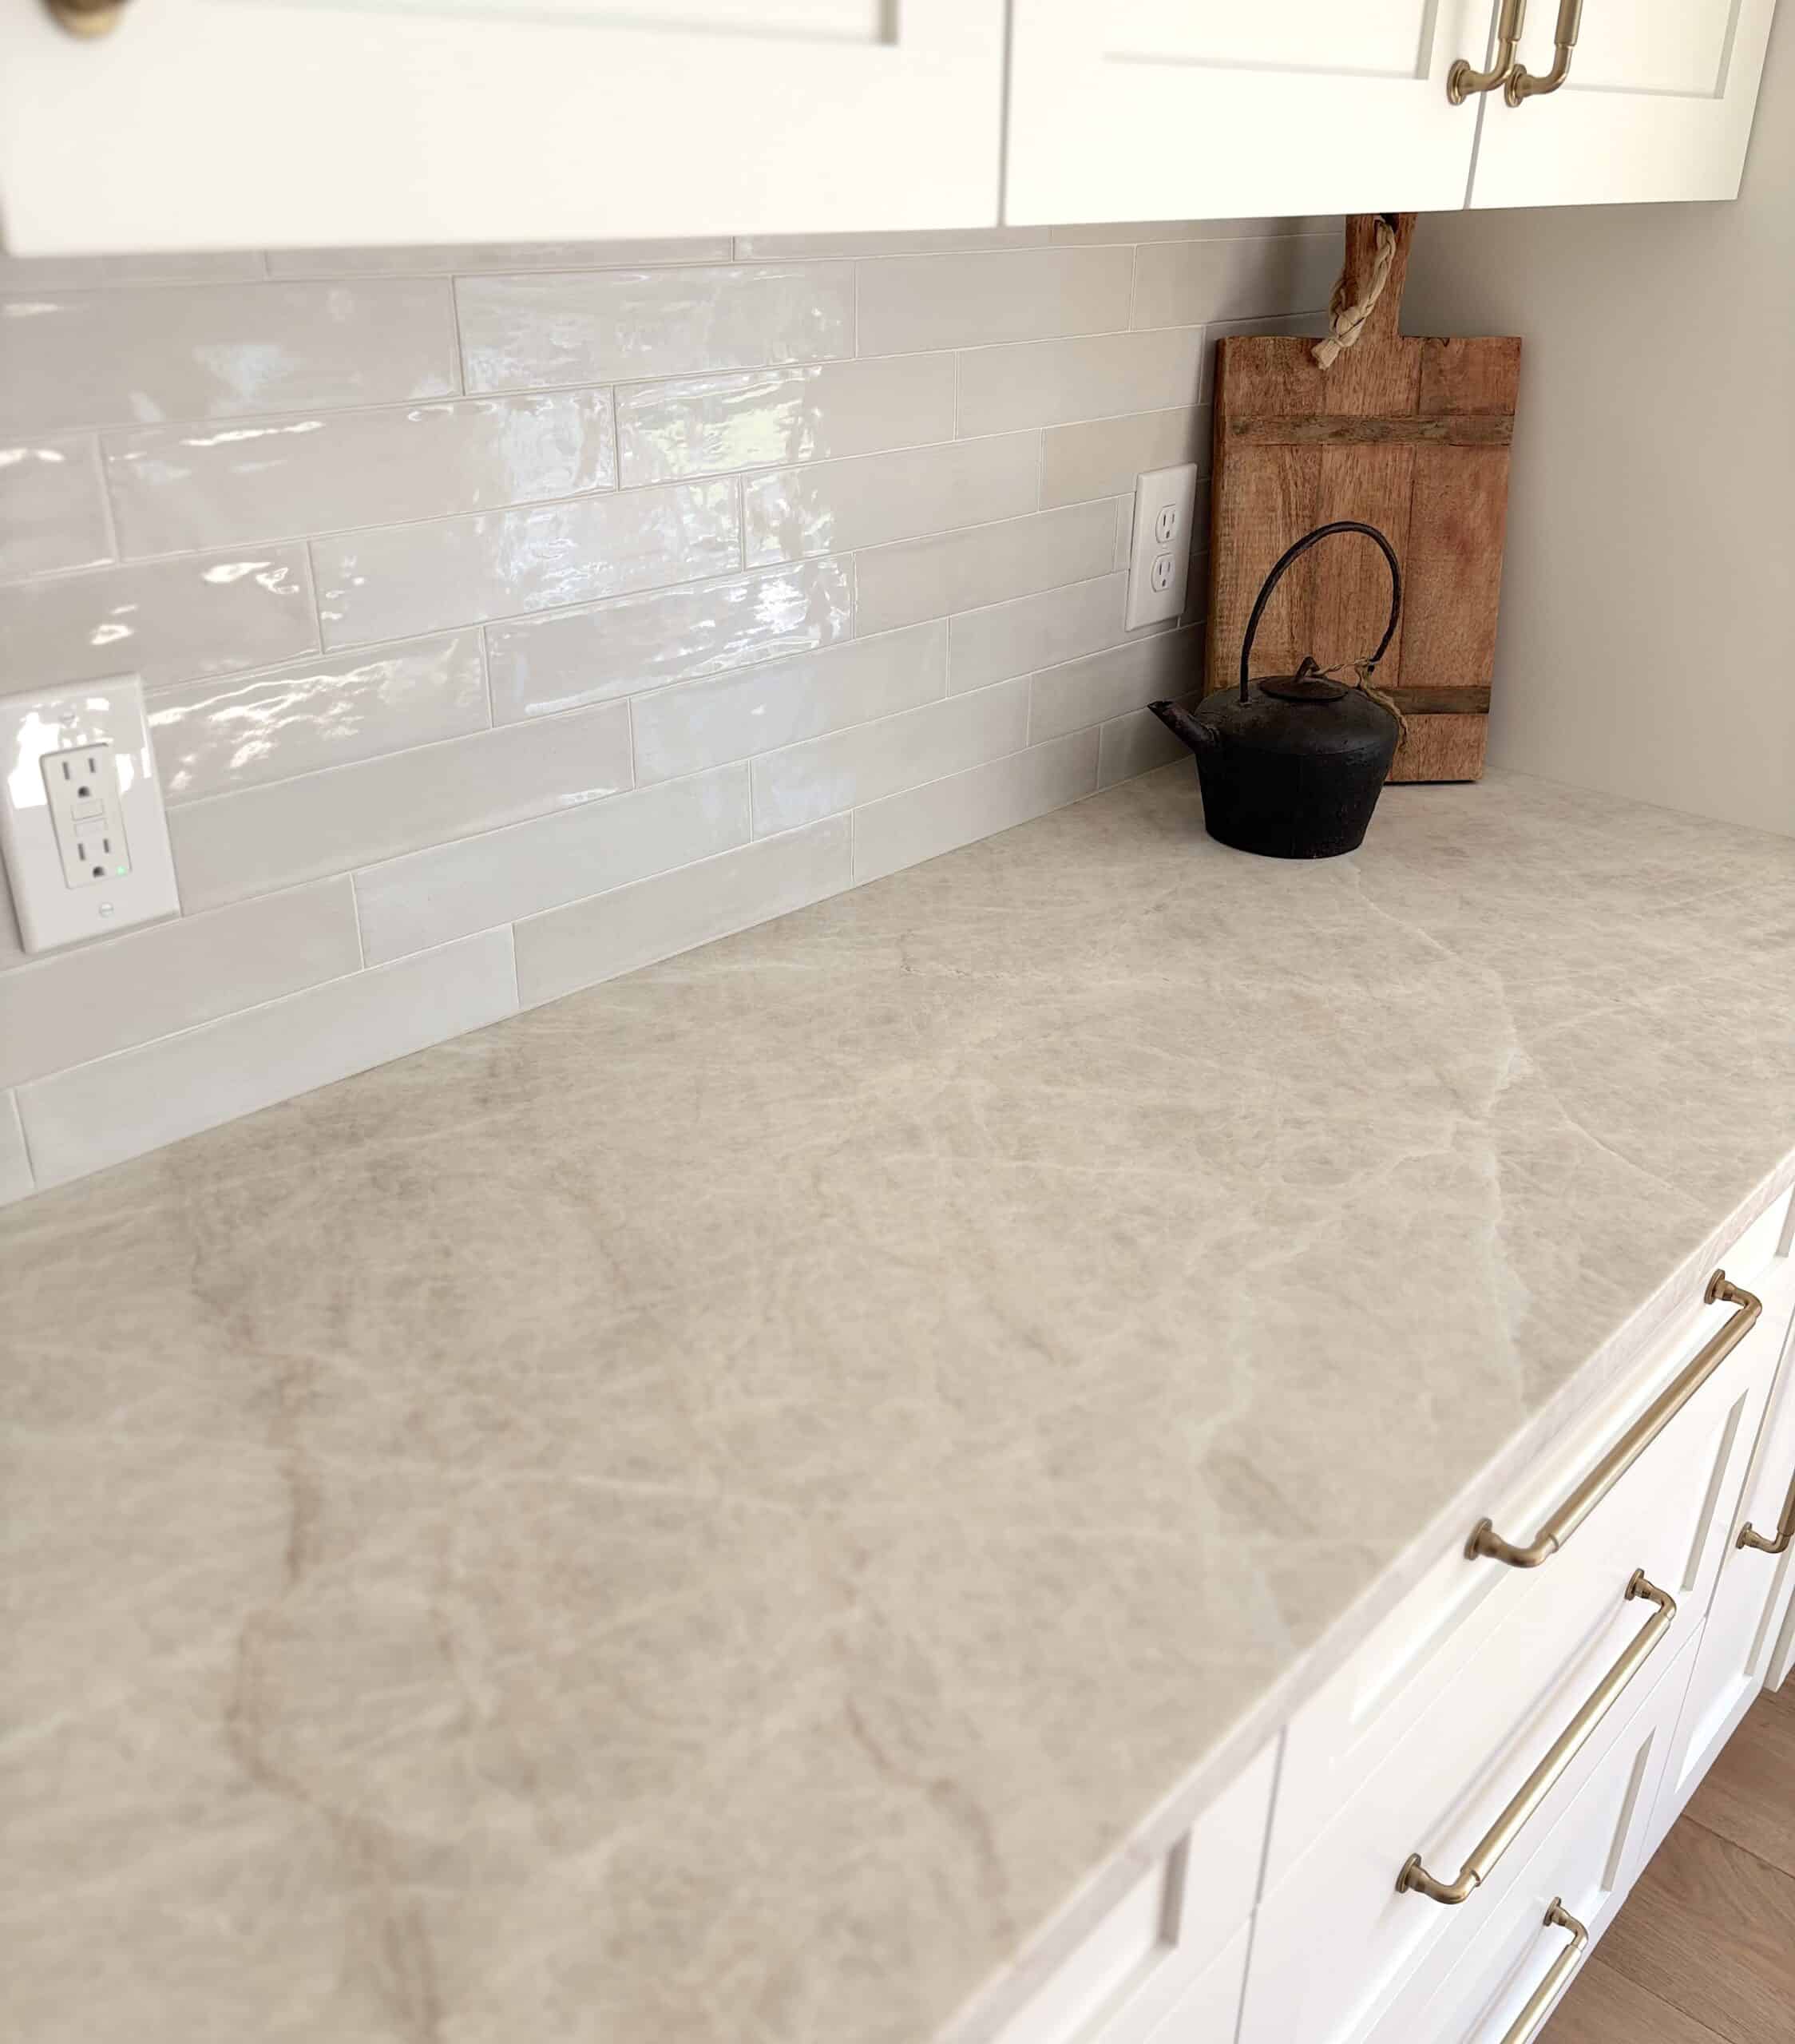
Behind the cooktop, we ran the same stone as our countertops up the wall for a completely seamless look. Not only does this create a beautiful focal point around the range hood, but it’s also incredibly easy to clean! No grout lines in the splash zone, which is always a win.
This mix of tile and stone keeps the kitchen visually interesting while still feeling cohesive. The backsplash supports the design rather than stealing attention, which is exactly what you want in a timeless kitchen.
Countertops
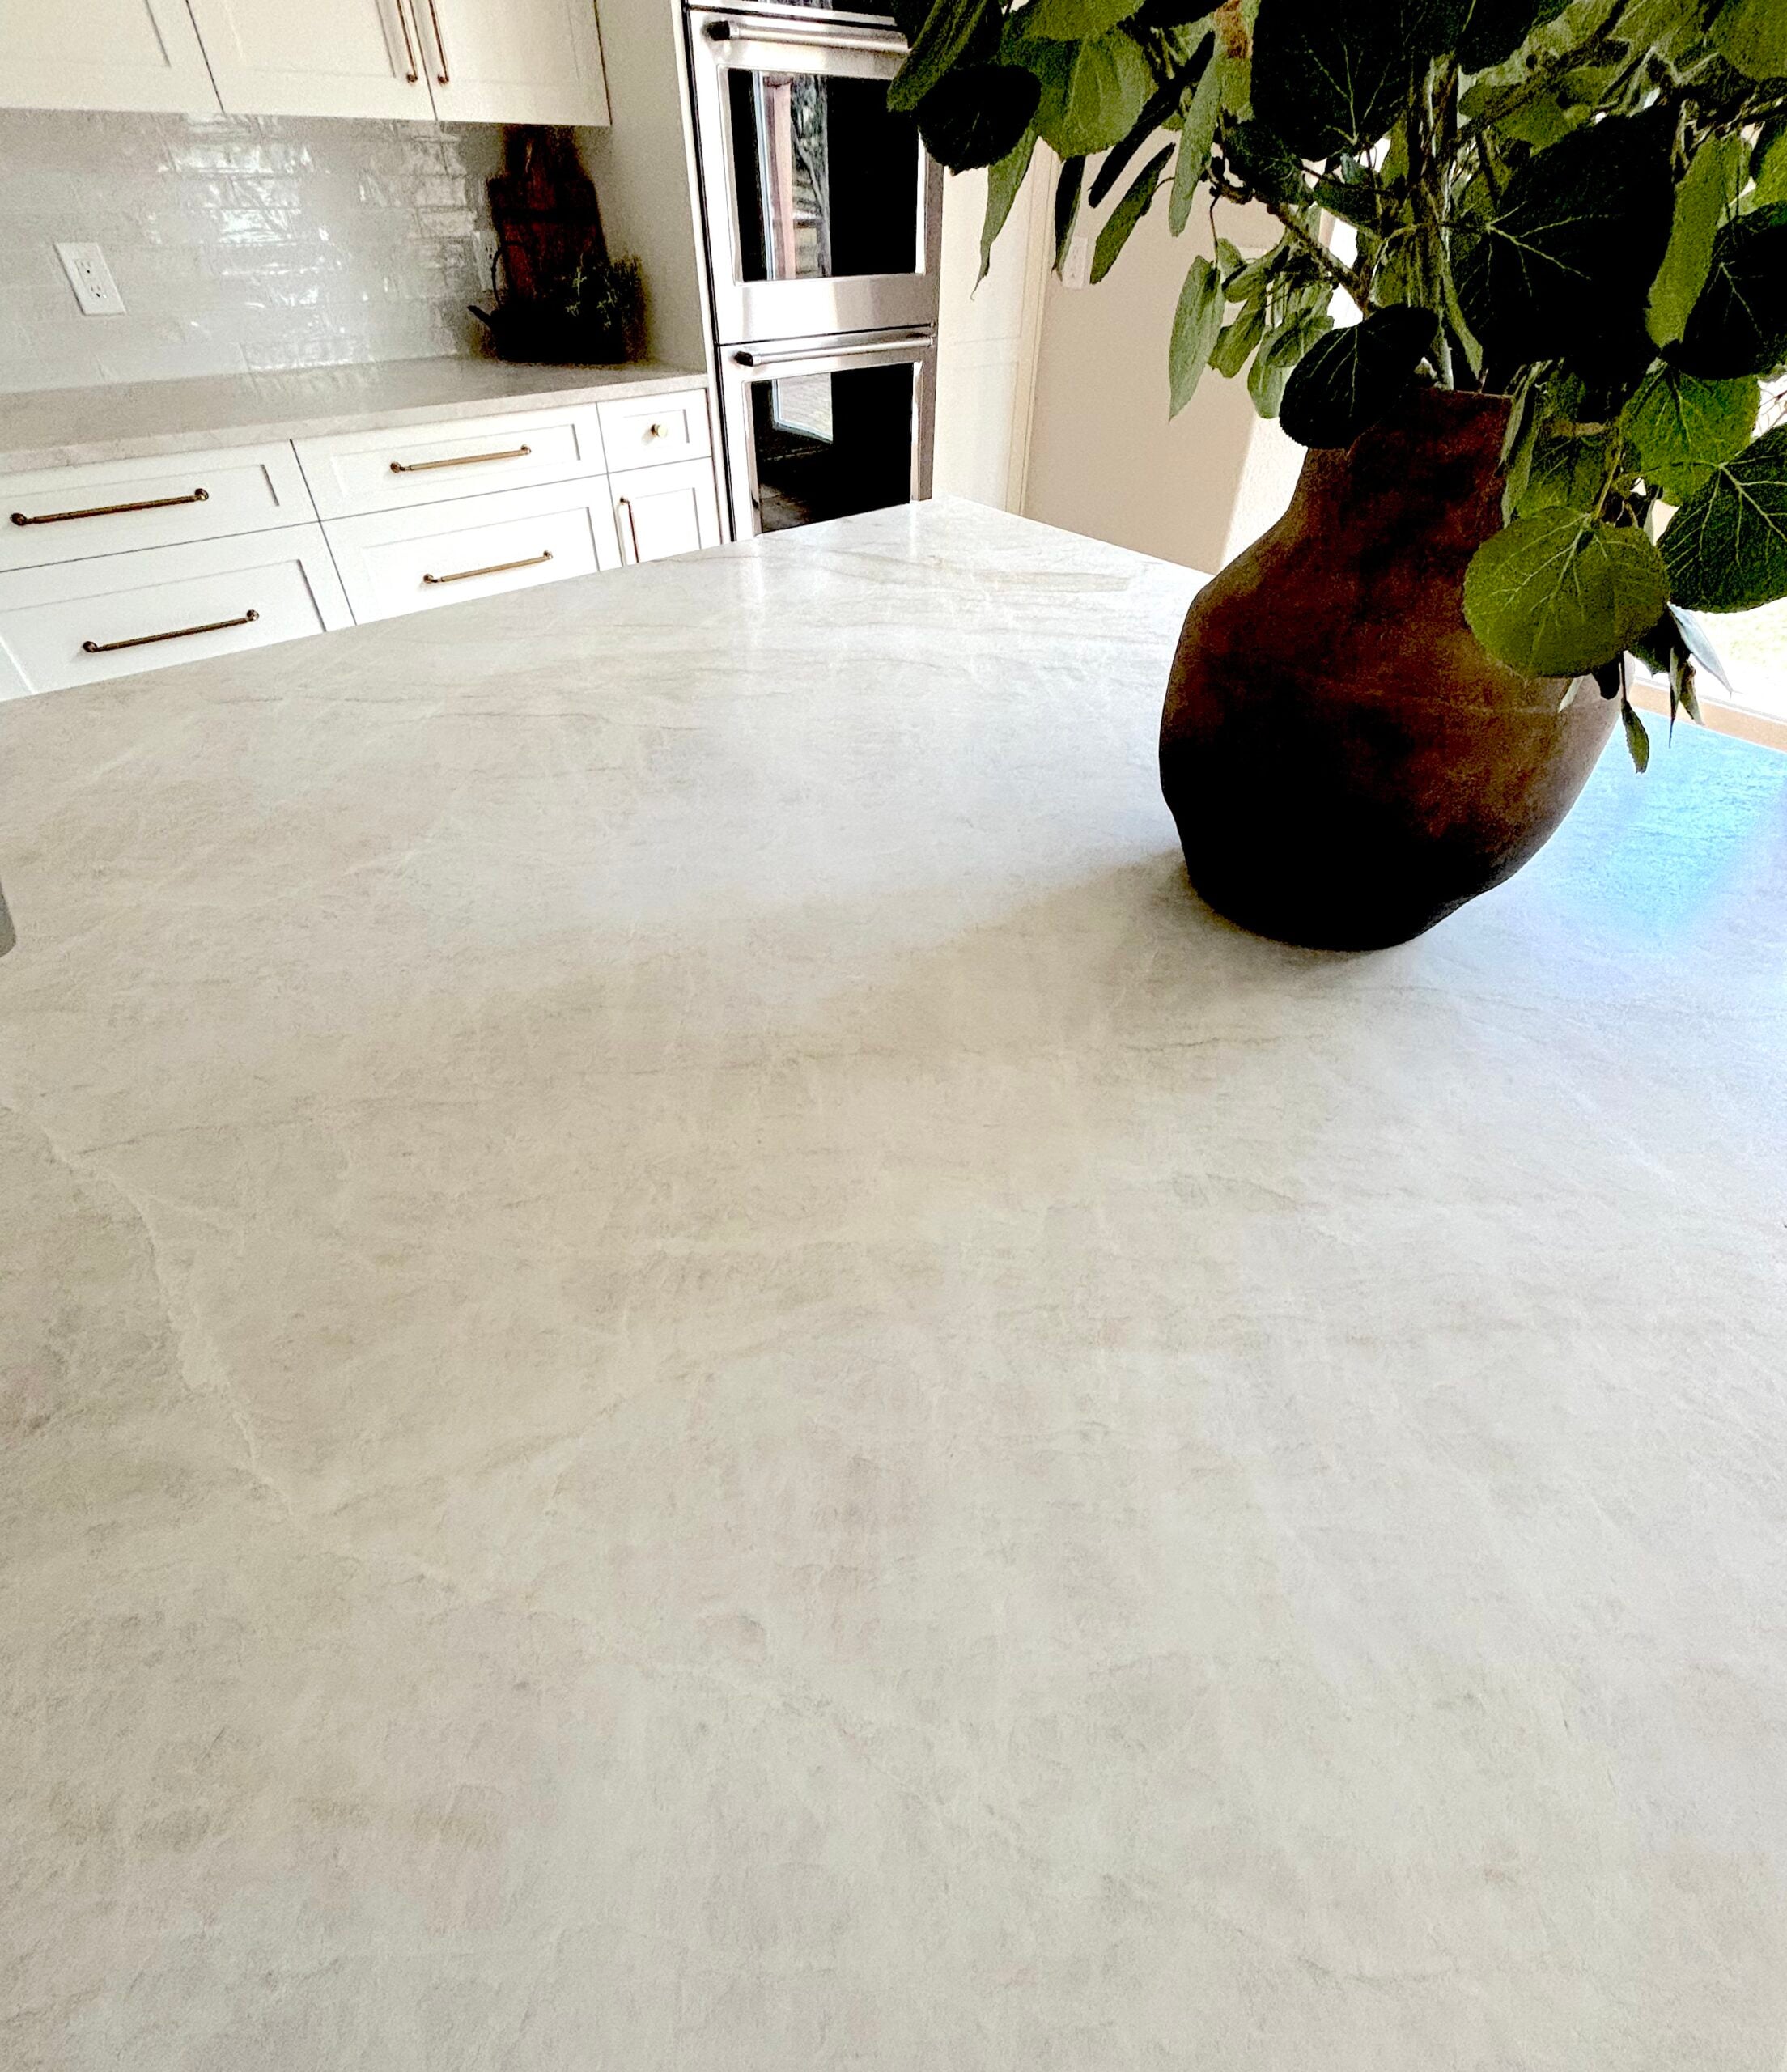
For the countertops, we chose Taj Mahal quartzite, which I’ve had my eye on for a long time. It’s a natural stone that combines soft cream and warm gray tones with unique, organic veining. We decided on a leathered (or honed) finish, which makes it feel more natural and casual.
Not only is it beautiful, but it’s also incredibly durable, making it an ideal choice for a high-traffic kitchen. It pairs perfectly with our White Dove cabinets and white oak island and adds just enough interest and “movement” (design term) without competing with the rest of the space.
The Kitchen Island
The kitchen island might be the biggest transformation of all.
What was once a two-level, awkwardly placed island is now a huge, single-level island with seating at the end. It functions as:
- A casual dining spot
- A work surface (for several people at once – woohoo!)
- A gathering space when we’re entertaining

We also added cabinets on the backside of the island to stash away all of our fancy stuff and china (yes, we still have china). The island also houses our sink, dishwasher, trash pull-out, and my favorite feature (see next) for maximum functionality.
Barstools | Ombre Vase | Faux Aspen Branch Greenery | Runner Rug
My Favorite Kitchen Feature: The Built-In Paper Towel Drawer
If I had to pick one favorite feature in our new kitchen, this might be it! It’s not flashy or expensive, but it makes a huge difference in our daily life.
We added a custom, built-in paper towel holder drawer directly above the trash cabinet in our island, and it’s one of those small upgrades that feels absolutely necessary once you start using it. The drawer holds the active roll for easy access, plus extra paper towel rolls tucked neatly behind it, so everything stays hidden but convenient.

No countertop clutter. No awkward wall-mounted holder. And no walking across the kitchen with messy hands! Check out my Instagram post to see it in action.
From a design standpoint, this little feature keeps the countertops clean and streamlined, which was important to me in a kitchen. From a functional standpoint, it’s exactly where you need it…right by the trash, sink, and prep area.
This is such a simple cabinet modification, but it’s one of those features I would 100% do again in any future kitchen renovation. If you’re working with a custom cabinet maker, it’s absolutely worth asking about – especially if you want a kitchen that looks beautiful and works for you in real life.
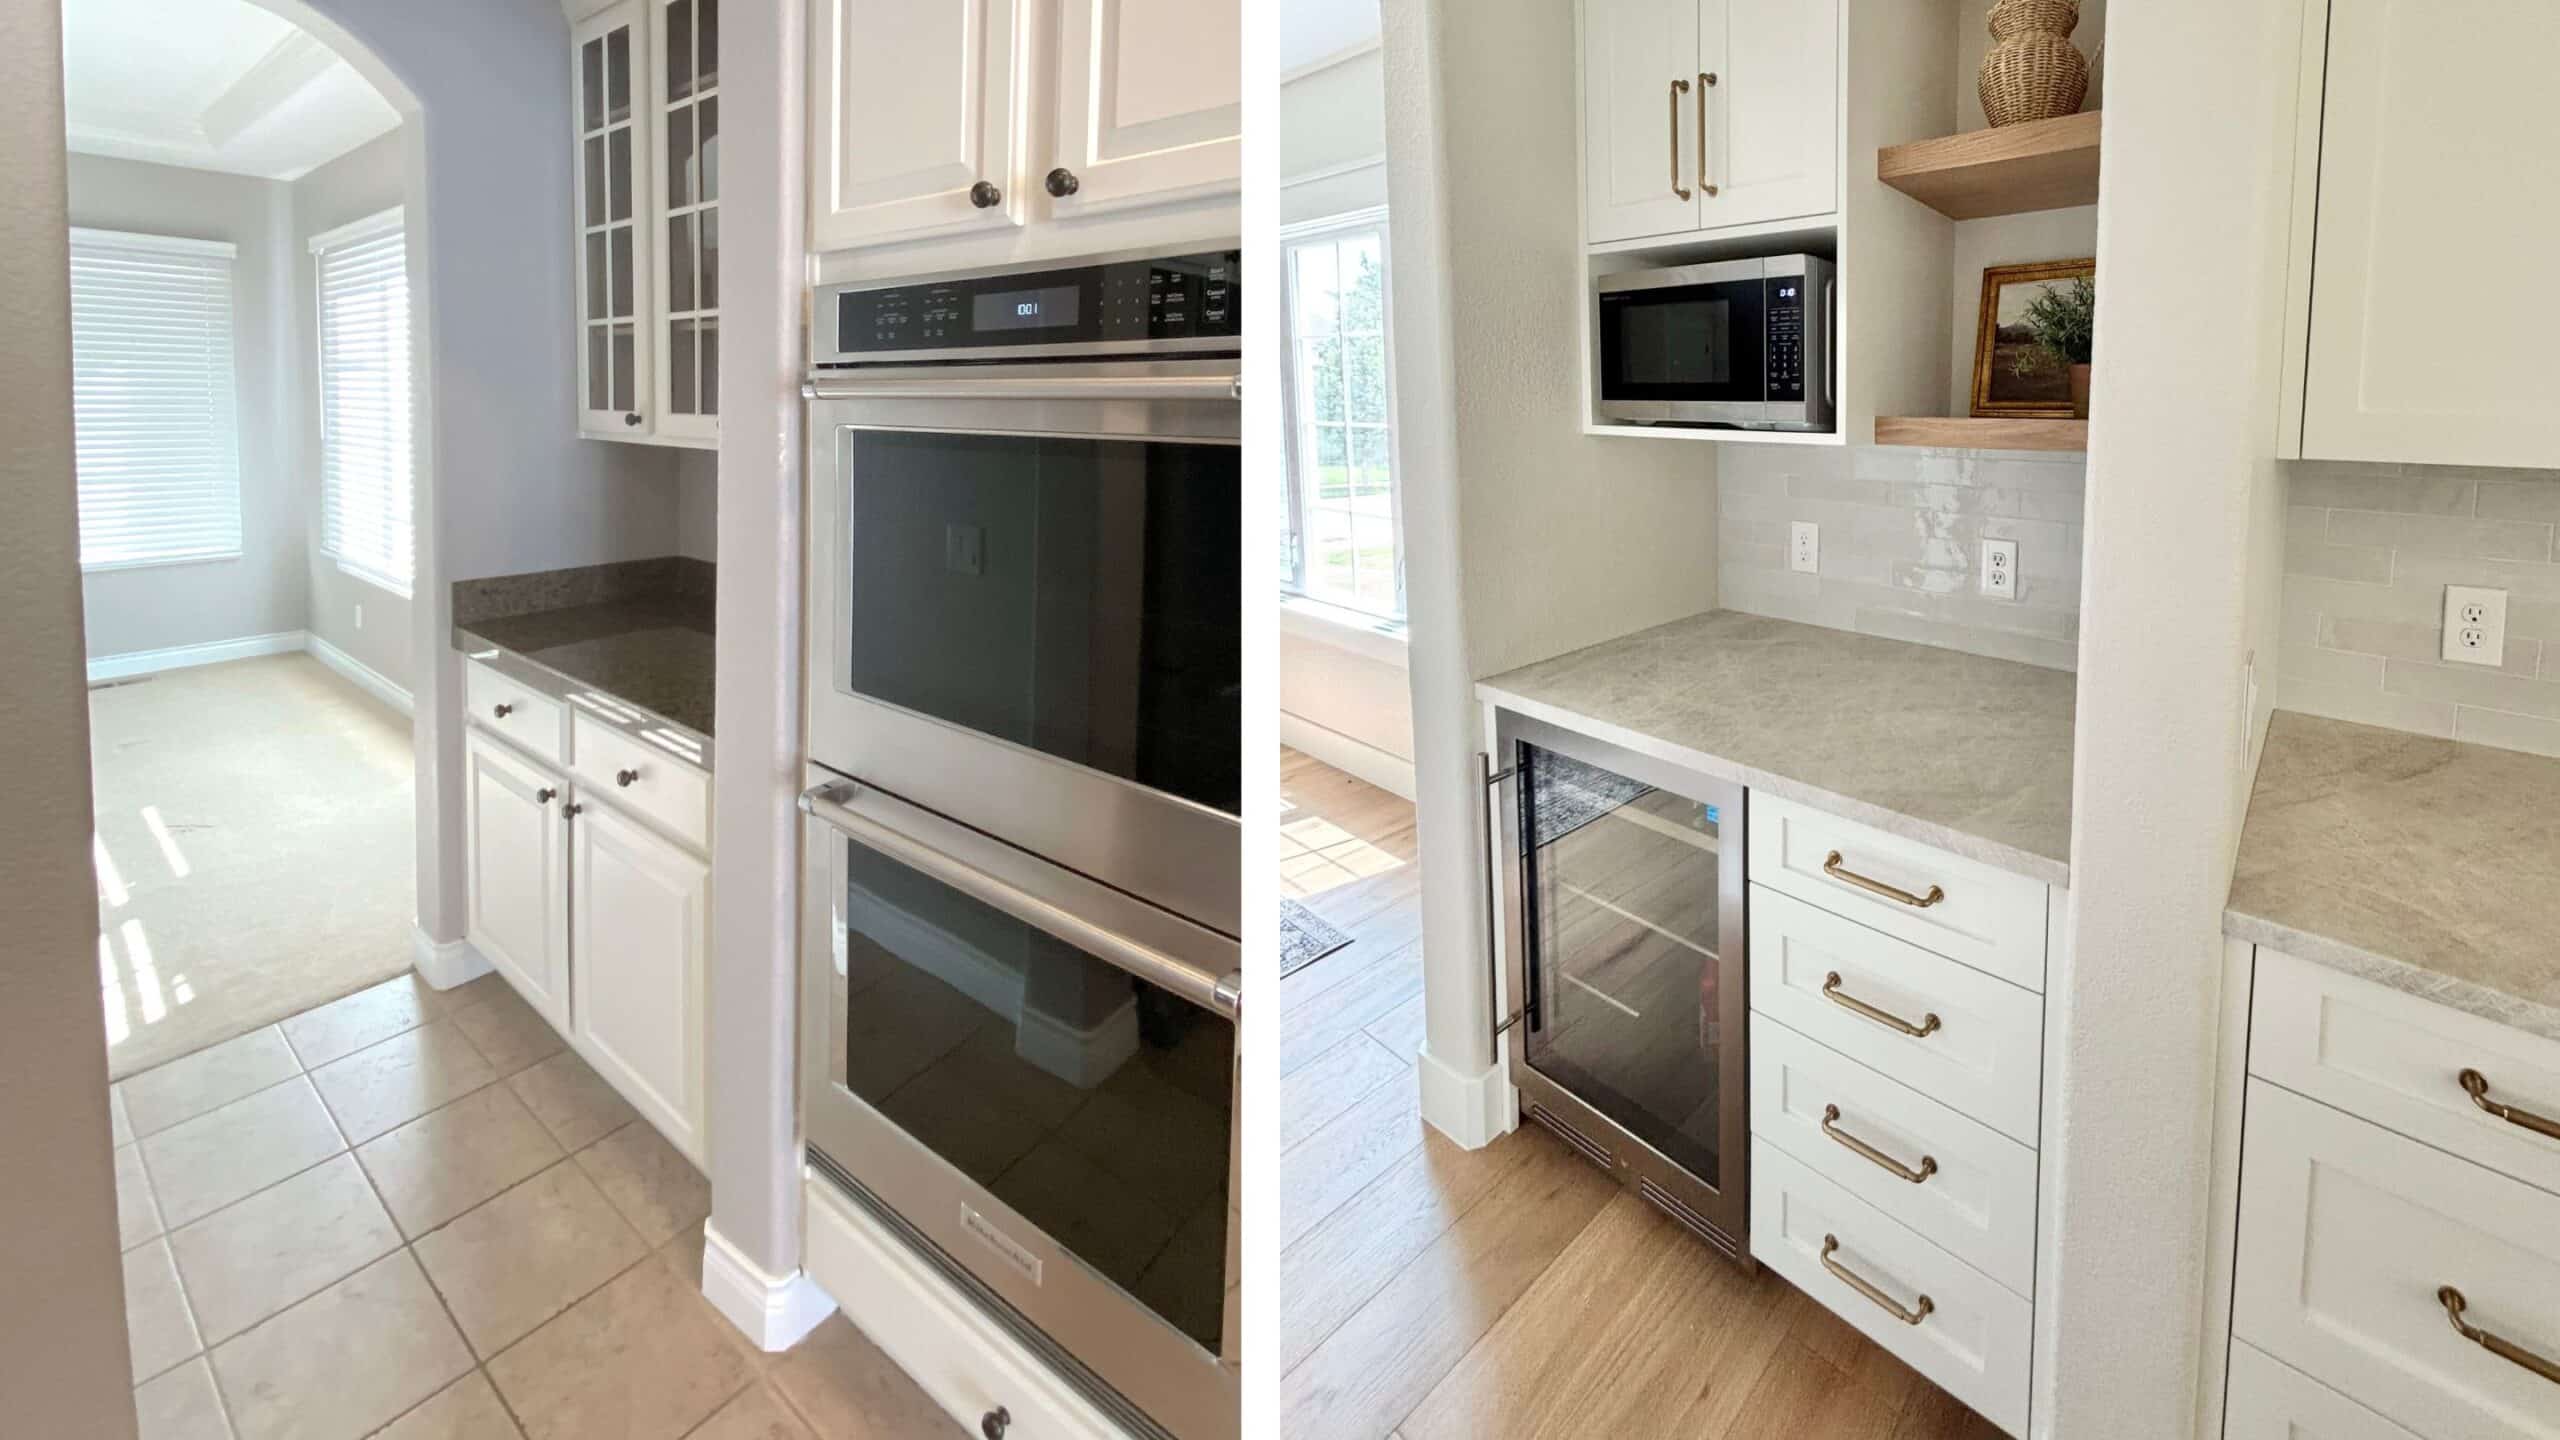
The Butler’s Pantry
Another functional upgrade we made in the kitchen was in the adjacent butler’s pantry. While it’s technically a separate space, it plays a huge role in how our new kitchen works day to day.
We designed the butler’s pantry to handle the “workhorse” appliances so the main kitchen could stay clean and streamlined. We added a beverage fridge for drinks, an upper cabinet that houses the microwave, and some white oak open shelving for a decorative touch.
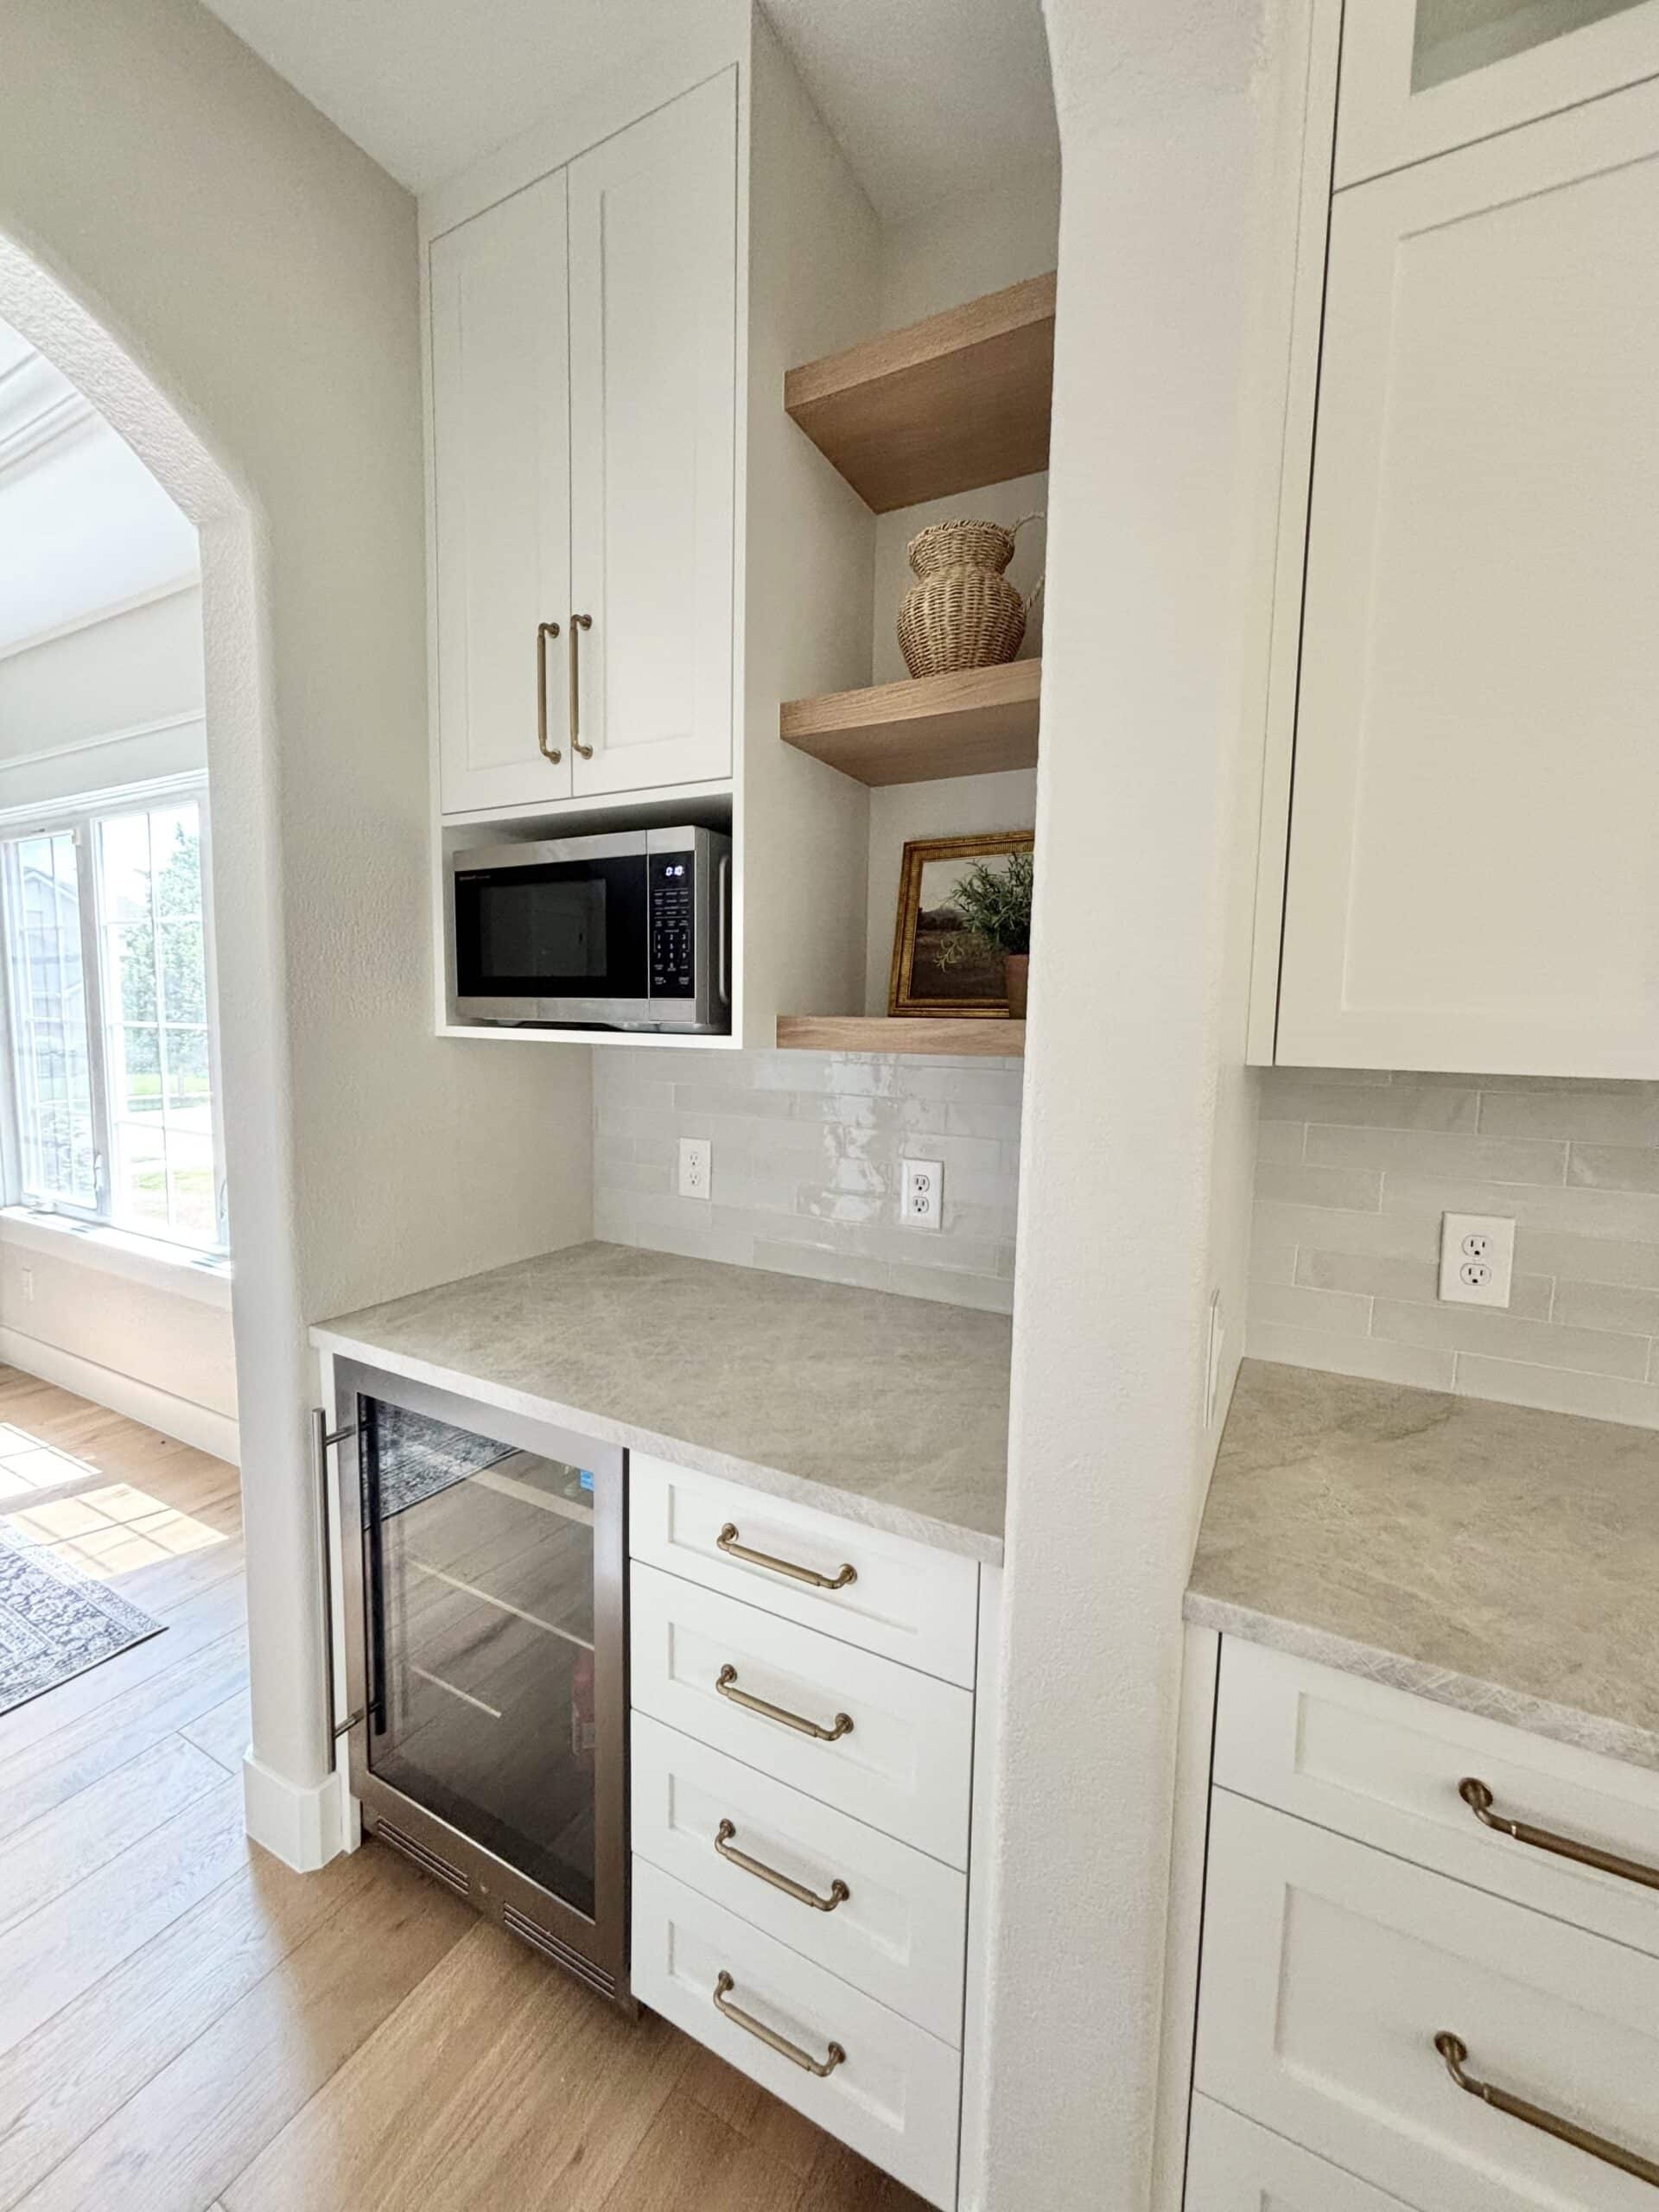
The open shelves tie in beautifully with the white oak kitchen island and add warmth, while still keeping the space practical. It’s the perfect spot for coffee supplies (if you drink coffee, which I don’t), glassware, and small appliances that would otherwise clutter the countertops in the main kitchen.
This small-but-mighty space makes a big difference in how the kitchen functions, especially when we’re entertaining. And, it allows the main kitchen to feel more open and less cluttered.
If you’re designing a new kitchen, a butler’s pantry or beverage station is one of my favorite upgrades when space allows. It adds storage, function, and flexibility without overcomplicating the main kitchen layout.
Hardware, Brass & Finishing Details
The finishing touches definitely elevated this kitchen. We used brass cabinet hardware throughout…warm, classic, and timeless. The brass ties in beautifully with the faucet, light fixtures, and warm wood details without feeling too shiny or trendy.
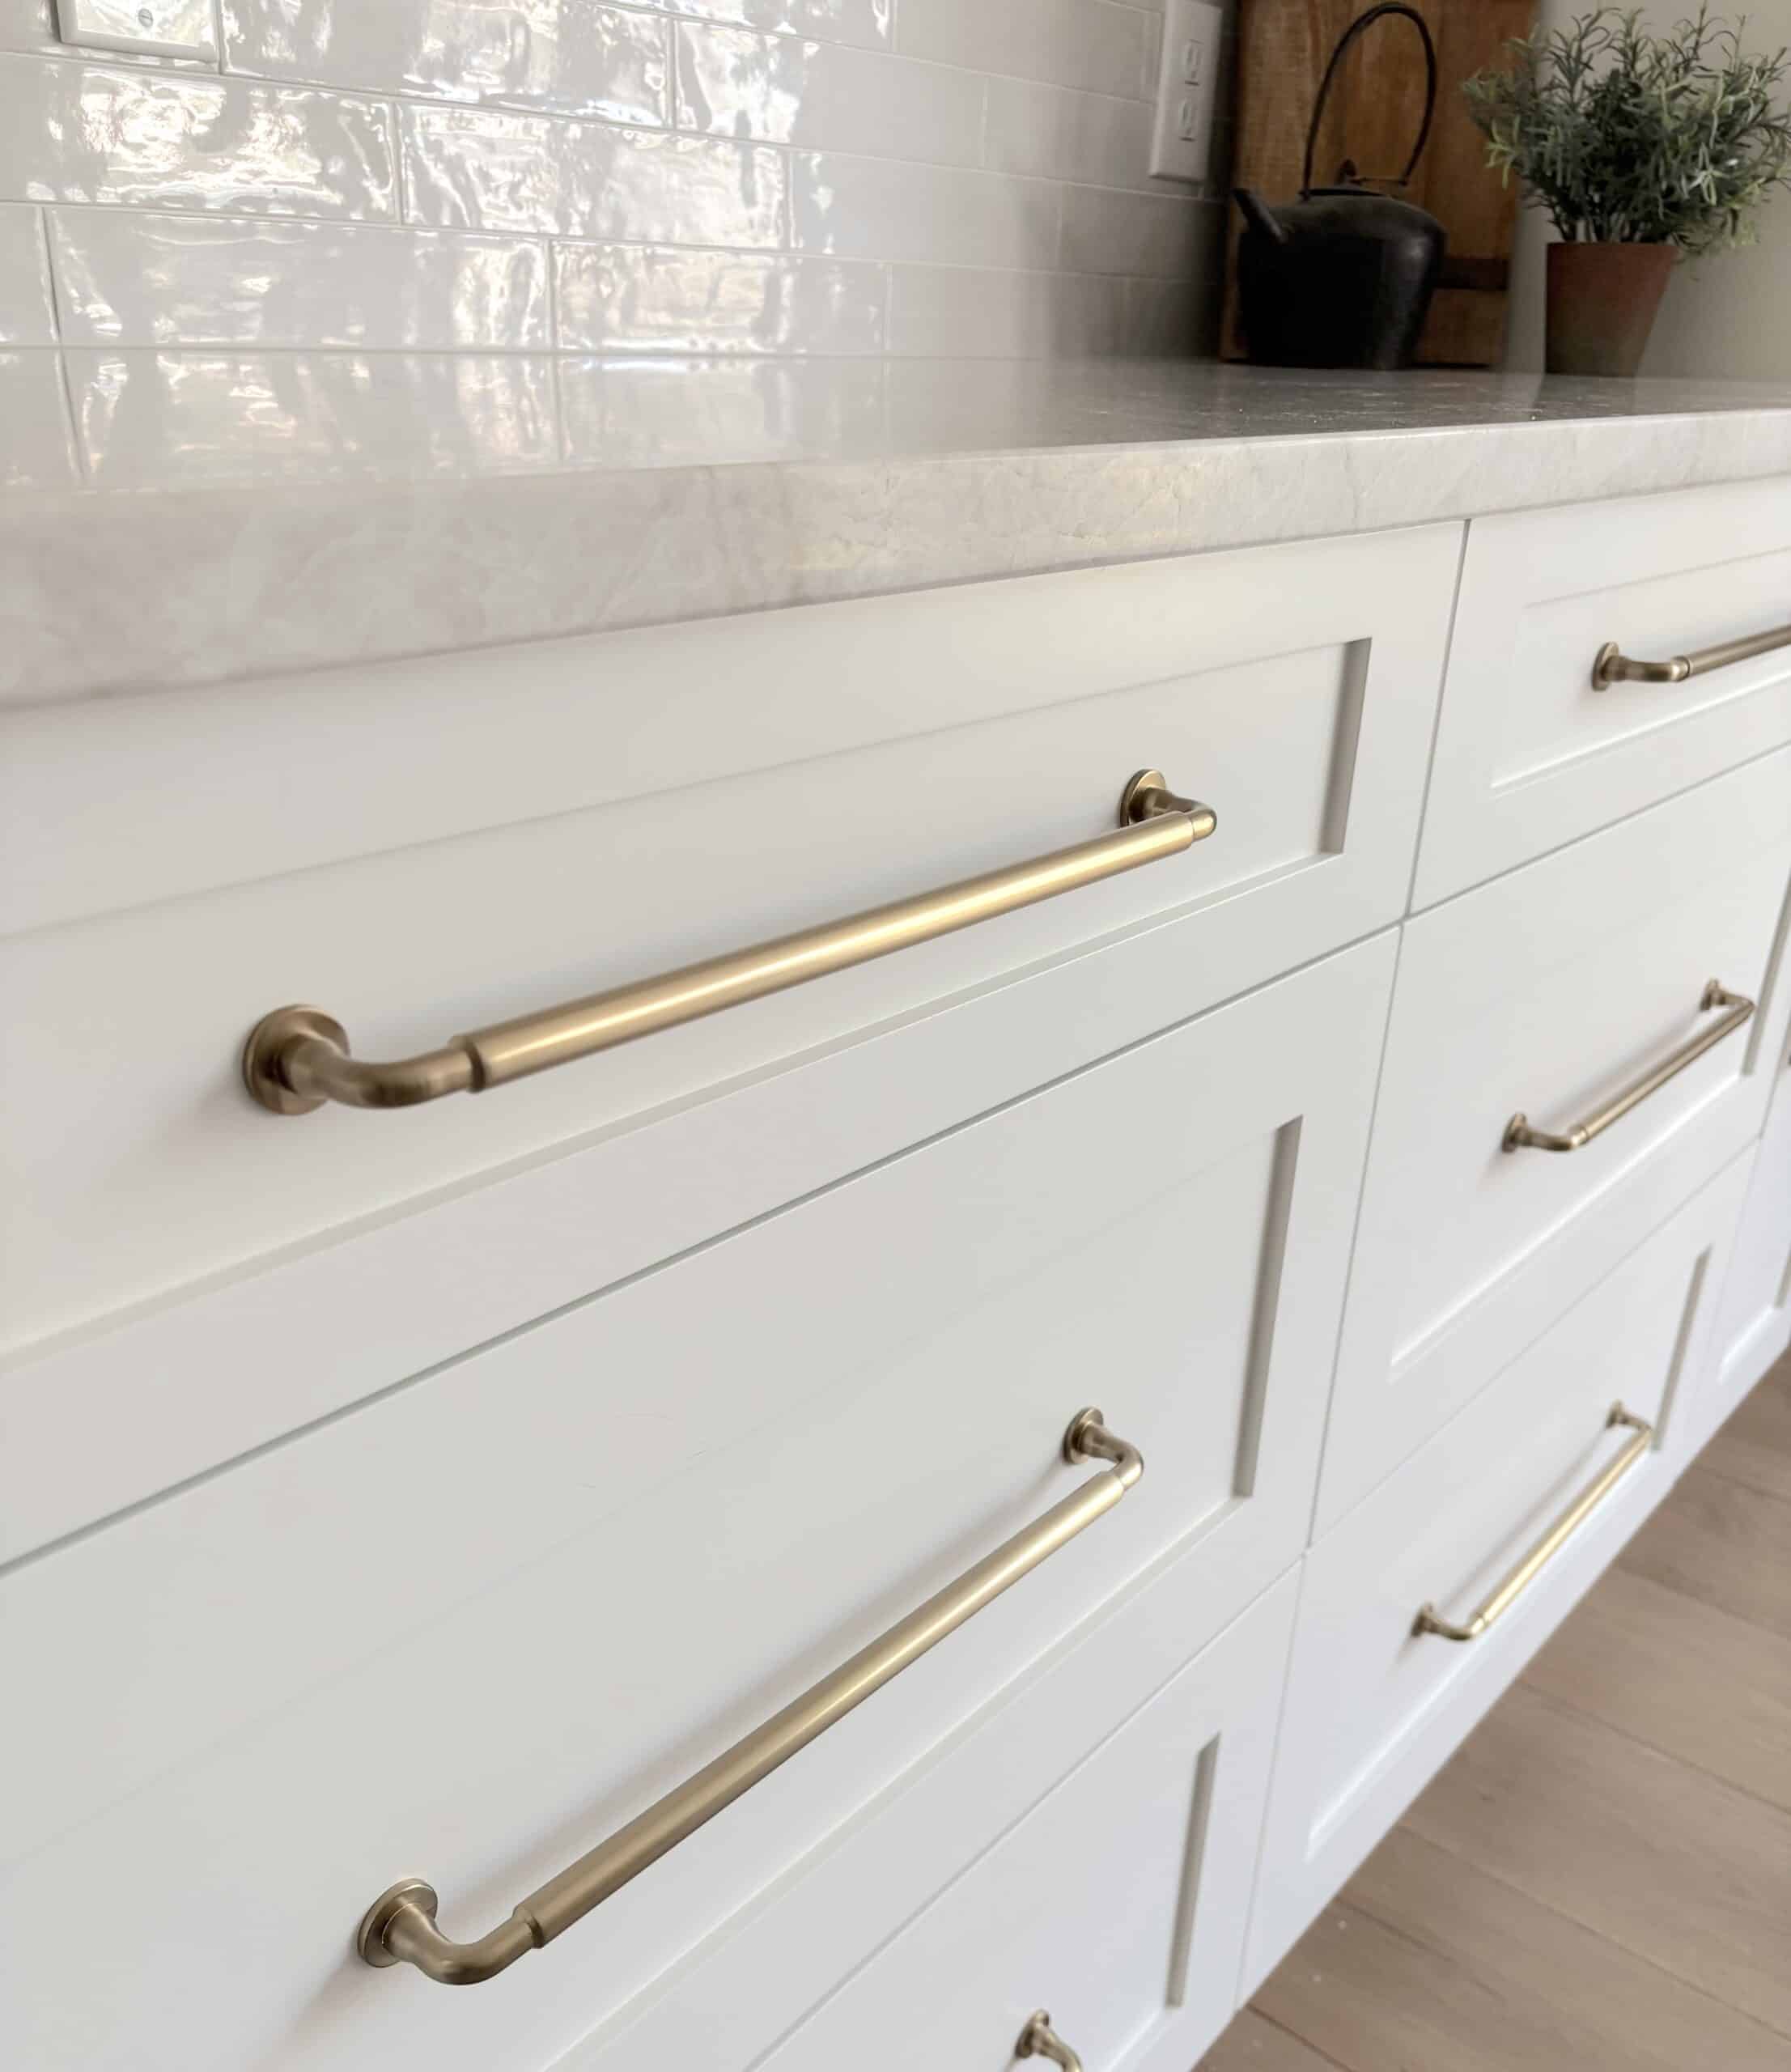
We used long drawer pulls on most of the cabinets (including the uppers), with knobs on the decorative glass cabinets and the cabinets on the backside of the island. The drawer pulls are different sizes, depending on the size of the drawer or cabinet.
I intentionally chose longer pulls for the cabinets to add wow factor, and make more of a design statement in this kitchen. These small choices might seem minor, but together they make the space feel more luxurious and cohesive.
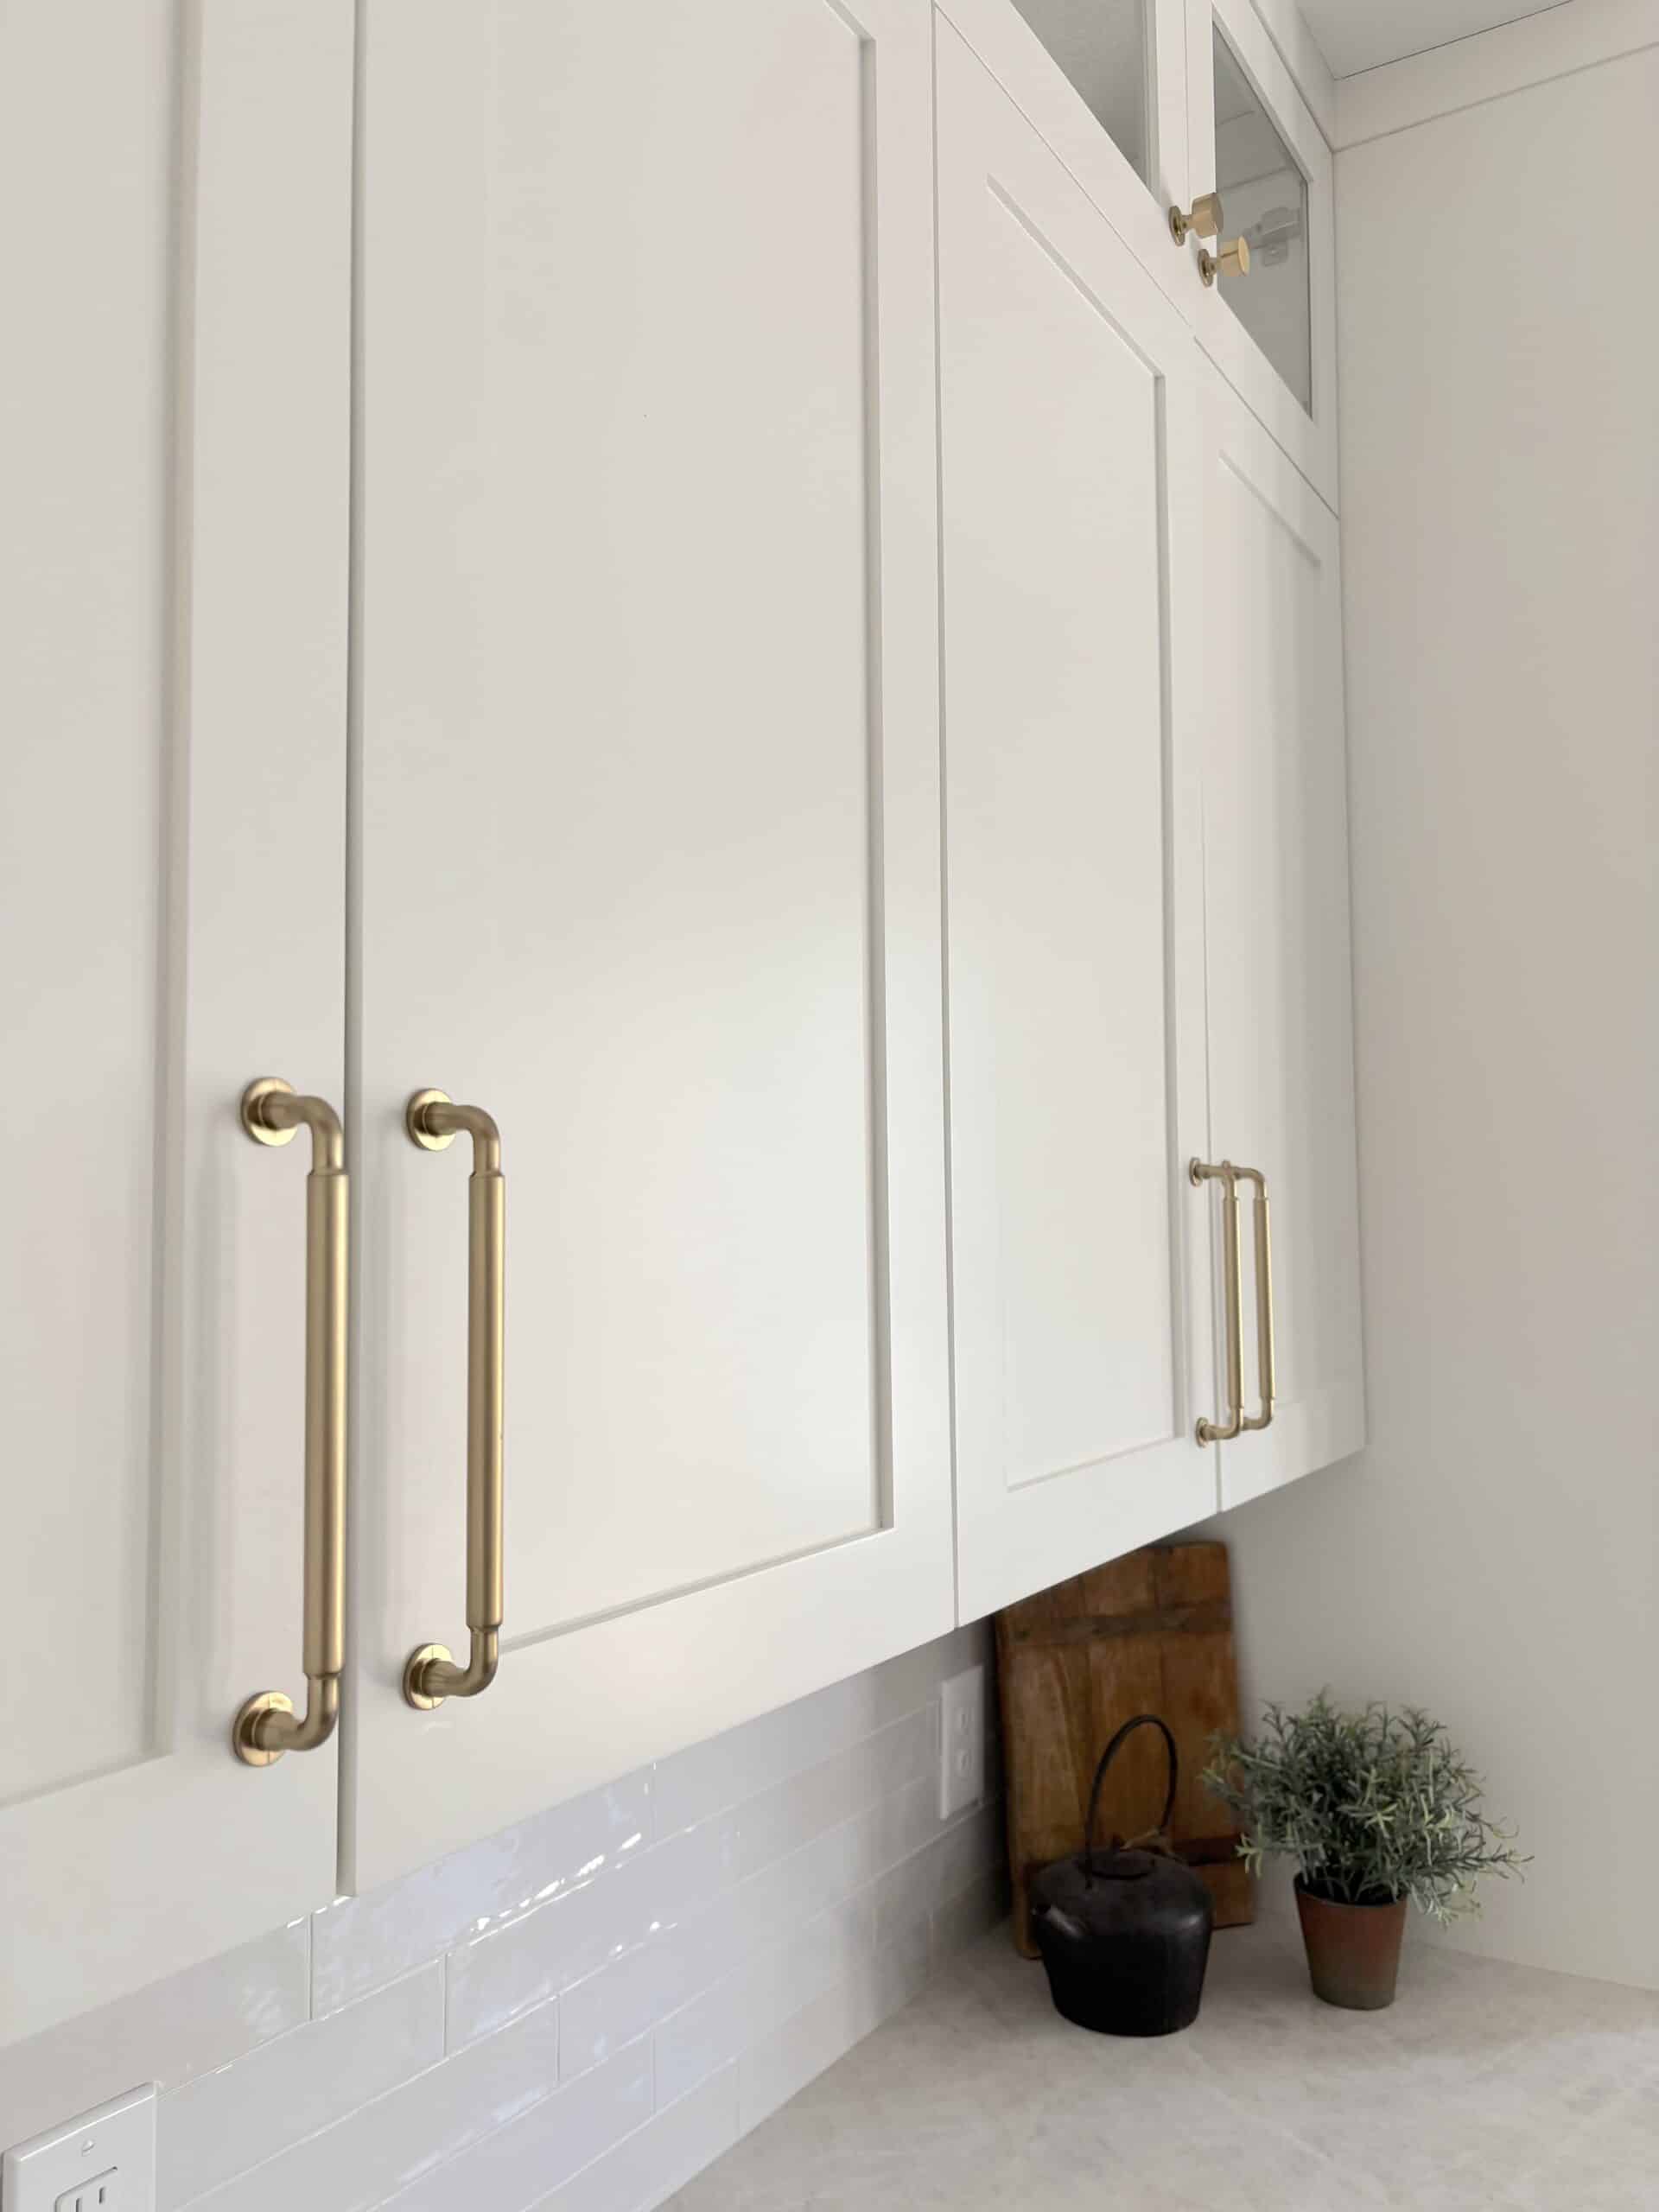
Top Knobs Lily Bar Pulls (in Honey Bronze)| Top Knobs Lily Round Knobs (in Honey Bronze)
The paint colors in the kitchen include:
- Cabinet Color: Benjamin Moore White Dove (satin finish)
- Wall Color: Benjamin Moore Pale Oak
- Trim Color: Benjamin Moore Chantilly Lace (satin finish)
- Ceiling Color: Benjamin Moore Chantilly Lace (flat finish)
Pendant Lights
Lighting is one of the easiest ways to upgrade a kitchen, and our pendant light fixtures made a big impact in this kitchen renovation. We had a wait a long time for our pendants to arrive (backordered for 6 months!), but it was worth it in the end.
We layered our kitchen lighting with statement pendants over the island and functional, recessed task lighting. Good lighting doesn’t just make a kitchen look better, it makes it feel better to cook in.
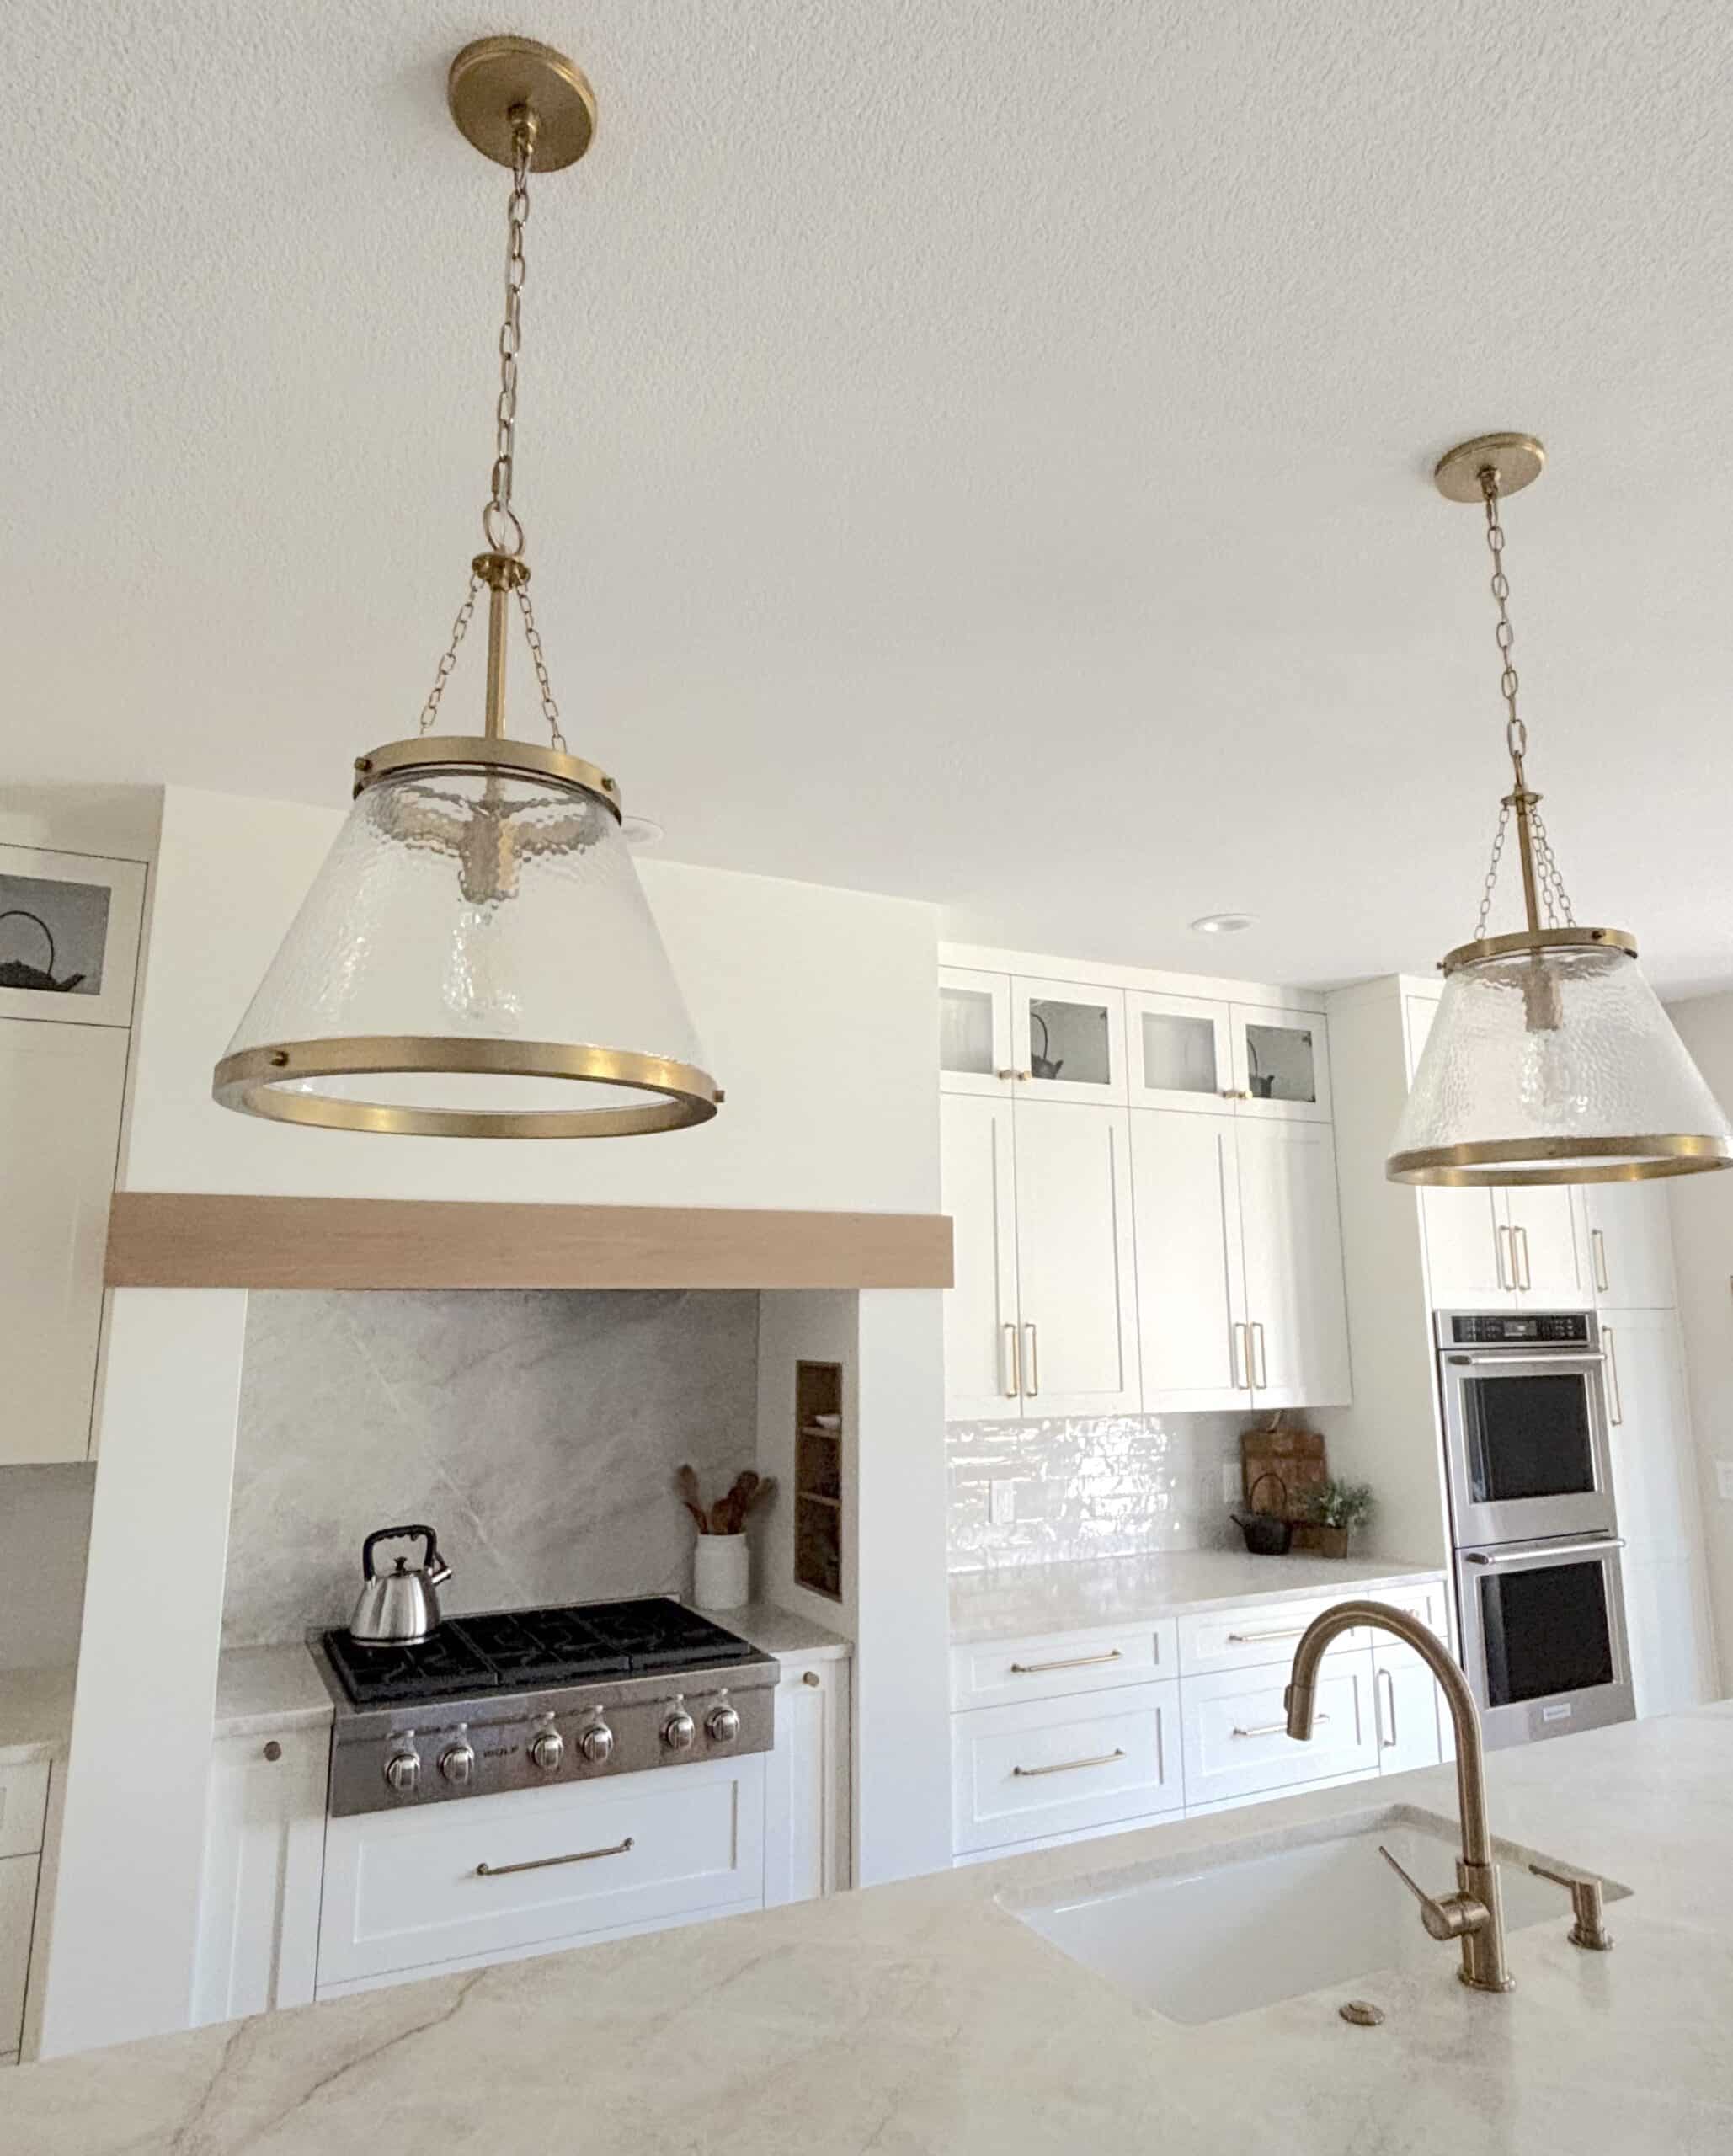
Capital Lighting Landon 15″ Pendant Lights in Aged Brass
The Flooring
The flooring in the kitchen is the same engineered hardwood that we installed throughout the house.
- Brand: California Classics
- Collection: Mediterranean (8″ width)
- Color: Mondariz
Engineered hardwood is a great choice for kitchens because it has a layered construction that makes it more stable and resistant to moisture and temperature changes than solid hardwood. In other words, it handles spills and humidity better than hardwood, while offering the same look and feel.
However, engineered hardwood floors still require some care, like wiping spills quickly and using rugs in high-traffic areas, especially around sinks, to maintain its beauty.
The Finished Kitchen: Before & After
And there you have it! Our fully finished new and improved kitchen.
The combination of white cabinets, white oak, natural stone countertops, brass accents, and thoughtful storage completely transformed the space. It finally feels like our kitchen – functional, timeless, and welcoming. Here’s a few more before and after side-by-side pics, so you can see the incredible transformation.


Why This Kitchen Works So Well
What I love most about this kitchen isn’t just how it looks…it’s how it functions.
- Storage is efficient, maximized, and intuitive
- The island is enormous, and supports real life, not just staged photos
- Every material works together, instead of competing
- It’s a light, bright, very relaxing space to cook in
Final Thoughts
If you’re planning your own kitchen renovation, I hope our kitchen before and after gives you inspiration and confidence to make decisions that align with your style and how you actually live.
Have questions about cabinetry, countertops, or layout? Drop them in the comments — I’m always happy to help.
*This post contains affiliate links. That means I may earn a small commission at no extra cost to you if you make a purchase through my links. Thank you for supporting my blog!


I love it! It is BEAUTIFUL!! Enjoy sitting in your space and admiring your wonderful transformation.
Thank you so much! We’re enjoying the new and improved kitchen – much more enjoyable to cook in!
It’s absolutely beautiful! Thanks for sharing all your remodel information. I may have to steal some of your ideas! 😉
Great reveal! The combination of soft white cabinetry, brass accents, and natural textures gives the kitchen a very elegant yet cozy vibe. Thanks for sharing the design details.
Absolutely stunning! Would you mind sharing which grout color you used with the Celine tile on the backsplash?
Absolutely! It was Bright White.